Managing search and SpotIQ settings
You can manage certain advanced settings for your organization from the Admin Console. This includes enabling, disabling, and configuring the following features: SpotIQ, column indexing, summaries, the new Answer, SpotIQ, and Liveboard experiences, and the footer for downloaded Answers and Liveboards.
| If your organization uses multi-tenancy with Orgs, you must be a cluster administrator to manage these settings, not an Org administrator. You manage these settings for the whole cluster. You cannot set them separately for each Org. |
Navigate to the Admin Console by selecting the Admin tab from the top navigation bar. Select Search & SpotIQ from the side navigation bar that appears.
If your organization uses multi-tenancy with Orgs, ensure that you are in the Primary Org, in the All orgs section of the Admin Console. You manage Search and SpotIQ settings for the whole cluster. You cannot set them separately for each Org.
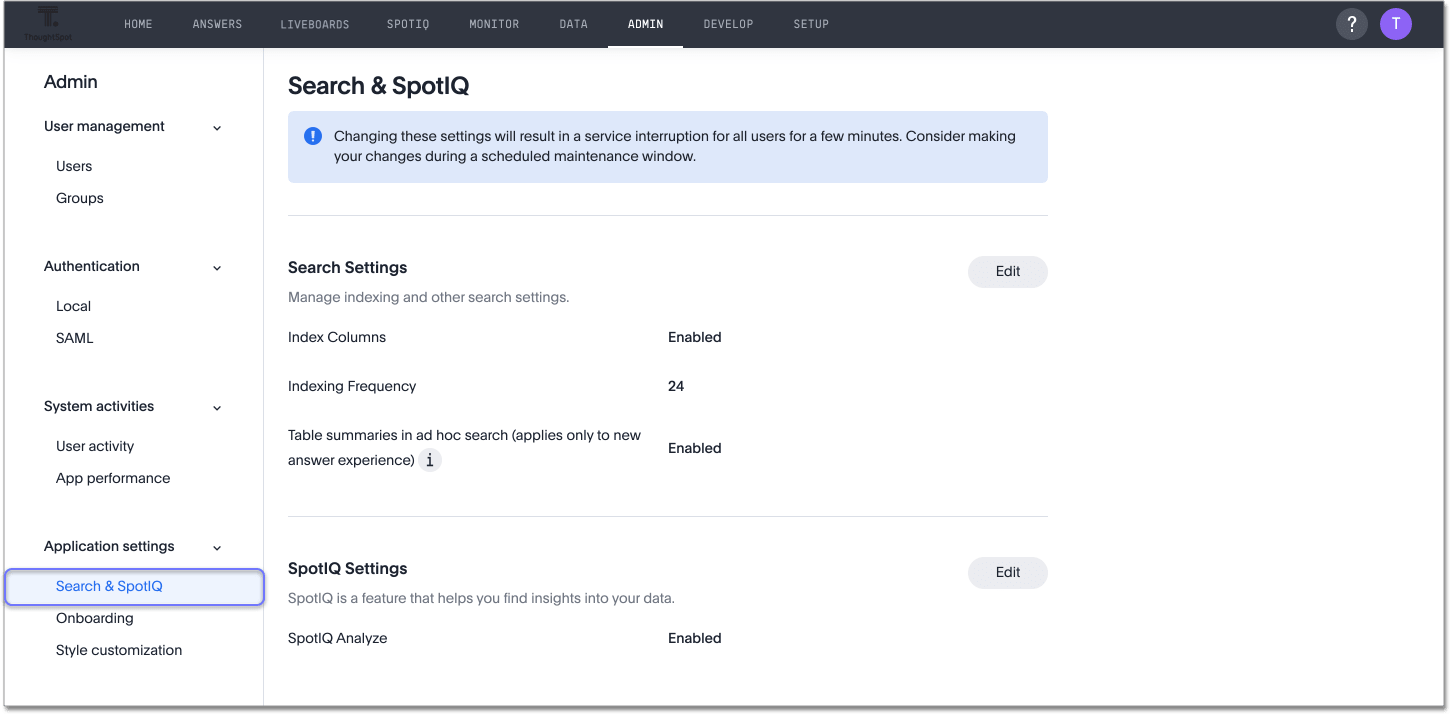
You can update the search, SpotIQ, Answer, SpotIQ, and Liveboard experiences, and footer settings from this page.
| Changing these settings results in a service interruption for all users for approximately 2 minutes. To minimize disruption, consider making your changes during a scheduled maintenance window. |
Index settings
Under Index settings, you can configure ThoughtSpot’s indexing behavior.
To learn more about ThoughtSpot’s default indexing behavior, refer to Manage suggestion indexing.
Supported Indexing Frequencies
ThoughtSpot supports the following frequency schedules for instance-level indexing:
| Frequency Type | Description and Execution Pattern |
|---|---|
Hourly |
Runs indexing jobs periodically at fixed hour intervals (8 and 12 hours). |
Daily |
Runs indexing jobs once per day at a specified local time (for example, every day at 02:00 AM). |
Weekly |
Runs indexing jobs on designated days of the week at a specified time (for example, every Sunday at 04:00 AM). |
Monthly |
Runs indexing jobs on specific days of the month at a designated time (for example, on the 1st and 15th of every month at 03:00 AM). |
Only once |
Schedules a single, non-recurring indexing execution for a specific date and time. |
Configure an Indexing Schedule
Follow these steps to set or update the indexing schedule for your instance:
-
Log in to your ThoughtSpot instance.
-
Select Admin from the top navigation bar.
-
Select All Orgs.
-
In the left navigation panel, select Search & SpotIQ.
-
In the Index Settings section, click Edit.
-
Index columns (effective for new tables/columns only): Select the toggle to enable or disable ThoughtSpot’s indexing of columns in new connections. If you disable this feature, all columns from new connections are set to
DONT_INDEX. Note that this change only applies to columns from new connections. You must manually set columns that already exist toINDEXorDONT_INDEX. -
Indexing scope: Select which columns you want to index. The options are Index only columns used in Models (default), or Index all columns.
Indexing only columns used in your Models significantly reduces the number of queries sent to your cloud data warehouse and reduces memory usage. This option does not apply to SQL views, CSV tables, or datasets, which are always indexed. -
Large table indexing control: You can choose to Index all tables, Disable indexing for tables with ≥ 100M rows, Disable indexing for tables with ≥ 250M rows, or Disable indexing for tables it ≥ 1B rows.
-
Use the Indexing Frequency dropdown menu to select the desired schedule type (Hourly, Daily, Weekly, Monthly, or Only once).
-
In the Frequency settings section, configure the schedule parameters according to your requirements:
-
For Hourly, select the hour interval (for example,
8 hours). -
For Daily, select the run time and time zone (for example,
02:00 AMAmerica/Los_Angeles). You can exclude weekends if you want. -
For Weekly, select the run time, day(s) of the week, and time zone (for example,
Sundayat04:00 AM,America/Los_Angeles). -
For Monthly, select the calendar day(s) and the run time (for example,
1stof the month at03:00 AM). -
For Only once, the tables will be indexed only once, when they are brought into ThoughtSpot.
-
-
Click Save.
Reset an Indexing Schedule to Default
To revert instance indexing to the default system schedule (Weekly on Sunday at 04:00 AM local time), do the following:
-
Select Admin from the top navigation bar.
-
Select All Orgs.
-
In the left navigation panel, select Search & SpotIQ.
-
In the Index Settings section, click Edit.
-
Click Reset configuration.
-
Verify that the displayed schedule updates to the system default configuration of weekly at 4:00 on Sunday.
Important considerations and best practices
|
Search settings
Under Search settings, you can configure ThoughtSpot’s indexing behavior, and enable or disable summaries.
To learn more about ThoughtSpot’s default indexing behavior, refer to Manage suggestion indexing.
To manage search settings, follow these steps:
-
Select the Edit button in the Search Settings section.
-
Index columns: Select the toggle to enable or disable ThoughtSpot’s indexing of columns in new connections. If you disable this feature, all columns from new connections are set to
DONT_INDEX. Note that this change only applies to columns from new connections. You must manually set columns that already exist toINDEXorDONT_INDEX. -
Index frequency: Select a frequency for column indexing from the dropdown list. The options are 8, 16, or 24 hours. To further customize your indexing frequency and the index start time, contact ThoughtSpot Support.
-
Table summaries in ad hoc search: Select the toggle to enable or disable the display of summaries in ad hoc search. This setting only affects the display of summaries for users on the new Answer experience, not the classic experience.
This setting does not affect the display of summaries in saved objects, such as saved Answers, pinned tables, or metric tiles in Liveboards. -
Select Save. Alternatively, you can select Reset configuration to reset to the default. By default, ThoughtSpot indexes new columns at a frequency of 24 hours, and enables summaries.
SpotIQ settings
Under SpotIQ settings, you can enable or disable SpotIQ analyze.
To enable or disable SpotIQ Analyze, follow these steps:
-
Select the Edit button in the SpotIQ Settings section.
-
Select the toggle to enable or disable the feature.
-
Select Save. Alternatively, you can select Reset configuration to reset to the default. By default, SpotIQ is enabled.
ThoughtSpot experience settings
Under ThoughtSpot experience, you can manage availability of the new Answer, Liveboard, and SpotIQ experiences for all users.
| The new Liveboard and SpotIQ experiences are dependent on the new Answer experience. To enable the new Liveboard or SpotIQ experience, ensure that you first enable the new Answer experience. |
There are two different toggles for each new experience in this section. The first toggle, New [ Answer | SpotIQ | Liveboard ] experience, turns on the ability to opt into the new experience for any user. The second toggle, Make new [ Answer | SpotIQ | Liveboard ] experience default, turns the new experience on by default.
You can turn the new Answer, SpotIQ, or Liveboard experience on or off globally, and specify the default experience for all users. For example, you can turn the new Liveboard experience on globally, but keep the classic experience the default, allowing users to opt into the new experience.
To manage the new experiences, follow these steps:
-
Select the Edit button in the ThoughtSpot experience section.
-
Select the relevant toggle to enable or disable the new experience[s].
-
After you enable a new experience, you can specify whether it should be on by default for all users, or if they should have to opt in.
To display the new experience to all users, enable the new [ Answer | SpotIQ | Liveboard ] experience toggle, then enable the Make new [ Answer | SpotIQ | Liveboard ] experience default toggle.
To display the classic Answer, SpotIQ, or Liveboard, experience to all users, but allow them to turn the new experience on for themselves in their profile, enable the new [ Answer | SpotIQ | Liveboard ] experience toggle, then disable the corresponding Make new [ Answer | SpotIQ | Liveboard ] experience default toggle.
Visualization footer settings
| The visualization footer feature is part of the new Answer experience and the new Liveboard experience. The new Answer and Liveboard experiences are both on by default. If you are using the classic experiences, you cannot set a standard download footer. If you are using only the new Answer experience and not the new Liveboard experience, you can only set a standard download footer for Answers, not Liveboards. |
Specify the footer that appears in all downloaded Answers and Liveboards. Use this functionality to add a confidentiality disclaimer, for example. You can also allow your users to add their own footers to downloaded Liveboards.
Note that this standard footer does not apply to Liveboards downloaded with the Liveboard export API. Liveboards downloaded with the API use the footer specified by the footer_text API parameter.
To edit the standard footer, follow these steps:
-
Select the Edit button in the Visualization section.
-
Edit the text box next to Downloaded file instructions with the text you would like to appear in the footer, up to 700 characters.
The default footer is Disclaimer: The information downloaded is confidential.
To allow your users to add their own footers to downloaded Liveboards, remove all content from the text box.
-
Select Save.
Footer behavior
This footer replaces the Footer text option that appears when you download a Liveboard as a PDF. Instead, if you are on the new Liveboard experience, you see a note under the footer text box: Footer text was set by your admin. You cannot edit the footer text for a specific Liveboard; you can only edit it for all Liveboards from the Admin Console.
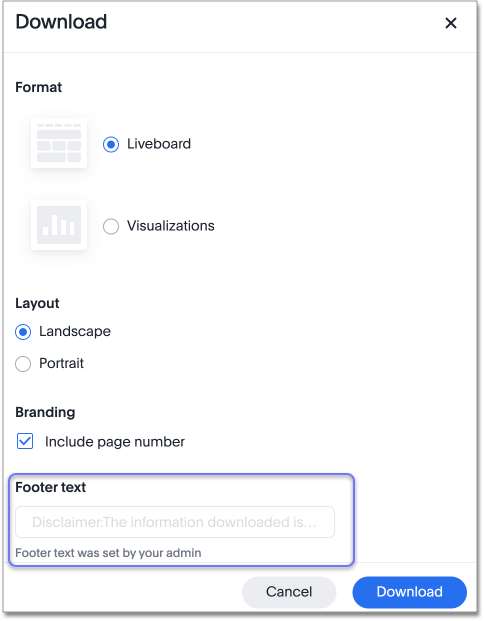
The placement and behavior of the footer differs, depending on the format in which you download an object.
- Answer PNG or PDF
-
Text appears at the bottom of the page.
- Answer CSV or XLSX
-
Text appears between the Data extracted information row and the Filter rows.
- Liveboard PDF
-
Text appears at the bottom of every page in the PDF.
Related information