Supported databases
Connectivity policy
Analyst Studio currently supports connectivity to customer data using Java Database Connectivity (JDBC) drivers. Analyst Studio does not write JDBC drivers. We contract the use of proprietary JDBC drivers or use established and well-supported open-source JDBC drivers.
For Preferred and Supported databases, Analyst Studio ensures functionality for all versions of the database server currently actively maintained by the database vendor. Analyst Studio does not ensure continued functionality for database server versions that have reached end of life, or for database types that are not explicitly supported.
Analyst Studio will usually support or recommend only one driver per database type. However, to give customers flexibility during their update process, we will enable customers to use either the recommended or the most recent version until the next update (either 6 or 12 months). Analyst Studio will usually provide 6 months' notice to customers before driver removal, although we reserve the right to remove drivers with known security issues on less notice.
Driver deprecation
Analyst Studio will mark for deprecation and set removal dates for older versions of drivers. We generally set removal dates for the oldest drivers 6 months out, when adding new versions of drivers.
Drivers that are past their removal date cannot be used to connect to Analyst Studio. The removed driver will no longer be available in the Preferred JDBC driver dropdown of the connection’s details.
On the removal date, any connections still using that driver will be updated by Analyst Studio to use the latest recommended driver. This may cause connectivity issues. Analyst Studio encourages customers to update their preferred drivers shortly following announced updates.
Support levels
For the listed database types below, Analyst Studio aims to support all versions of the database actively supported by the database vendor or appropriate open-source community.
Tier 1: Preferred
These database and integration types are fully supported by Analyst Studio and drivers are upgraded at least semi-annually. We are committed to improving the experience of users connecting Analyst Studio to data sources of these types, and will fix issues based on severity and demand. As part of our release process, Analyst Studio runs exhaustive integration tests against all types in this tier to ensure quality.
| Database / Integration Type | Database Version Support | Bridge |
|---|---|---|
Optional |
||
9.5, 9.6, 10, 11, 12, 13, 14, 15 |
Optional |
|
5.6, 5.7, 8.0 |
Optional |
|
Not supported |
||
Optional |
||
Not supported |
||
2012, 2014, 2016, 2017, 2019 |
Optional |
|
versions up to 413 |
Optional |
|
versions up to 413 |
Optional |
|
1.0.0 - 3.1 |
Optional |
|
Optional |
||
Optional |
||
Optional |
||
Not supported |
||
Not supported |
Tier 2: Supported
These database types are fully supported by Analyst Studio and drivers are upgraded annually. We are committed to improving the experience of users connecting Analyst Studio to data sources of these types, and will fix issues based on severity and demand. As part of our release process, Analyst Studio runs integration tests against all types in this tier to ensure quality.
| Database Type | Database Version Support | Bridge |
|---|---|---|
11.2, 12.1, 12.2, 18c, 19c, 21c |
Required |
|
Optional |
||
Optional |
||
Not Supported |
||
Not Supported |
||
2.8 - 3.2 |
Required |
|
Optional |
||
Optional |
||
Optional |
||
Optional |
||
7.2 - 10.1.1 |
Required |
|
Optional |
||
Optional |
||
Optional |
||
Optional |
||
Optional |
||
0.20.1 |
Required |
|
8.0 |
Optional |
|
Not supported |
Tier 3: Works, not Supported
These database types are partially supported by Analyst Studio, but the database vendor’s recommended driver is not used. Analyst Studio is able to connect to these database types because of similarities of SQL dialects or shared database servers. Analyst Studio makes no commitment to improve implementation, fix issues, or regularly run tests against these database types.
| Database Type | Database Version Support | Bridge |
|---|---|---|
Optional |
||
Optional |
||
MemSQL |
Not supported |
|
Not supported |
||
Not supported |
||
Optional |
||
1.6, 2.1 - 3.0 |
Optional |
|
up to version 0.240 |
Optional |
Databases
| If the database supports multiple Drivers, use the Manage Connections page to update to your preferred driver. |
Amazon Athena
Supported JDBC drivers and known issues
| Driver | Driver Release Date | Analyst Studio Removal Date |
|---|---|---|
Amazon v 3.2.2 |
7/22/2024 |
|
(Recommended) Simba v 2.1.1.1001 |
7/31/2023 |
|
Simba v 2.0.35.1001 |
12/22/2022 |
|
Simba v 2.0.33.1001 |
10/4/2022 |
|
Simba v 2.0.31.1001 |
5/30/2022 |
|
Simba v 2.0.27.1001 |
1/13/2022 |
|
Simba v 2.0.23.1000 |
6/10/2021 |
|
Simba v 2.0.18.1000 |
1/29/2021 |
|
Simba v 2.0.13.1000 |
6/9/2020 |
Analyst Studio recommends connecting via the Simba Athena driver because it is the official driver endorsed by Amazon.
The following are known issues with the current supported drivers. Analyst Studio continues to advocate on our customers' behalf for vendors and open-source communities to resolve these issues.
| Driver | Known Issue | Further Details |
|---|---|---|
Simba v 2.0.27.1001 |
Queries with special characters failing |
Queries with special characters (for example, ‘√ß’ and ‘√Ö’) are failing with String index out of range error. As a workaround, use the previous version of the driver (2.0.23.1000). |
Simba v 2.0.13.1000 |
Requires additional IAM permissions for queries |
This version of the driver requires that the Analyst Studio user’s IAM permissions include the |
Simba v 2.0.13.1000 |
Schema refreshes fail with Null Pointer Exception for external data sources |
Attempts to get or update schemas when Athena is connected to non-Hive (PostgreSQL confirmed) external data sources results in a Null Pointer Exception. For customers whose Athena instance includes external data sources, automatic refresh of the database’s schema data should be disabled and the Analyst Studio Schema Browser will be unable to display data. |
Database configuration instructions
The Analyst Studio user’s IAM permissions must include athena:ListDatabases and athena:ListDataCatalogs.
In addition, ensure that port 444 is open to outbound traffic.
Connecting to Analyst Studio via access keys
-
Follow the steps to connect a database with Direct Connect.
-
Select Amazon Athena from the list of databases.
-
Fill out your AWS region to be formatted like
us-west-2. -
Select Authentication method: Access keys in the Analyst Studio connection form.
-
The AWS Access Key and Access Secret should be for the AWS user you want to connect through. When creating an Athena connection, we recommend creating a user in AWS that only has access to the data you want to query through Athena. For data you want to query, the AWS user only needs read access.
-
The S3 Results Directory should be a bucket where Athena can write query results. For this bucket, the AWS user specified above needs read and write access. The bucket should be a full S3 url (for example,
s3://acme/my/athena/bucket). -
Click Connect. You will land on a page that displays your database schema.
Connecting to Analyst Studio via IAM role
-
Follow the steps to connect a database with Direct Connect.
-
Select Amazon Athena from the list of databases.
-
Fill out your AWS region to be formatted like
us-west-2. -
Select Authentication method: IAM role in the Analyst Studio connection form.
-
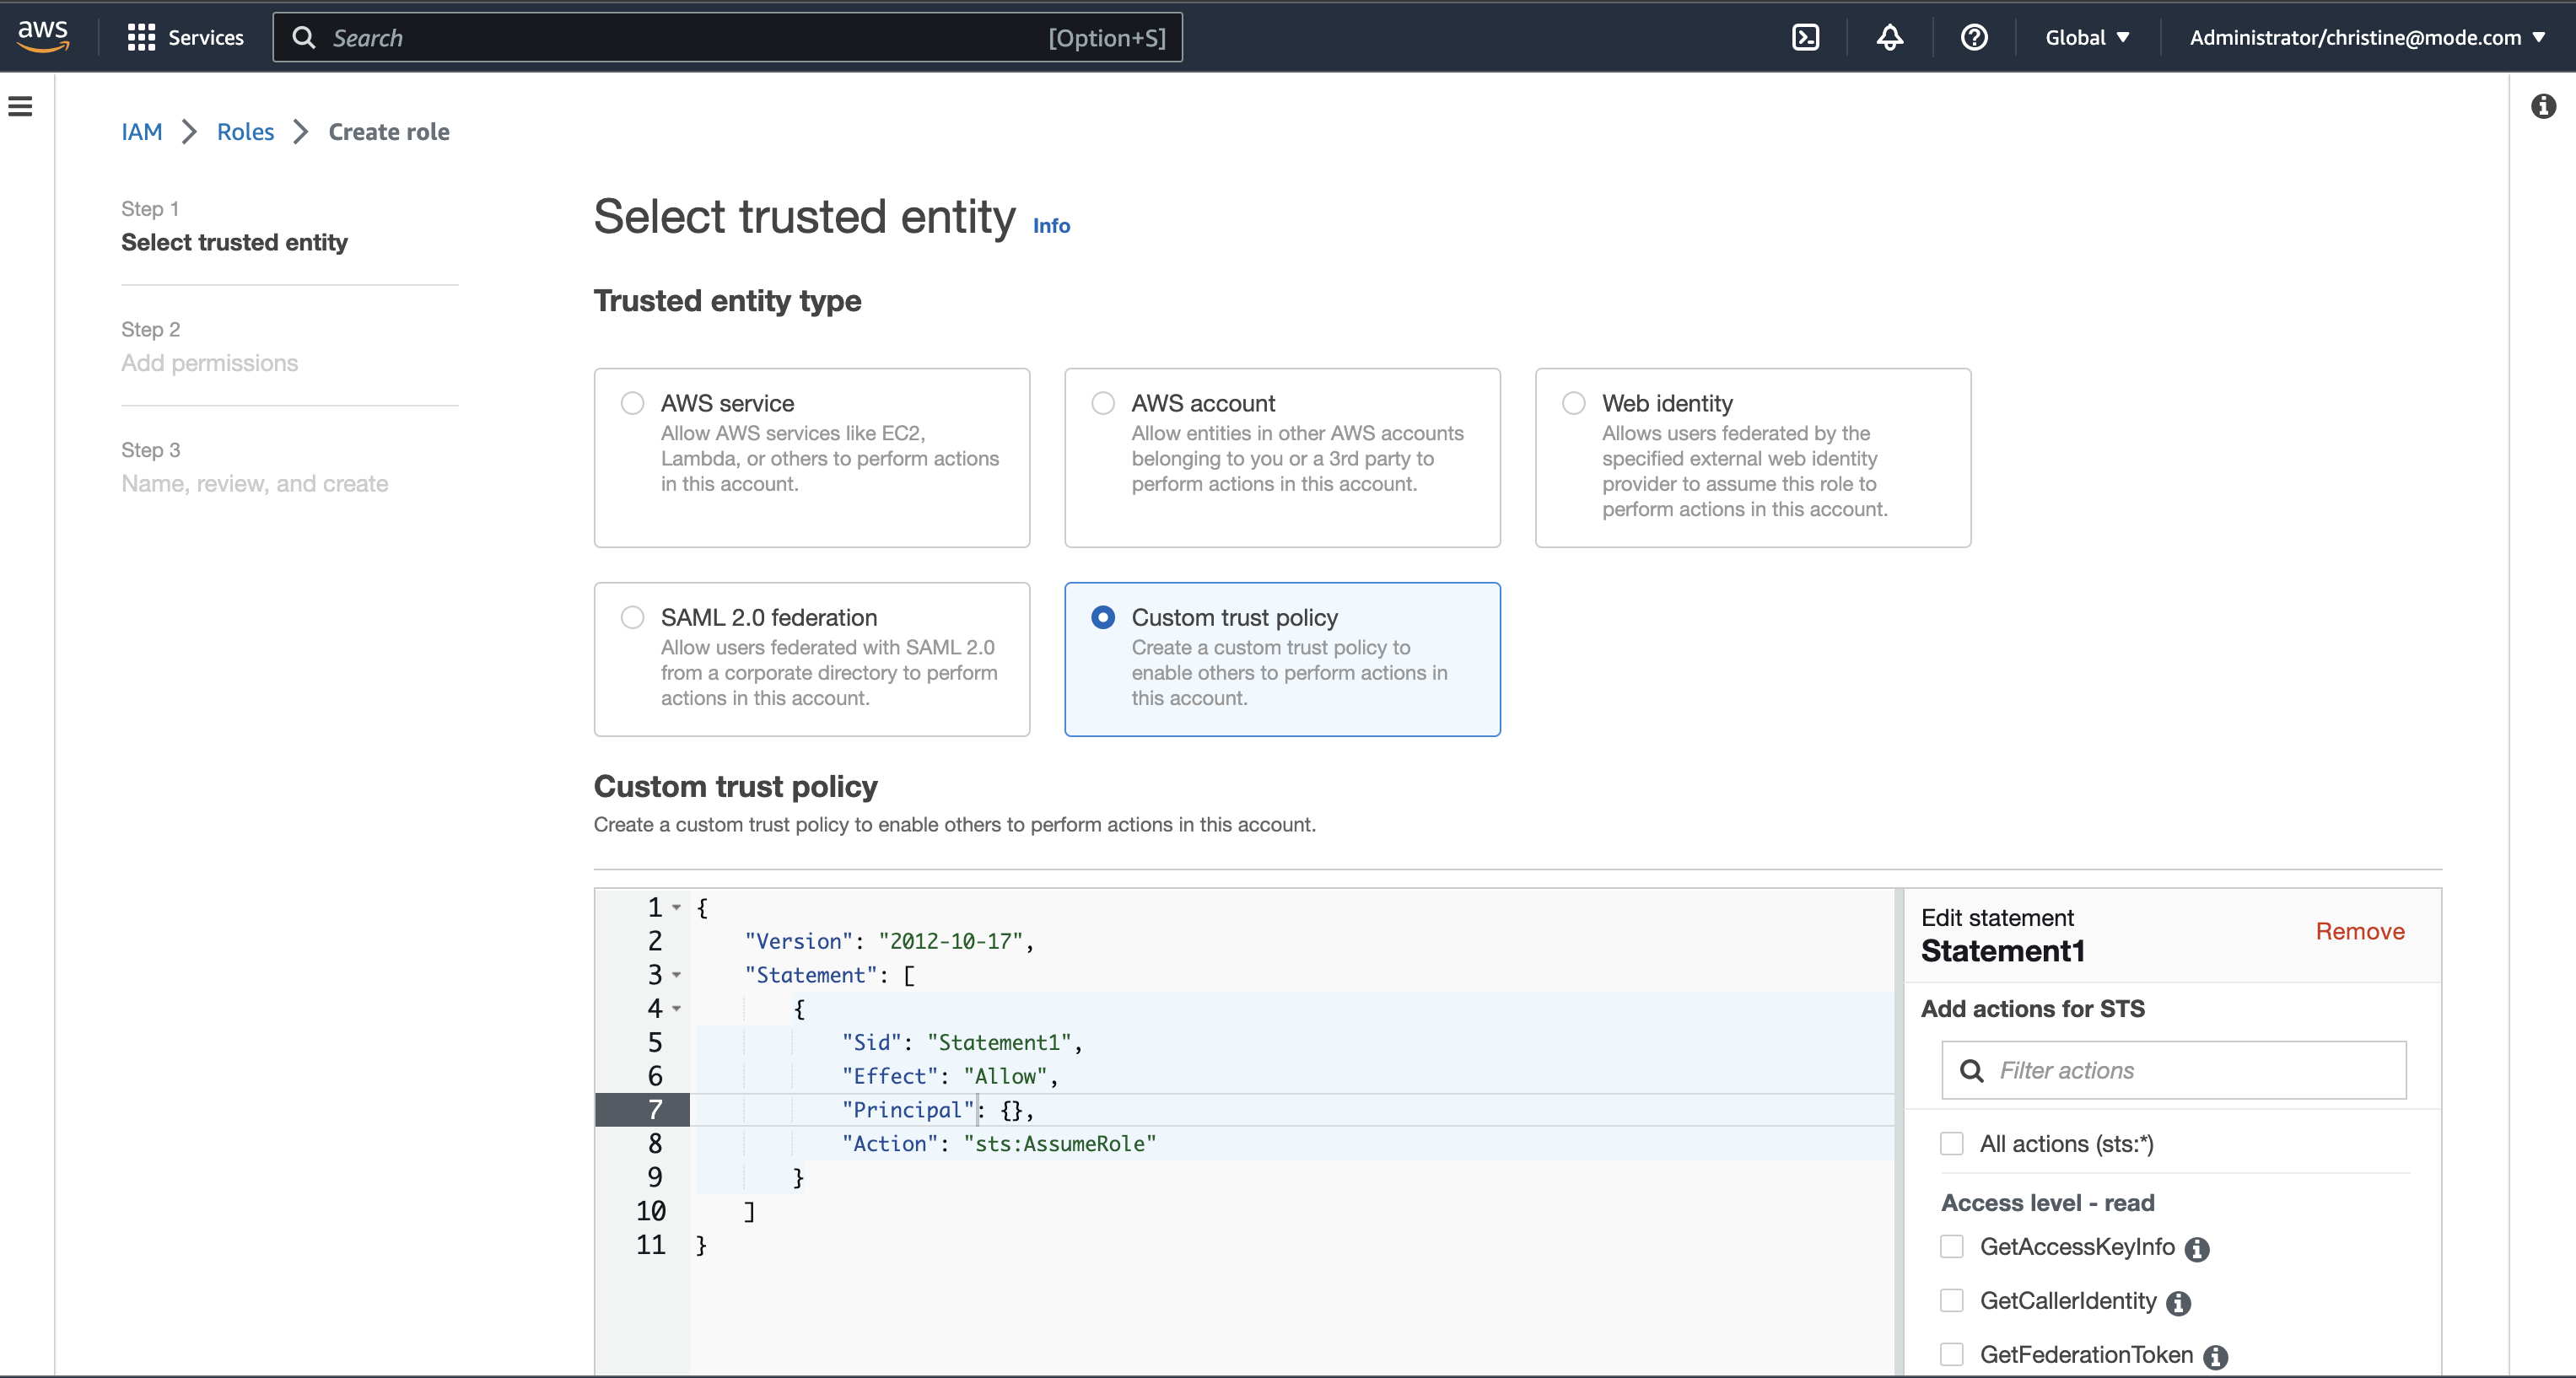
Navigate to IAM > Roles in your AWS Console.
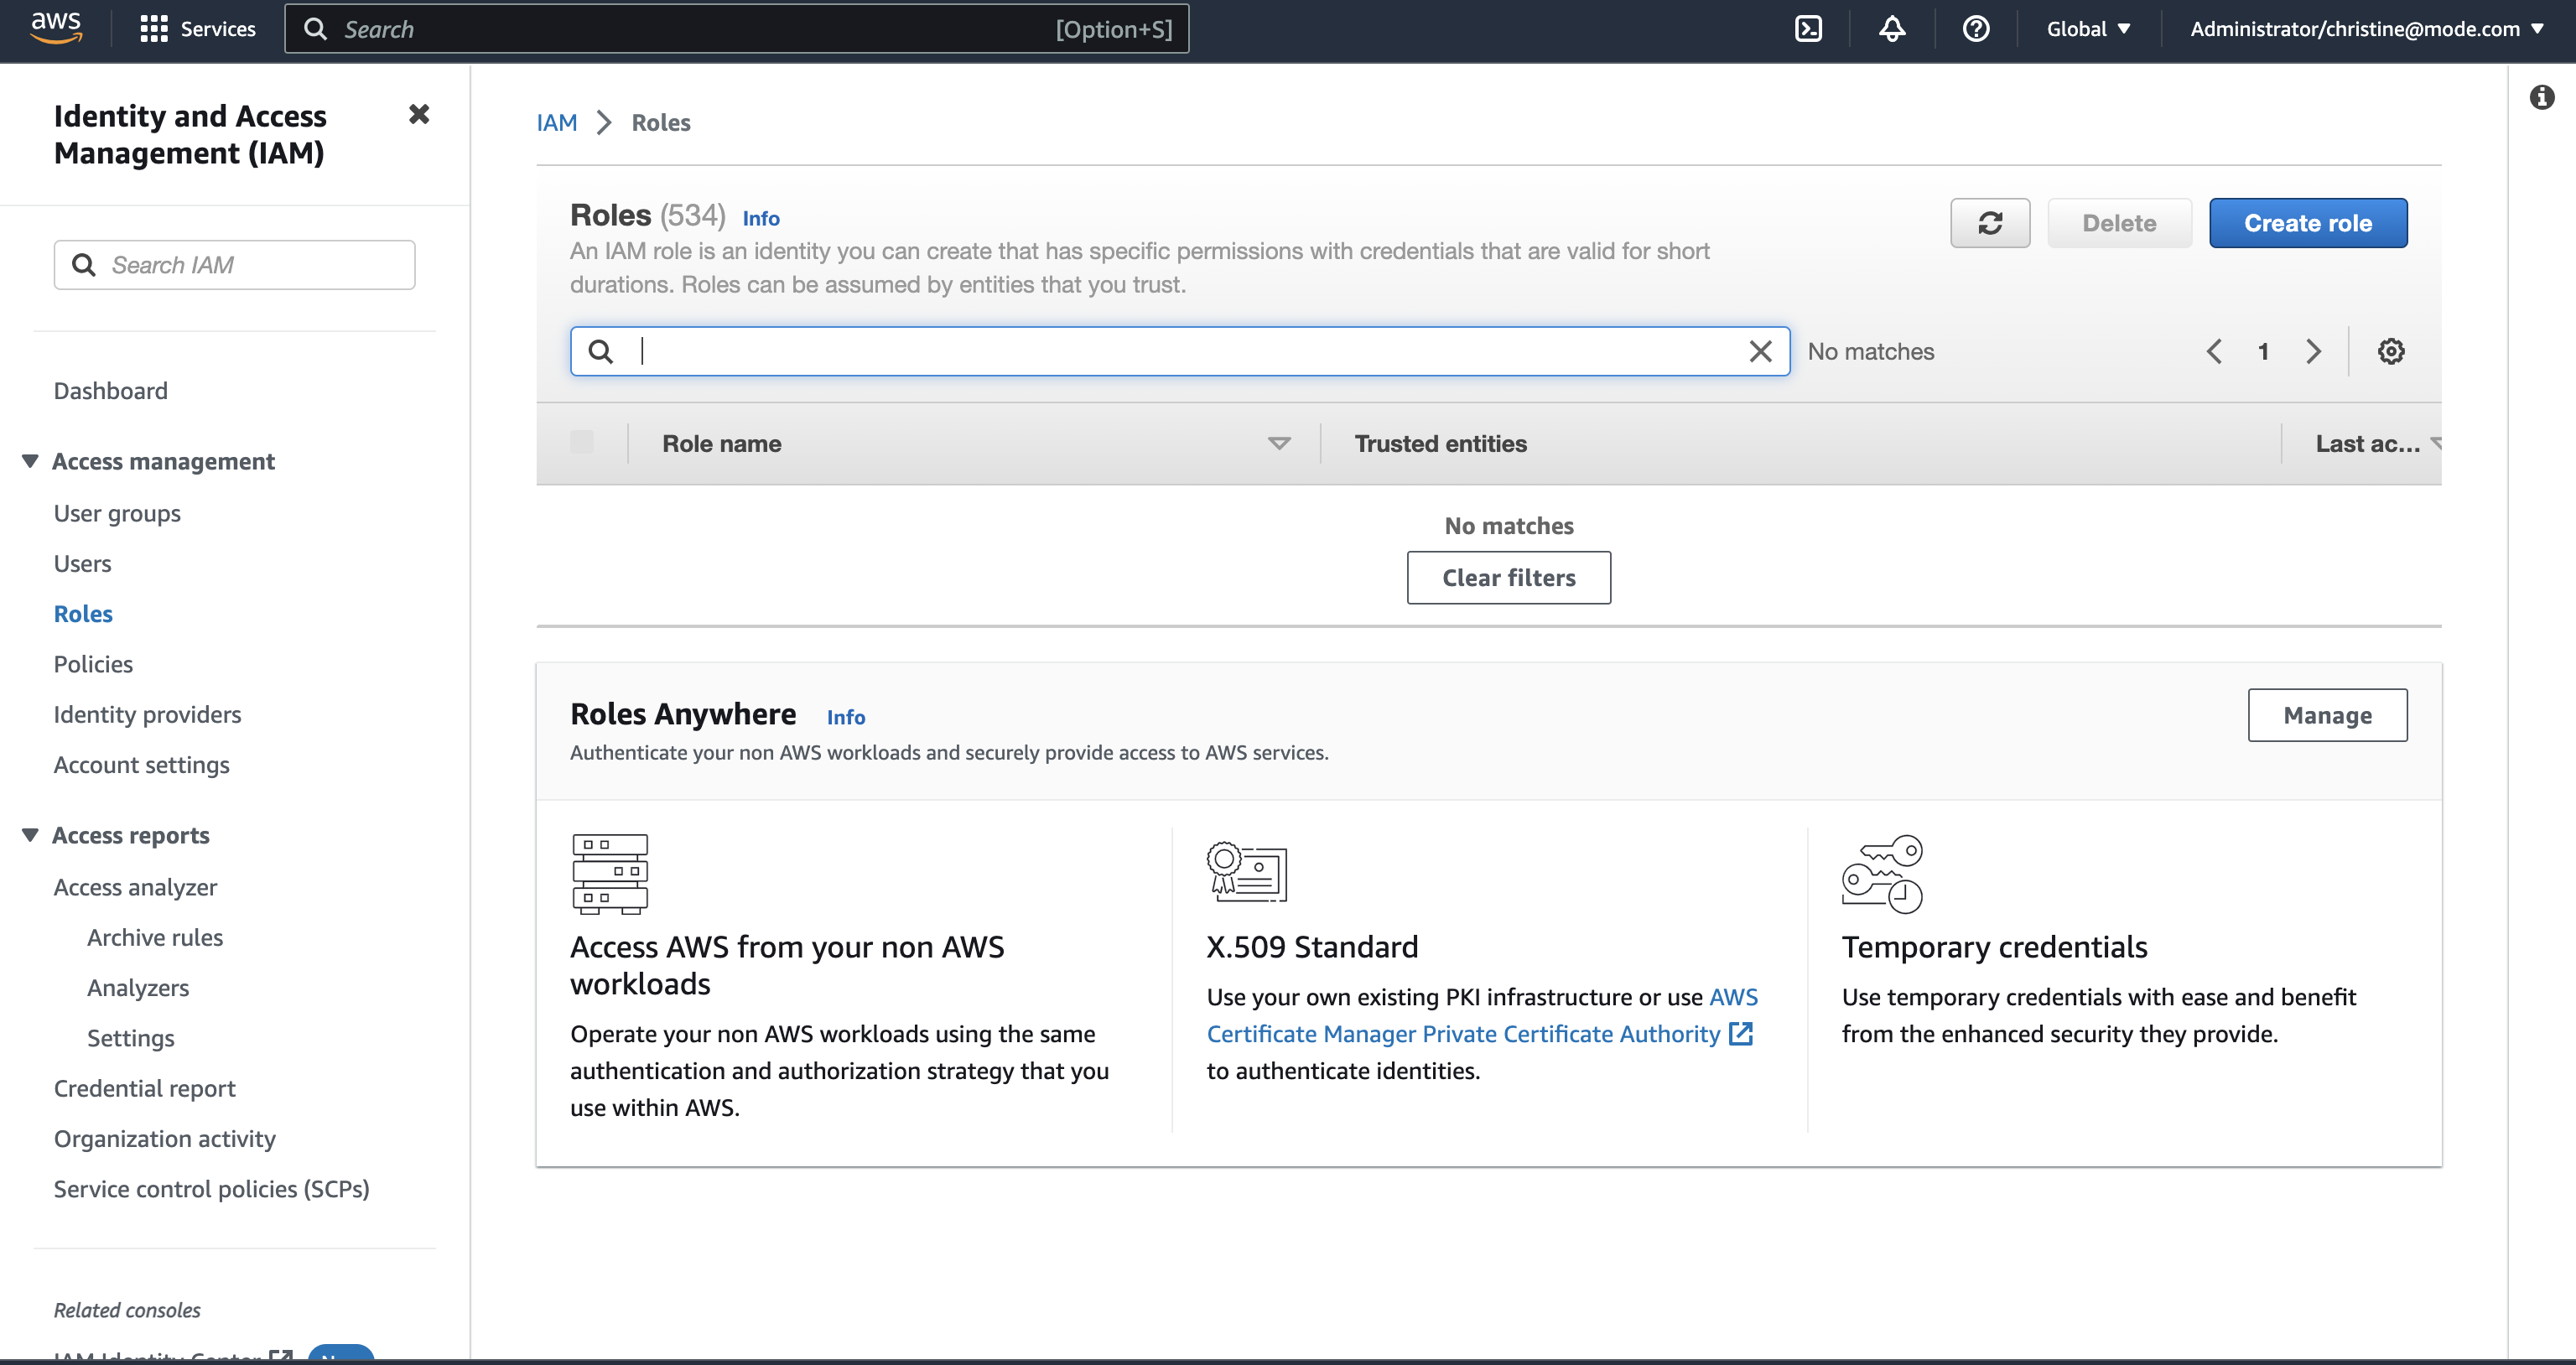
-
Create a new role or choose an existing role and select Custom trust policy under Trusted entity type.
-
Alternatively, you can choose an existing role and select the Trust relationships tab.
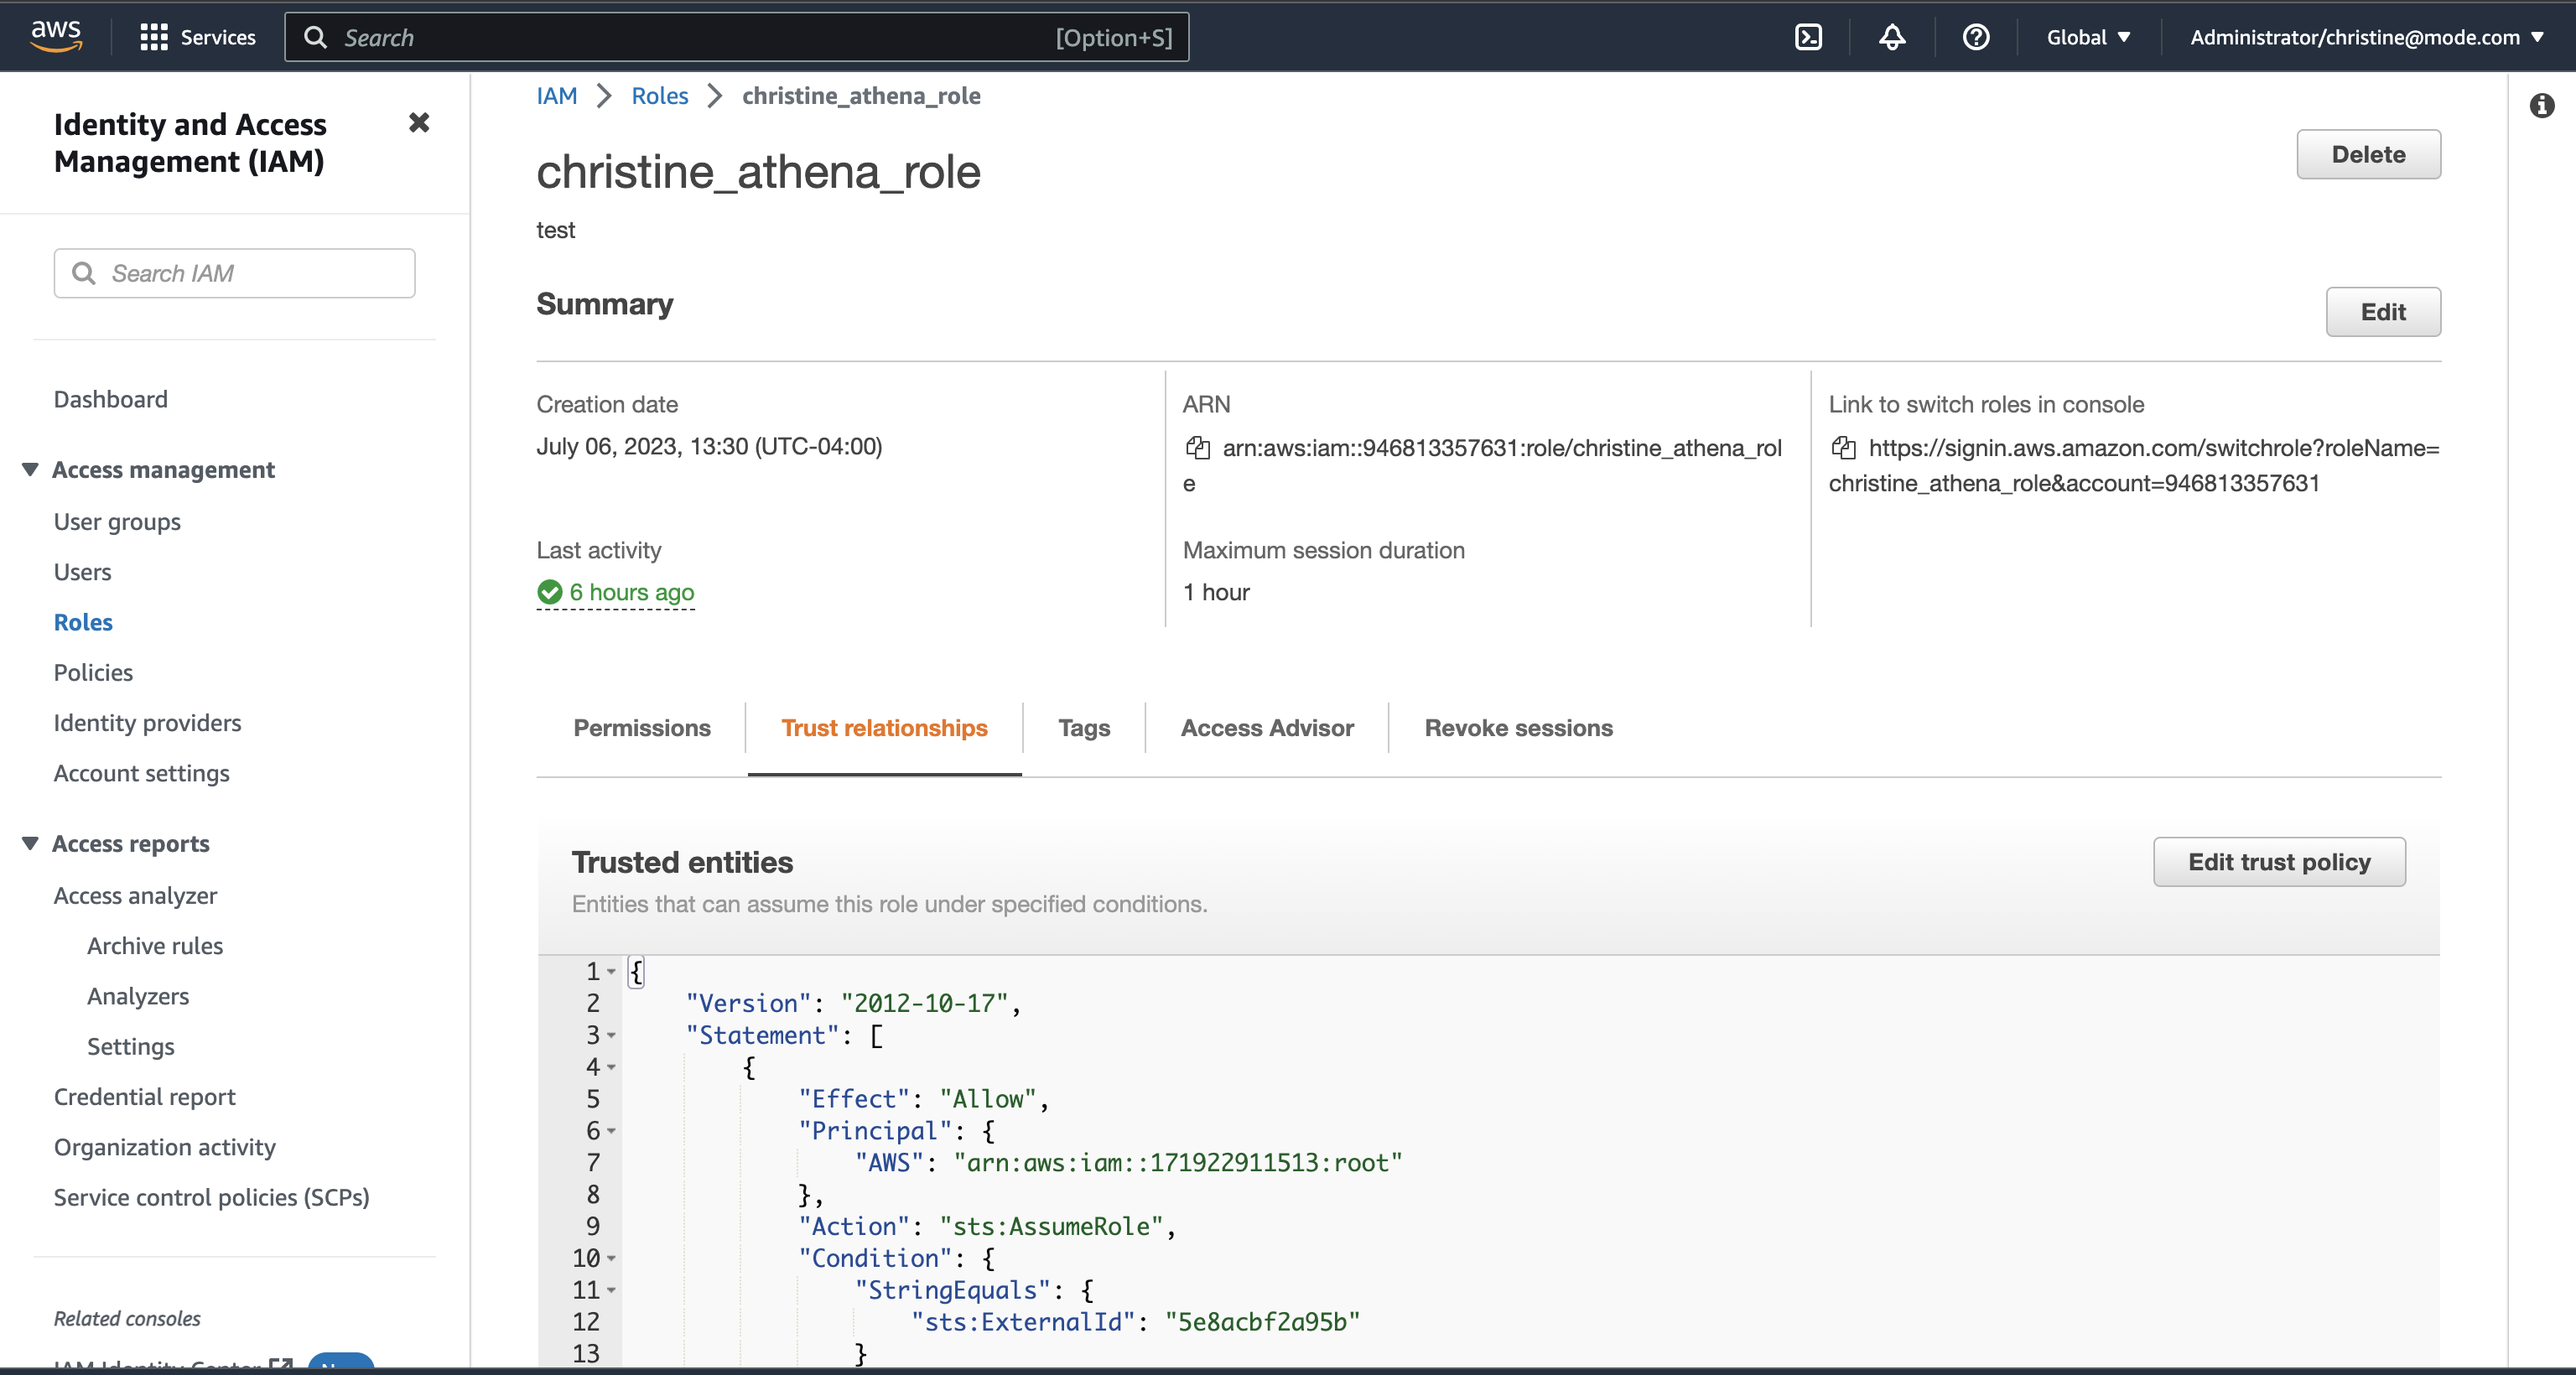
-
Copy and paste the trust relationship from the Analyst Studio connection form into your AWS IAM Role.
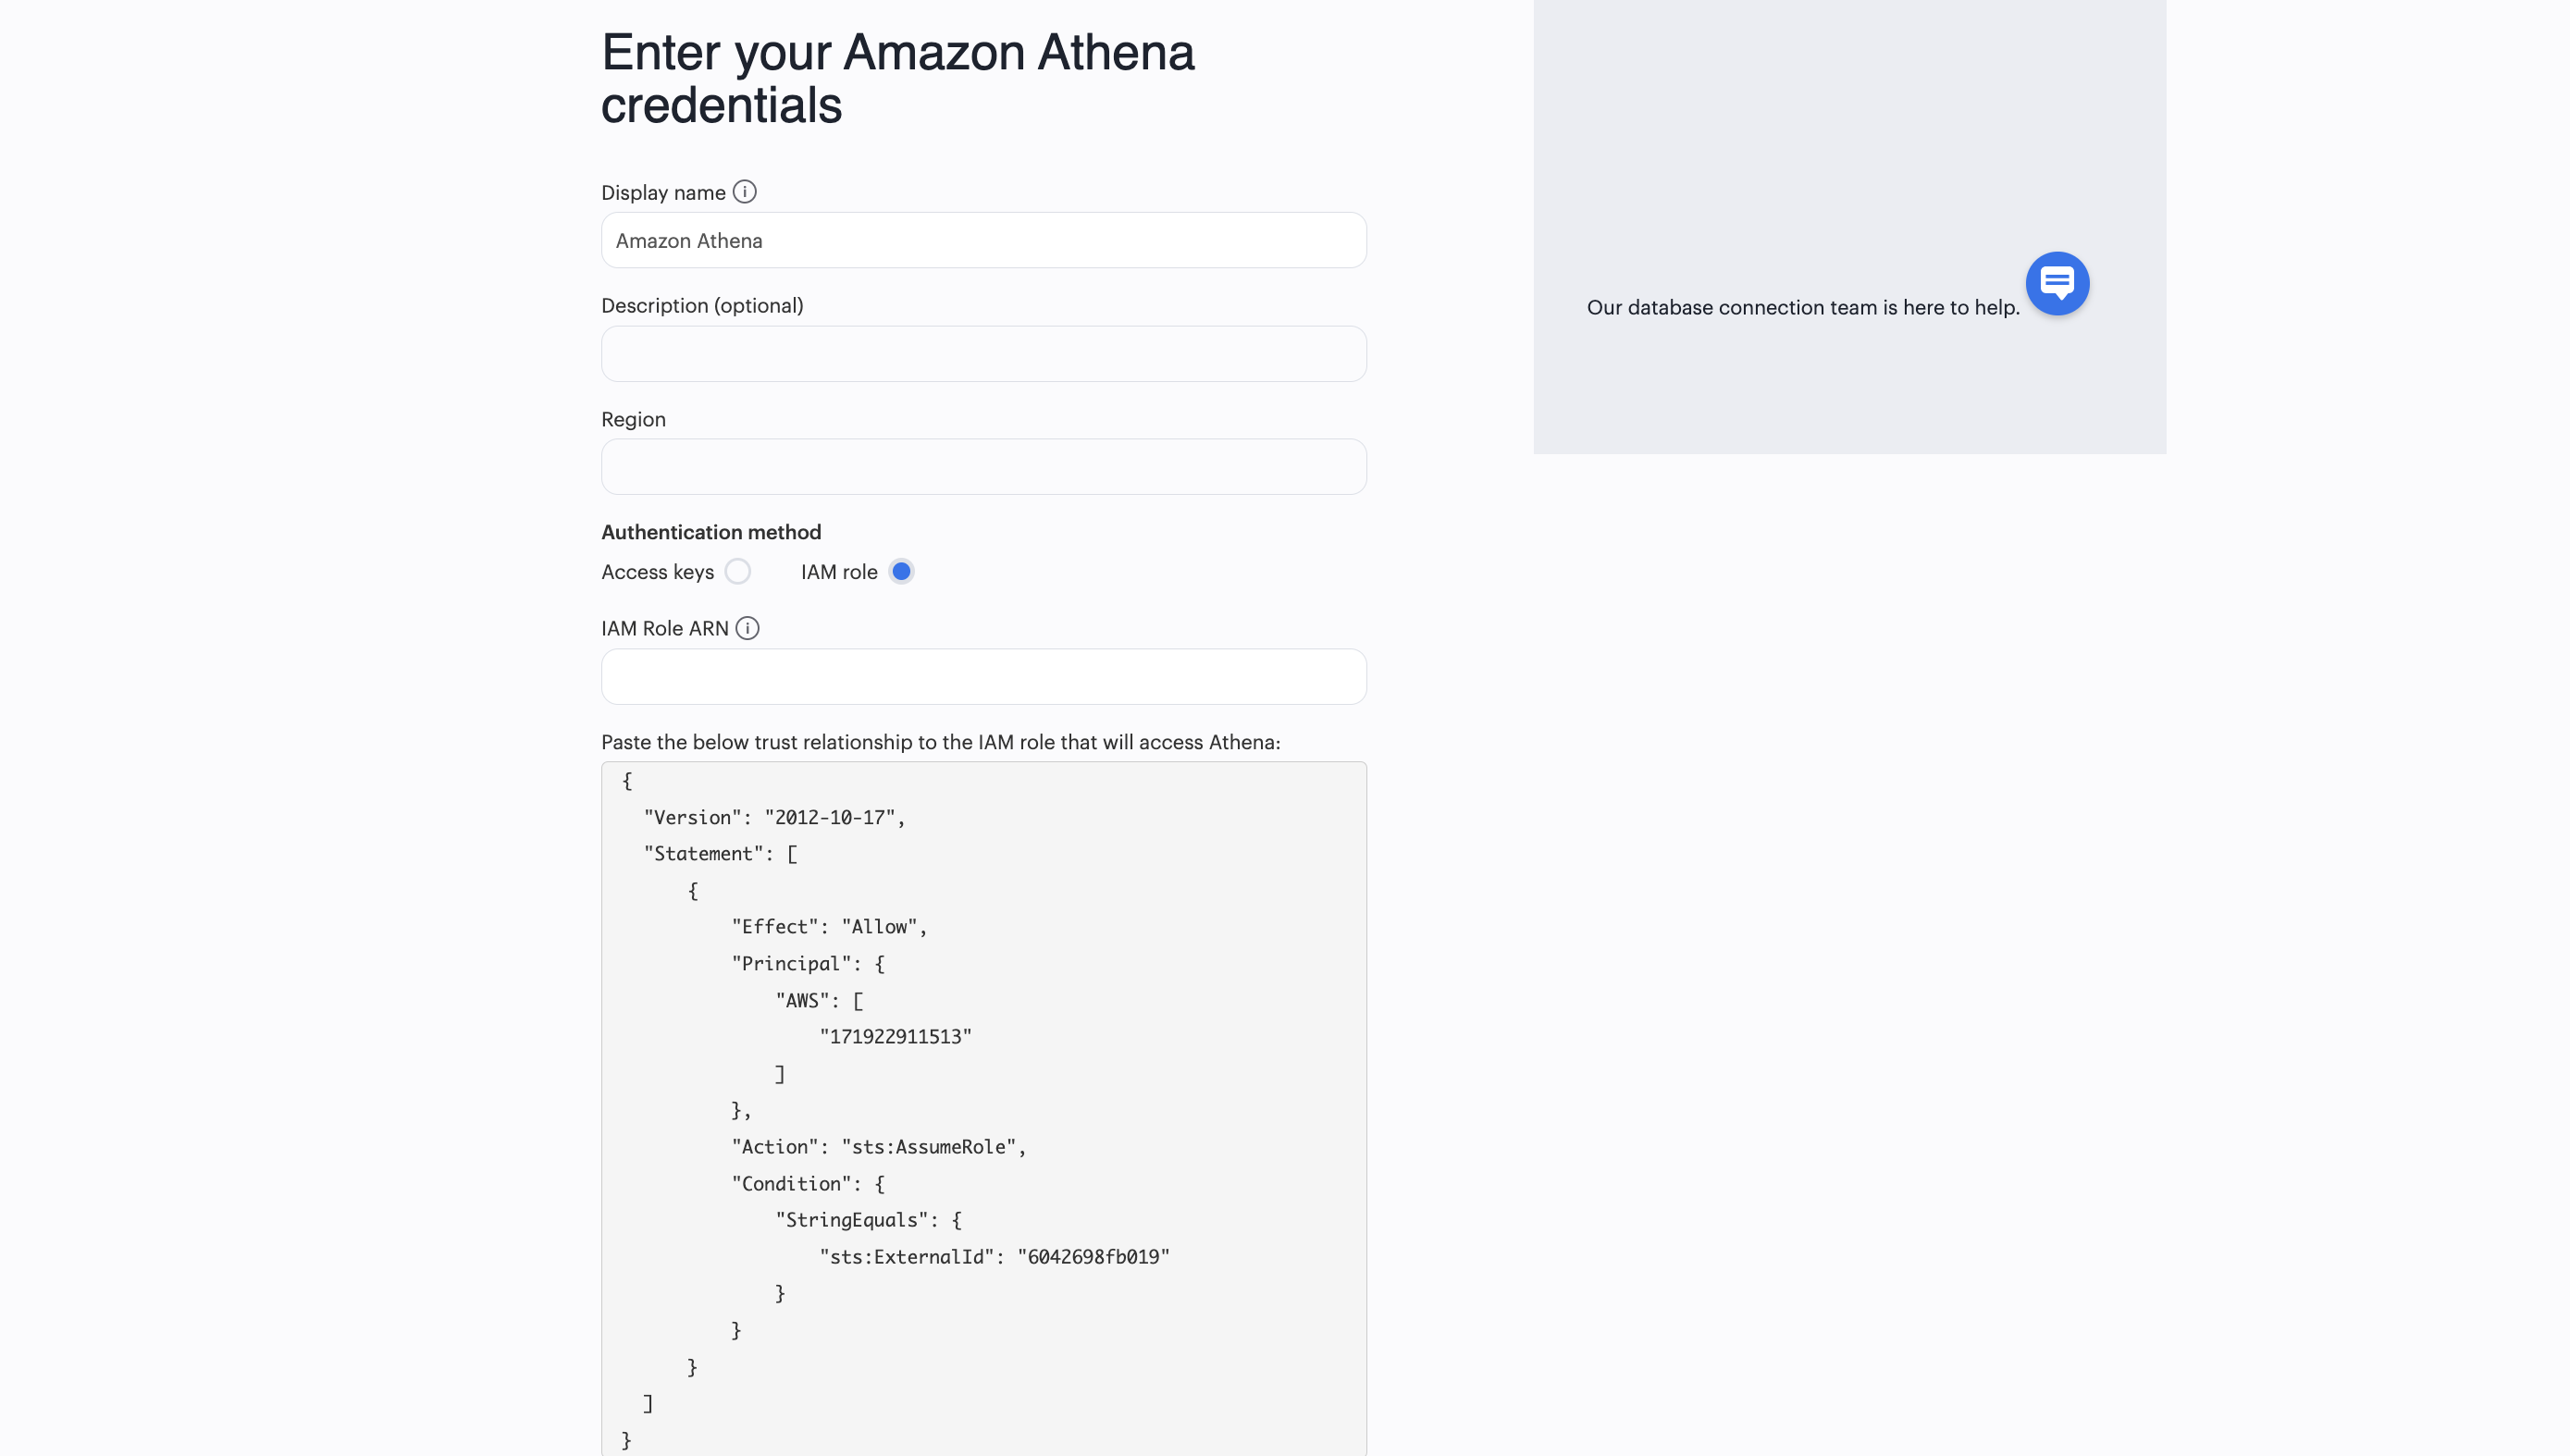
-
Add in the necessary IAM permissions to access your Athena resource (must include
athena:ListDatabasesandathena:ListDataCatalogs). -
Click Create Role in AWS and paste the IAM Role ARN into the Analyst Studio connection form.
-
The S3 Results Directory should be a bucket where Athena can write query results. For this bucket, the AWS user specified above needs read and write access. The bucket should be a full S3 url (for example,
s3://acme/my/athena/bucket). -
Click Connect. You will land on a page that displays your database schema.
Amazon Redshift
Additionally supports: mParticle Redshift, Tenjin Redshift
Supported JDBC drivers and known issues
| Driver | Driver Release Date | Analyst Studio Removal Date |
|---|---|---|
(Recommended) Amazon Redshift v 2.1.0.29 |
6/6/2024 |
|
Amazon Redshift v 2.1.0.13 |
3/30/2023 |
|
Amazon Redshift v 2.1.0.3 |
12/3/2021 |
|
Amazon Redshift v 2.0.0.7 |
7/23/2021 |
|
Amazon Redshift v 2.0.0.3 |
2/25/2021 |
The following are known issues with the current supported drivers. Analyst Studio continues to advocate on our customers' behalf for vendors and open-source communities to resolve these issues.
| Driver | Known Issue | Further Details |
|---|---|---|
All |
Date functions not displaying correctly |
Date functions like DATE_TRUNC do not work as expected due to Analyst Studio’s results formatter. A workaround is to use a function to convert the date to string. |
All |
Schema access privileges |
Redshift shows all schemas to users even if they don’t have permissions to them. The Redshift team confirmed there is a feature request to restrict access, but currently no ETA. |
Database configuration instructions
Amazon Redshift
Depending on your Amazon settings, you may need to grant Analyst Studio access to your Redshift security group:
-
Navigate to the Redshift Management Console.
-
Select Clusters from the left navigation bar.
-
Click on the cluster you want to connect.

-
Find Cluster Security Groups under Cluster Properties and click on the cluster’s security group.
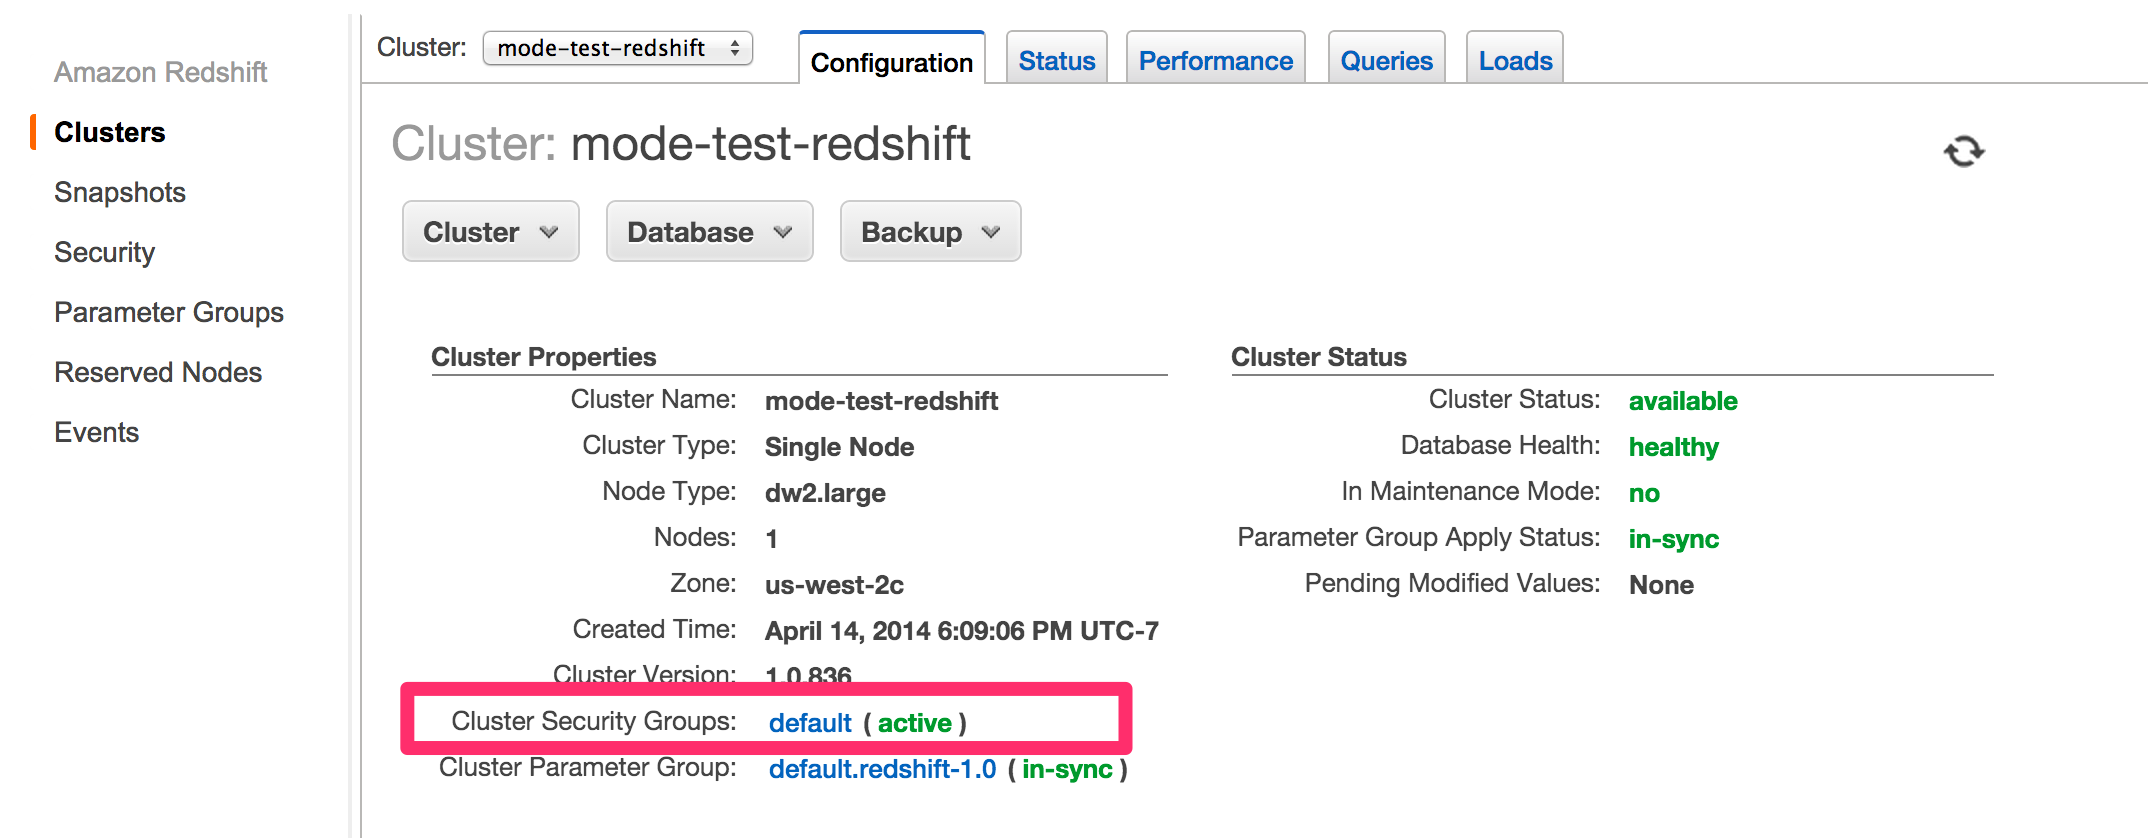
If you are using VPC Security Groups, you must also grant Analyst Studio access to that security group. Please click on your VPC Security Group name and follow this section of our Amazon RDS guide, starting with step 2. -
Click on the name of the security group.

-
You’ll see a list of authorized connections. Click the blue Add Connection Type button in the upper left.
-
Select CIDR/IP from the Connection Type dropdown, and paste the address
54.68.30.98/32in the CIDR/IP to Authorize field.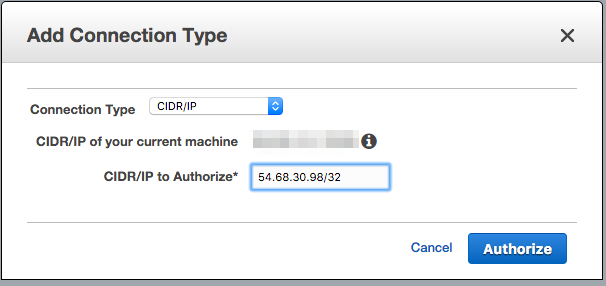
-
Click the blue Authorize button.
-
Repeat steps 5 through 7 for each of the addresses listed below:
-
54.68.45.3/32 -
34.209.23.118/32 -
54.188.241.100/32 -
52.43.195.103/32 -
3.224.146.111/32 -
54.221.238.89/32 -
52.20.173.236/32 -
18.219.18.49 -
3.20.219.67 -
3.130.46.196 -
18.190.82.112 -
18.219.27.193 -
18.224.75.176 -
3.143.83.15 -
3.22.39.190 -
52.15.221.243
-
Connecting to Analyst Studio via IAM role
-
Follow the steps to connect a database with Direct Connect.
-
Select Amazon Redshift from the list of databases.
-
Select Authentication method: IAM role in the Analyst Studio connection form.
-
Navigate to IAM Roles in your AWS Console.
-
Create a new role or choose an existing role and select Custom trust policy under Trusted entity type.
-
Alternatively, you can choose an existing role and select the Trust relationships tab.
-
Copy and paste the trust relationship from the Analyst Studio connection form into your AWS IAM Role.
-
Add in the necessary IAM permissions to access your Redshift resource.
-
Click Create Role in AWS and paste in the IAM Role ARN into the Analyst Studio connection form.
-
Click Connect. You will land on a page that displays your database schema.
mParticle Redshift
mParticle supports both mParticle-hosted and client-hosted Redshift clusters. If you’re using an mParticle-hosted Redshift cluster, log in to the mParticle platform and navigate to the Redshift Configuration tab. There, you’ll find your connection string and user credentials.
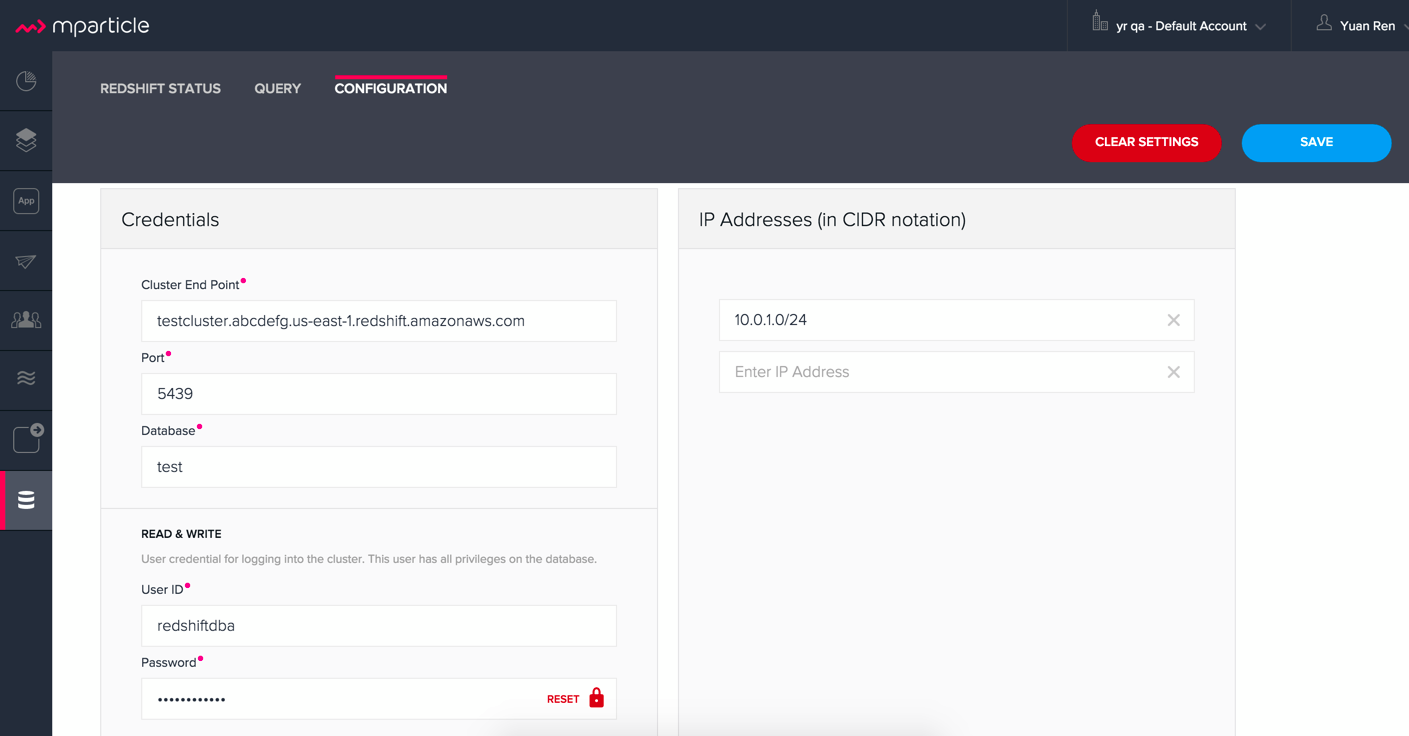
You can also allowlist Analyst Studio’s servers by editing the list of allowed IP addresses on mParticle UI, which will update the AWS security group settings associated with your Redshift cluster. Once you have your credentials, follow the steps below to connect Analyst Studio:
-
Log in to Analyst Studio and follow to steps to connect a database to Analyst Studio.
-
Select mParticle Redshift from the list of databases.
-
Enter your mParticle credentials and click Connect. You’ll land on a page that displays your database schema.
-
Click New Query in the top navigation to start writing queries.
Tenjin Redshift
Once you’ve activated the DataVault feature on your Tenjin account, you can access your DataVault credentials by logging in to the dashboard and navigating to Menu -> DataVault Credentials.
For additional questions about getting your DataVault credentials, please free to contact support@tenjin.io.
Apache Druid
Supported JDBC drivers and known issues
Driver |
Driver Release Date |
Analyst Studio Removal Date |
(Recommended) Apache Avatica 1.25.0 |
4/5/2024 |
|
Apache Avatica 1.23.0 |
1/19/2023 |
|
Apache Avatica 1.18.0 |
5/18/2021 |
|
Apache Avatica 1.17.0 |
6/21/2020 |
The following are known issues with the current supported drivers. Analyst Studio continues to advocate on our customers' behalf for vendors and open-source communities to resolve these issues.
| Driver | Known Issue | Further Details |
|---|---|---|
Avatica 1.17.0 |
Druid fetch size limited to 100 |
Druid JDBC driver only returns 100 rows per batch, resulting in longer-than-expected query response times. There is a server-side fix that can be applied. |
Avatica 1.17.0 |
Druid Basic Authentication is unsupported |
Analyst Studio currently requires Druid connections over Bridge. |
Avatica 1.17.0 |
Connection context properties are unsupported |
Analyst Studio currently does not support changing the Druid broker’s setting for the connection via JDBC properties. |
Avatica 1.17.0 |
Only Druid SQL support |
When connecting to Druid via JDBC, only Druid SQL syntax is supported. Native (json-type) query syntax will result in errors. |
Avatica 1.17.0 |
Druid SQL limitations |
Not all Druid features are supported via Druid SQL and JDBC connectivity. Please see the Druid docs. |
Avatica 1.17.0 |
Single Schema Support |
Analyst Studio’s Schema Browser will surface only tables found in the default |
Avatica 1.17.0 |
Query cancellation is unsupported |
Druid supports cancellation for native (json-type) queries, but not for Druid SQL queries. If users attempt to cancel a query in the Analyst Studio UI, the query run will not be interrupted. The driver does not return an error, so Analyst Studio is unable to surface anything to the user. |
Connecting to Analyst Studio
When connecting Druid to Analyst Studio, fill out the connection form as follows:
-
Display name: the name of the connection used in the Schema Browser.
-
Description: optional additional context viewable in Connection Management.
-
Host: the route of the Druid cluster Broker, as specified in the broker/runtime.properties file.
-
Port: the port of the Broker. The default port is 8082. If your cluster is secured by SSL, the default port is 8182.
-
Preferred JDBC Driver: the Avatica 1.17.0 driver is the only current driver.
-
Disable transport encryption: Analyst Studio strongly recommends that transport encryption be enabled and that Druid be configured to use TLS v.1.2. If disabled, connections between the Bridge connector and your database will not be encrypted.
Please note the following limitation of broker connection stickiness over JDBC:
"Druid’s JDBC server does not share connection state between Brokers. This means that if you’re using JDBC and have multiple Druid Brokers, you should either connect to a specific Broker, or use a load balancer with sticky sessions enabled. The Druid Router process provides connection stickiness when balancing JDBC requests, and can be used to achieve the necessary stickiness even with a normal non-sticky load balancer."
Databricks
Additionally supports: Spark
Supported JDBC drivers and known issues
| Driver | Driver Release Date | Analyst Studio Removal Date |
|---|---|---|
(Recommended) Simba Spark v 2.6.38.1068 |
5/4/2024 |
|
Simba Spark v 2.6.33.1055 |
5/22/2023 |
|
Simba Spark v 2.6.21.1039 |
12/24/2021 |
|
Simba Spark v 2.6.17.1023 |
6/17/2021 |
Analyst Studio recommends connecting via the Simba Spark driver because it is the official driver endorsed by Databricks.
The following are known issues with the current supported drivers. Analyst Studio continues to advocate on our customers' behalf for vendors and open-source communities to resolve these issues.
| Driver | Known Issue | Further Details |
|---|---|---|
Simba v 2.6.17.1021 |
Does not support Unity Catalog |
Please use v 2.6.21.1039 or newer to utilize Unity Catalog. |
Simba v 2.6.17.1021 |
Dates return incorrectly prior to 10/15/1582 |
When using Spark 2.4.4 to Spark 3.0, DATE and TIMESTAMP data before October 15, 1582 may be returned incorrectly if serializing query results using Apache Arrow. |
Simba v 2.6.17.1021 |
Does not support Spark version 2.1 |
The driver no longer supports servers that run Spark version 2.1. |
Simba v 2.6.17.1021 |
Strings in Binary Columns |
Queries return binary results (not strings) for binary datatype columns. |
Simba v 2.6.17.1021 |
Deprecated Versions |
Support for Spark 1.6, 2.1, and 2.2 is deprecated, and will be removed in a future release of this driver. The driver only supports connections to Spark Thrift Server instances. It does not support connections to Shark Server instances. |
Gather JDBC connection parameters
Connecting to Databricks requires a running Spark cluster configured with SSL enabled and using HTTPS as the underlying thrift protocol (this is the default configuration for new clusters).
Connecting to Analyst Studio
-
Follow these steps to connect a Databricks database. Change the display name to something that helps you recognize the database behind the connection.
-
Fill in the
host,token, andHTTP pathfields with the information you gathered above. -
Click Connect to save the new connection.
Supported SQL dialect
Analyst Studio supports connecting to Databricks clusters via their embedded Hive server using Hive’s open-source JDBC driver. This restricts the supported SQL dialect to HiveQL; we currently do not support querying in Spark SQL, though we may add support for it at a later date.
Automatic cluster termination
Databricks "Standard" Spark clusters are configured by default to automatically terminate after 120 minutes of inactivity. The Hive JDBC driver cannot trigger the cluster to automatically restart, so you may want to adjust the timeout or disable automatic termination per Databricks' documentation. If the driver attempts to connect to the server after it’s been shut down, the connection attempt will fail until the cluster is restarted manually.
dbt semantic layer
Supported JDBC drivers and known issues
| Driver | Driver Release Date | Analyst Studio Removal Date |
|---|---|---|
(Recommended) Arrow Flight SQL version 12.0.1 |
6/13/2023 |
Connecting to Analyst Studio
You will also need the following to set up the connection in Analyst Studio:
-
dbt Cloud Hostname: The hostname for the instance of dbt cloud.
-
Environment Id: The unique identifier for a dbt environment in the dbt Cloud URL, when you navigate to that environment under Deployments.
-
Service Token: Service Tokens for dbt Cloud can be created in dbt account settings, and must have at least "Semantic Layer Only" permissions.
Start by connecting a database.
From the dropdown, select dbt Semantic Layer.
Writing metrics queries in Analyst Studio
To write a new metrics query, navigate to the SQL editor and select your dbt Semantic Layer connection from the database dropdown.
By default, this connection will surface all available schemas and tables. To reference a metric within your query, use the following syntax:
Note all queries need to be wrapped in {%raw %} {% endraw %} tags.
For example:
{% raw %}
select * from {{
	semantic_layer.metrics()
}}
{% endraw %}Google AlloyDB
Supported JDBC drivers and known issues
| Driver | Driver Release Date | Analyst Studio Removal Date |
|---|---|---|
(Recommended) PostgreSQL v 42.7.4 |
8/23/2024 |
|
PostgreSQL v 42.6.0 |
3/18/2023 |
|
PostgreSQL v 42.3.2 |
2/15/2022 |
|
PostgreSQL v 42.2.23 |
7/6/2021 |
|
PostgreSQL v 42.2.19 |
2/18/2021 |
|
PostgreSQL v 42.2.14 |
6/4/2020 |
There are no known issues with this driver.
Database configuration instructions
-
Log in to Analyst Studio and select connect a Database in the dropdown menu under your profile in the left panel.
-
Select Google AlloyDB from the list of databases.
-
You can utilize Bridge connector if you have a private IP address.
-
Enter your Google AlloyDB credentials and click Connect.
-
Host / Port: Host name or IP address and Port of the server hosting AlloyDB.
-
Database name: The database to connect to for AlloyDB.
-
Username / Password: The username and password to authenticate with AlloyDB.
-
Google BigQuery
Supported JDBC drivers and known issues
| Driver | Driver Release Date | Analyst Studio Removal Date |
|---|---|---|
(Recommended) Simba v 1.6.1.1002 |
7/23/2024 |
|
Simba v 1.3.3.1004 |
5/25/2023 |
|
Simba v 1.2.23.1027 |
4/28/2022 |
|
Simba v 1.2.21.1025 |
10/28/2021 |
|
Simba v 1.2.16.1020 |
5/7/2021 |
|
Simba v 1.2.12.1015 |
11/30/2020 |
|
Simba v 1.2.11.1014 |
8/28/2020 |
Analyst Studio recommends connecting via the Simba Big Query driver because it is the official driver endorsed by Google.
The following are known issues with the current supported drivers. Analyst Studio continues to advocate on our customers' behalf for vendors and open-source communities to resolve these issues.
| Driver | Known Issue | Further Details |
|---|---|---|
Simba v 1.3.2.1003 and older |
Nullpointer exceptions |
This driver is known to cause null pointer exceptions (for example, when a table has unicode column names) so will be removed and replaced with the newest version where this issue is fixed. |
Simba v 1.2.23.1027 and older |
Does not support JSON format |
Please utilize 1.3.0.1001 or newer versions to work with JSON data. |
Simba v 1.2.21.1020 |
Read timed out error |
Queries occasionally encounter a read timed out error. |
Simba v 1.2.16.1020 |
DDL/DML commands in comments |
Null pointer exception when using DDL/DML commands (for example, create, update) in single line comments (for example — services created and deleted by month). As a workaround, use the /* */ format. |
Simba v 1.2.16.1020 |
Large queries need the 'bigquery.readsessions.create' permission |
Large queries trigger the Google Storage API, which is free to use for anonymous tables, but requires admins to add the 'bigquery.readsessions.create' to their Google Big Query role associated with the Analyst Studio DB connection. java.sql.SQLException: [Simba] BigQueryJDBCDriver 100210 Error initializing the Storage API. + Message : io.grpc.StatusRuntimeException: PERMISSION_DENIED: request failed:the user does not have 'bigquery.readsessions.create' permission. |
Simba v 1.2.11.1014 |
Nested rows return as objects vs. arrays using Analyst Studio driver |
Utilize UNNEST and ARRAY_AGG to view nested rows as arrays. select author, ARRAY_AGG(title) as title, |
Simba v 1.2.11.1014 |
Batch priority is unsupported |
The specification of job priority is unsupported.
All queries are executed as "interactive" priority, never "batch" priority. |
Simba v 1.2.11.1014 |
Necessary permissions |
To connect via this driver, the service account should have the roles BigQuery Data Viewer and BigQuery Job User. |
Database configuration instructions
To connect Analyst Studio to your BigQuery project, you will need to create a service account for Analyst Studio to use.
-
Navigate to the Google Developers Console. Before proceeding, click on the dropdown to the right of Google Cloud and select the project to which you want to connect.
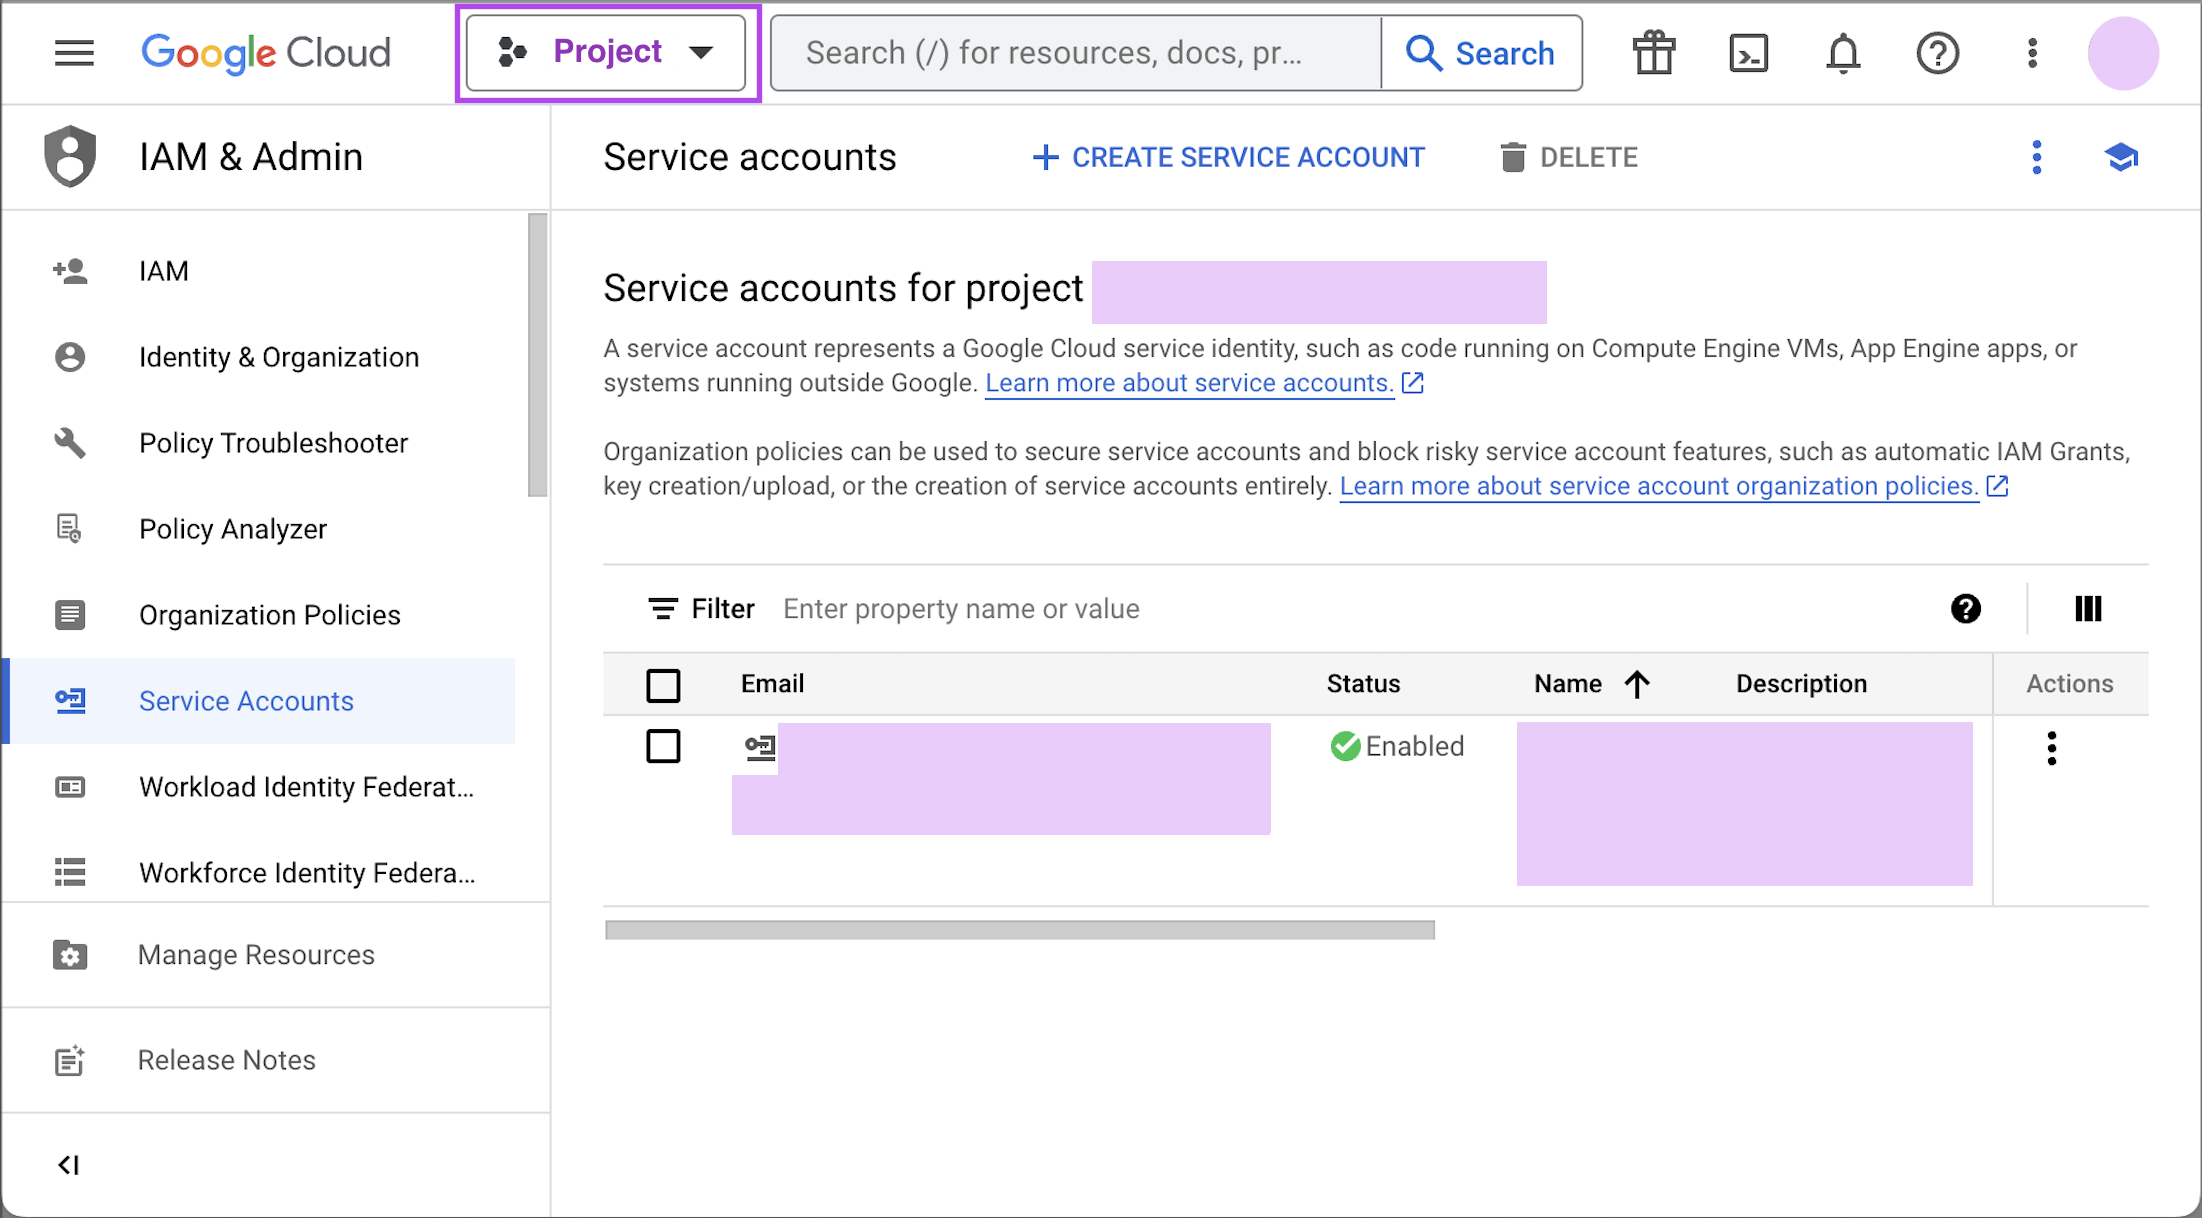
If you do not see the project you would like to connect to listed in the dropdown, click on the account switcher in the upper right corner of the window and ensure you are logged in to a Google account that is a member of the project. -
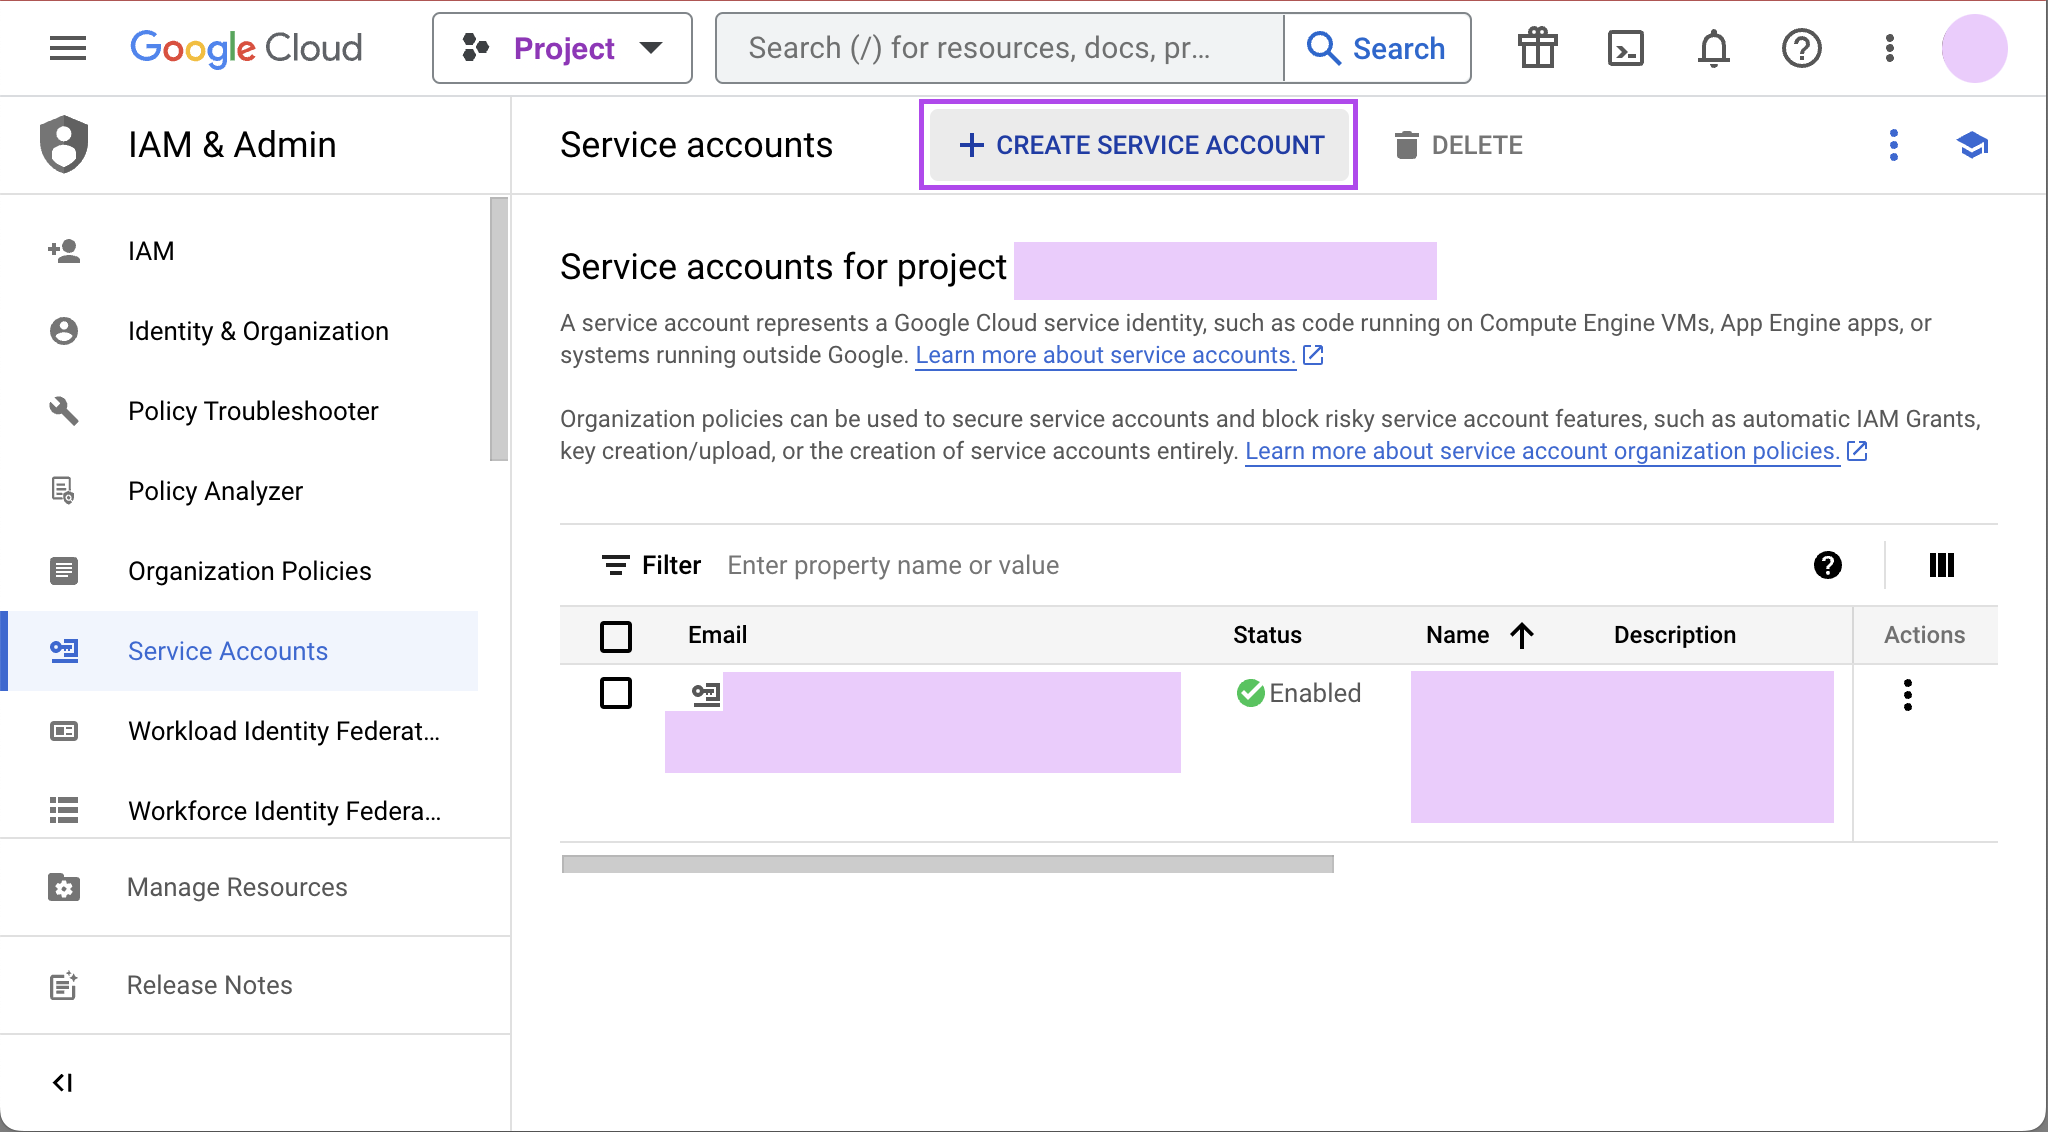
Click on the hamburger menu in the upper left and select IAM & Admin and then Service accounts. Click the Create service account button.
-
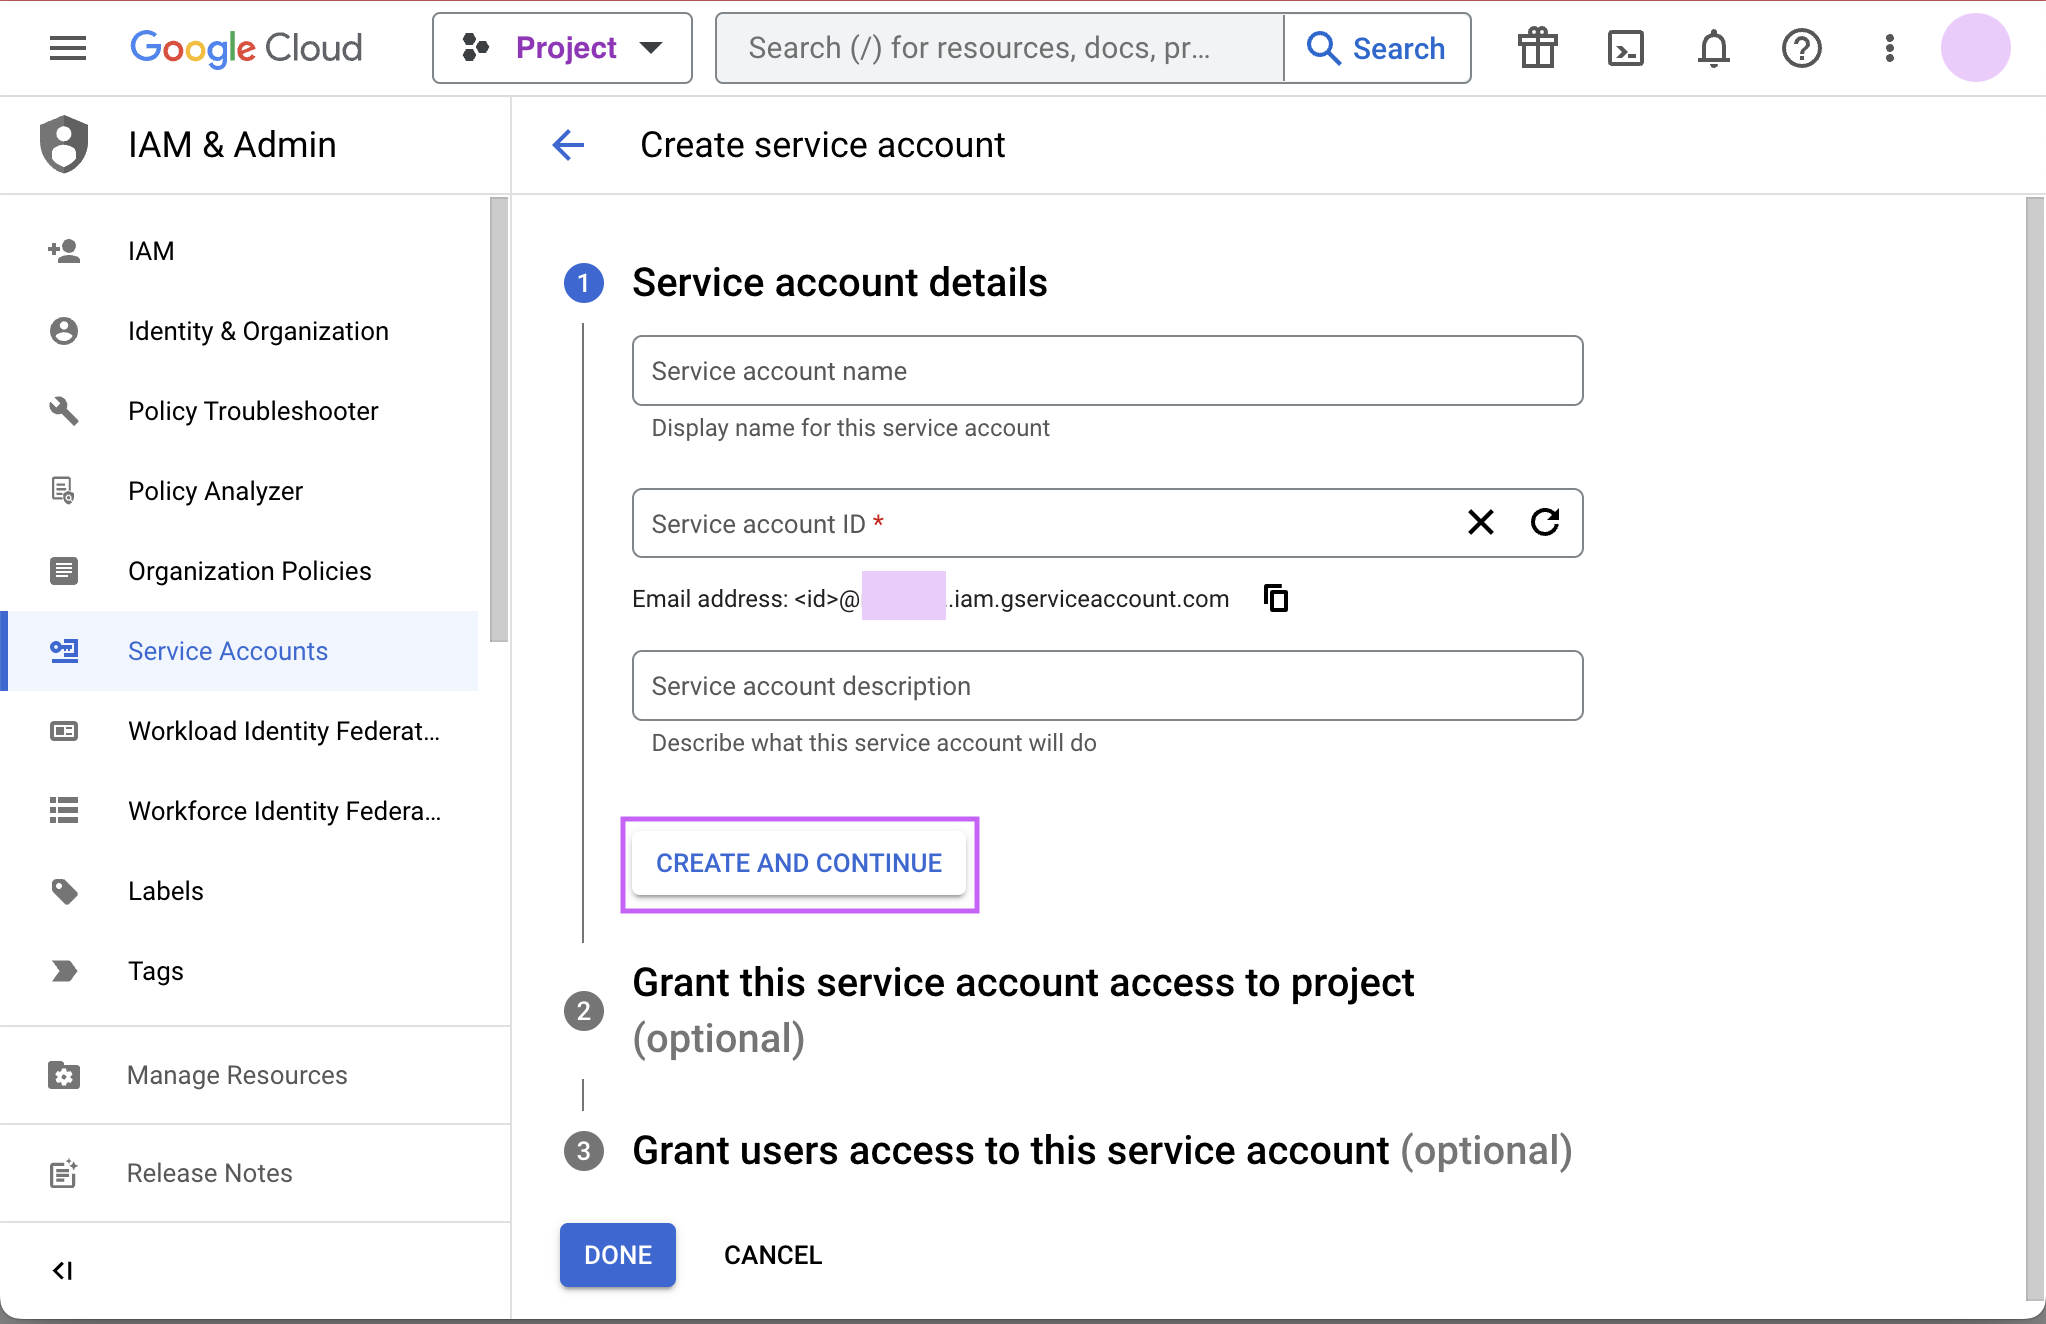
Give your new service account a name, pick a unique ID, and add a description. Click Create and continue.
-
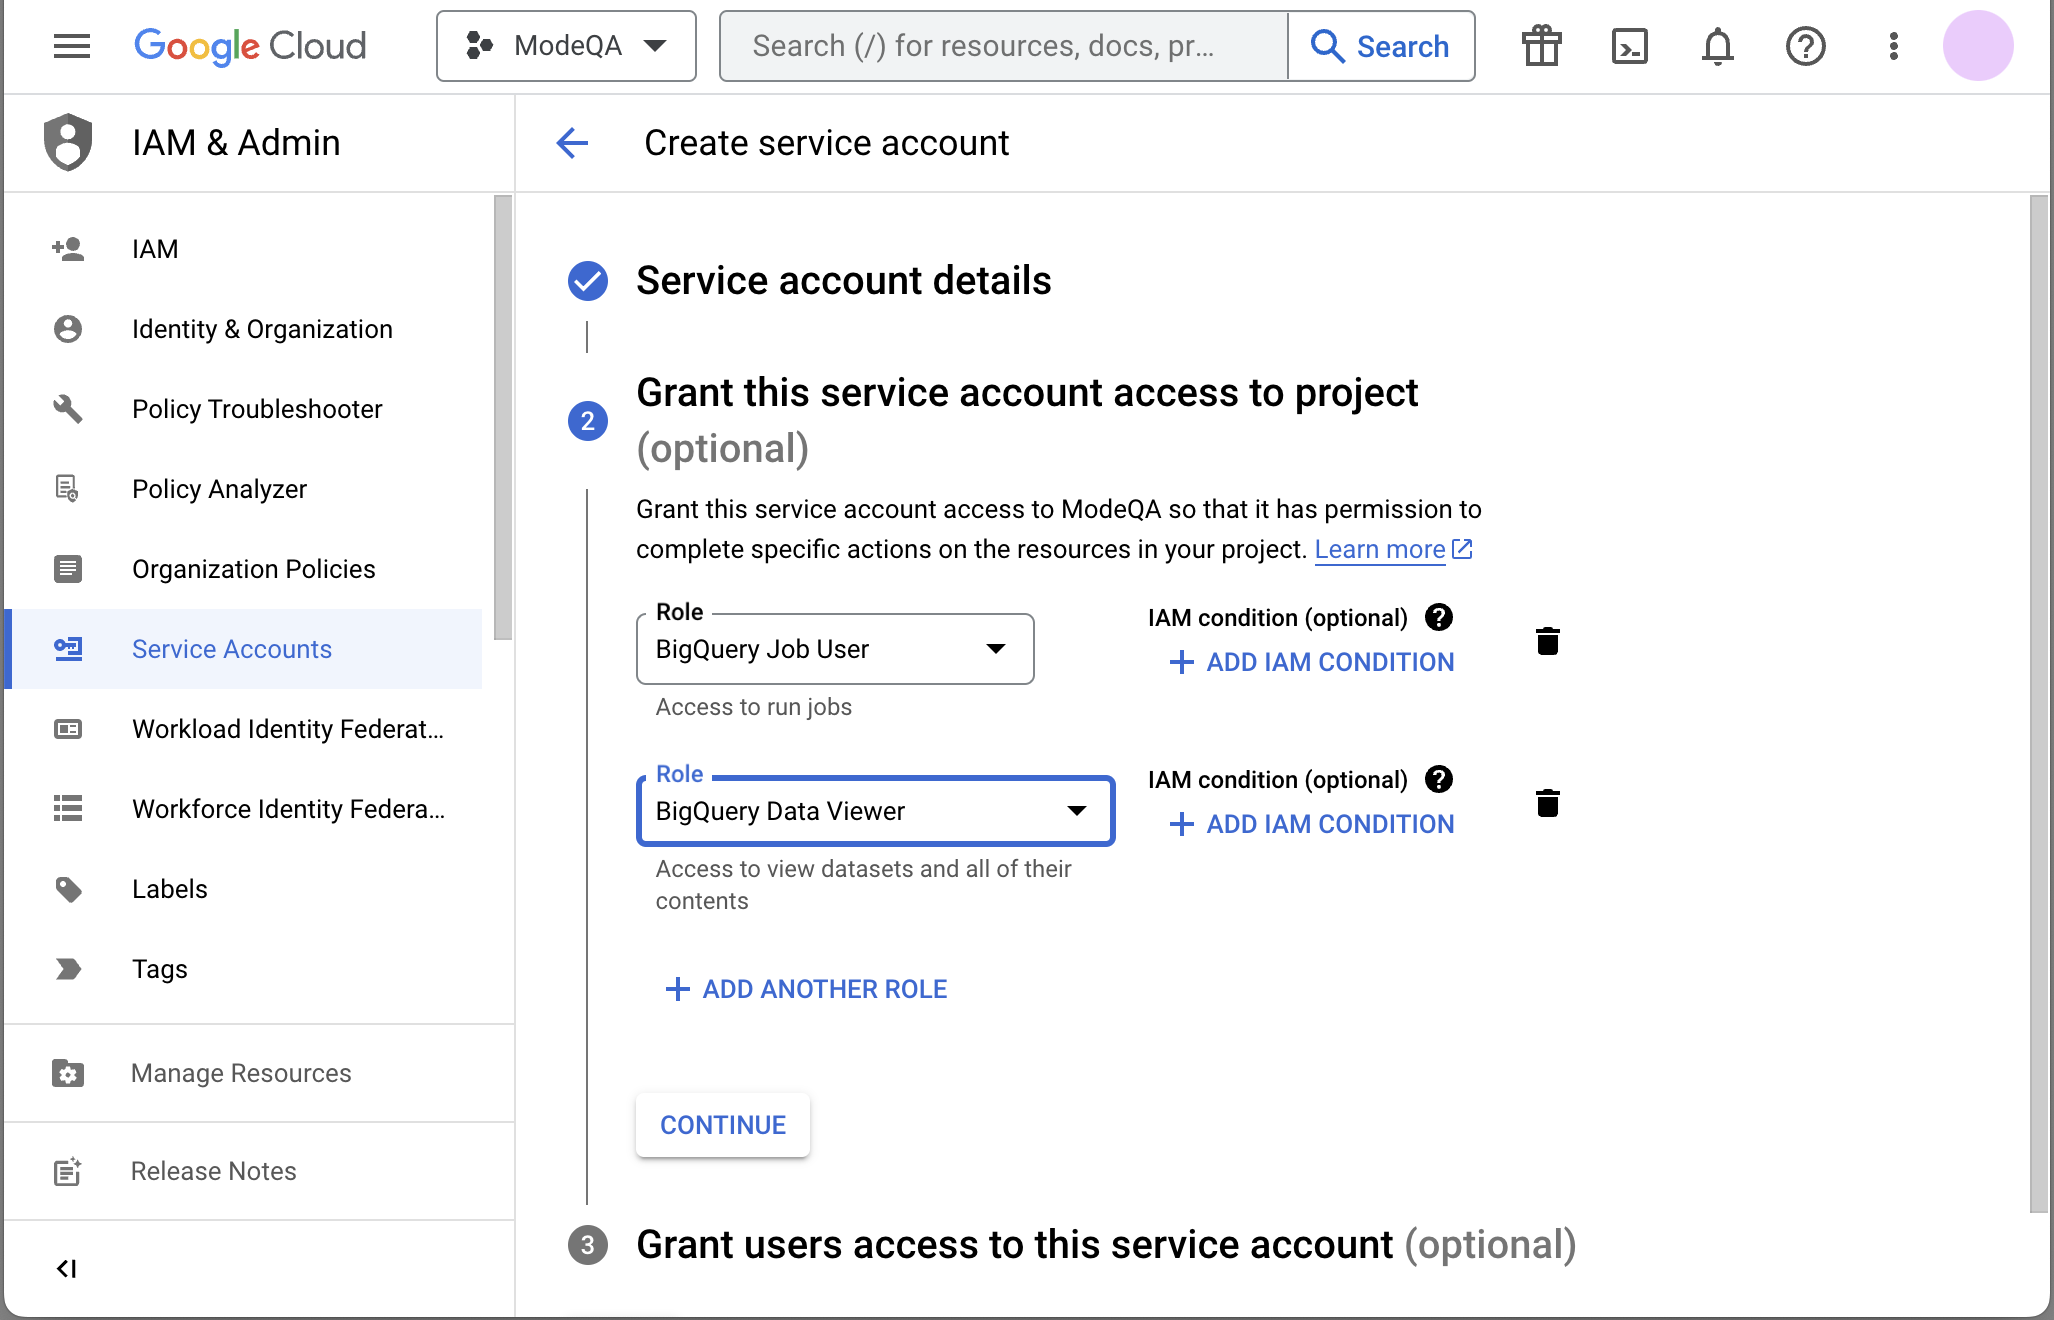
Grant required roles, for example, BigQuery Job User and BigQuery Data Viewer.
-
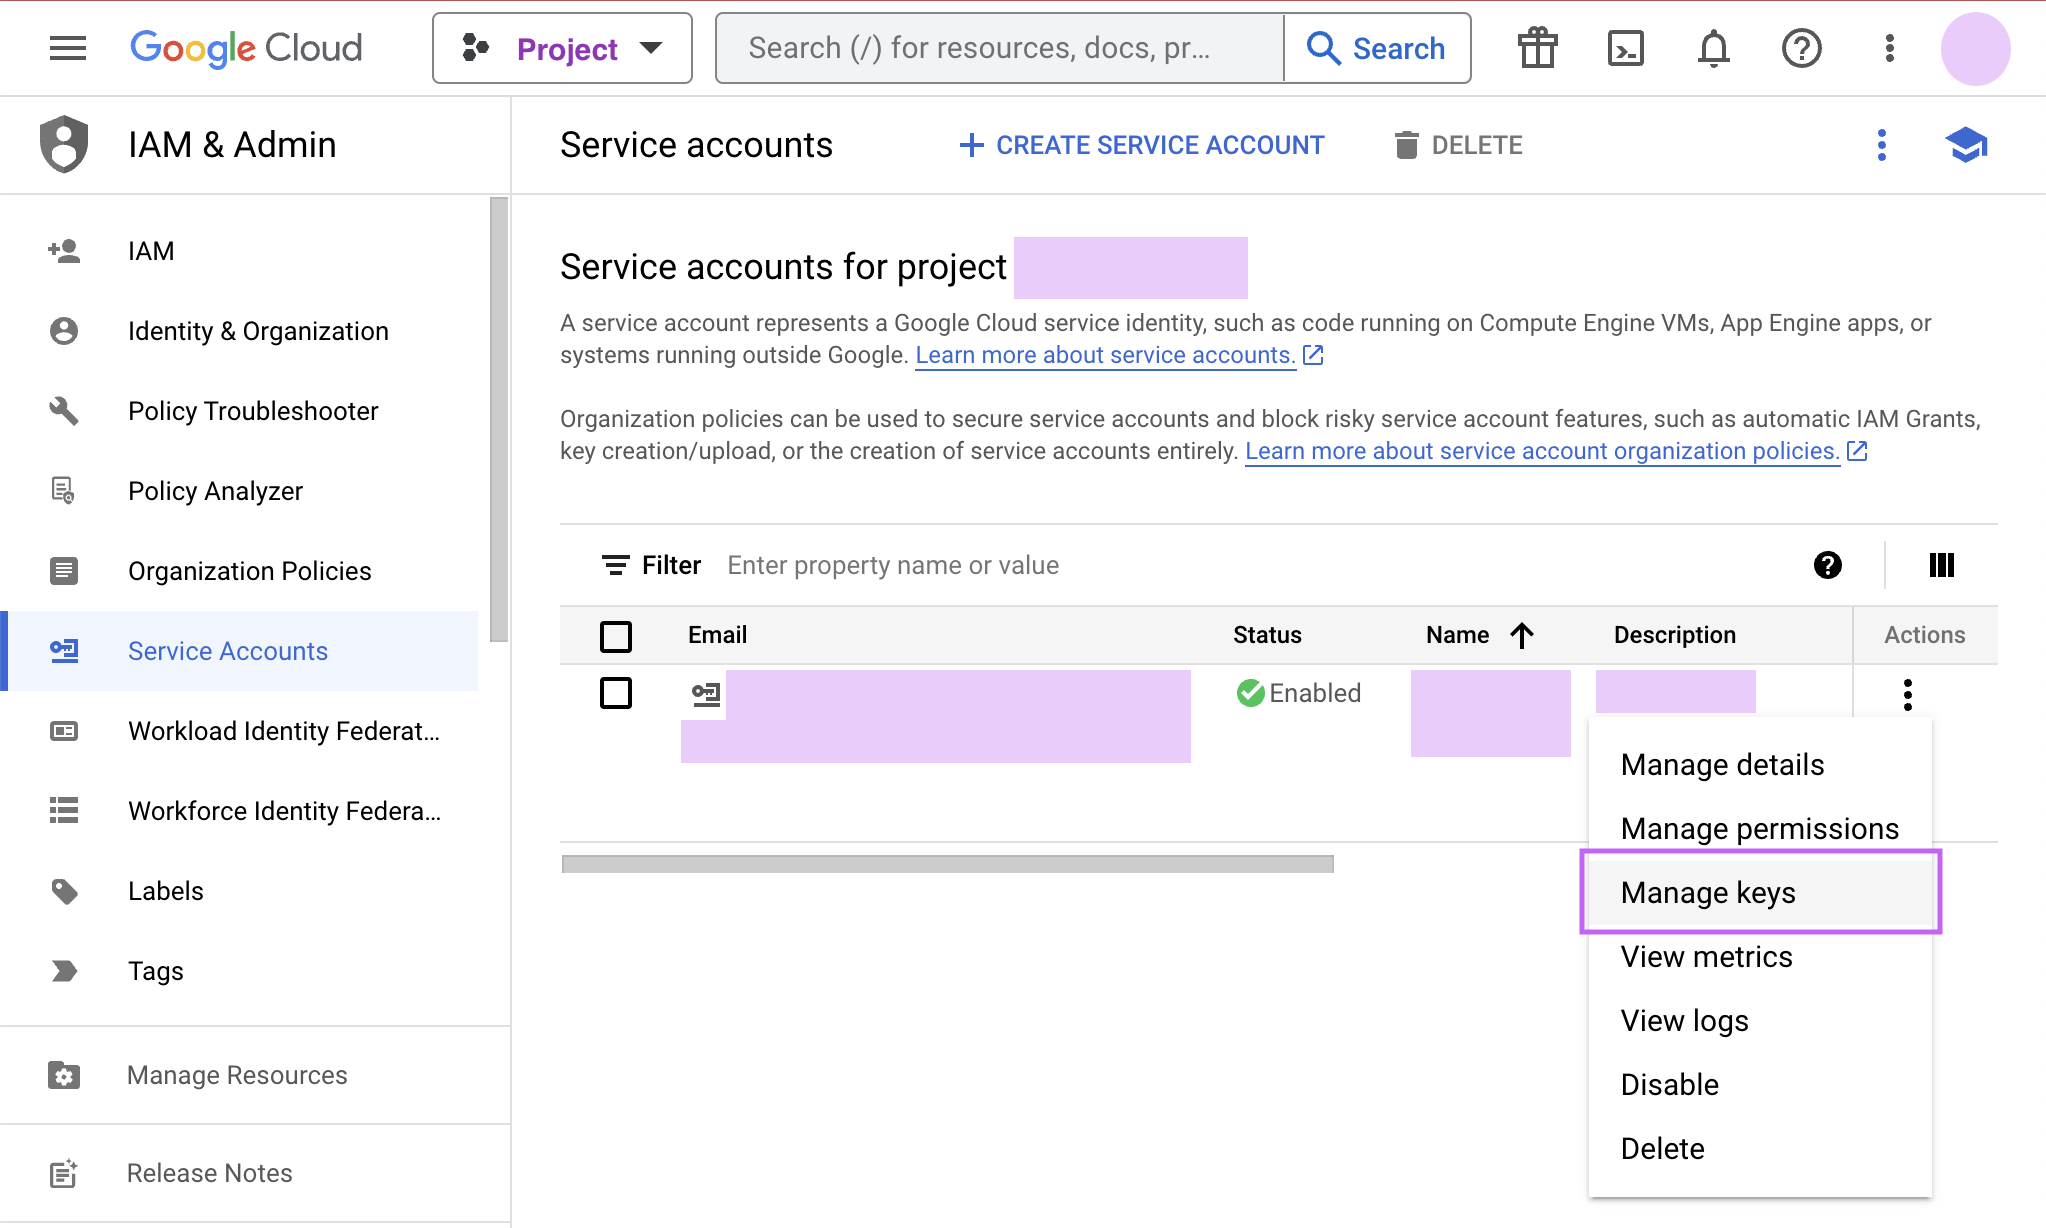
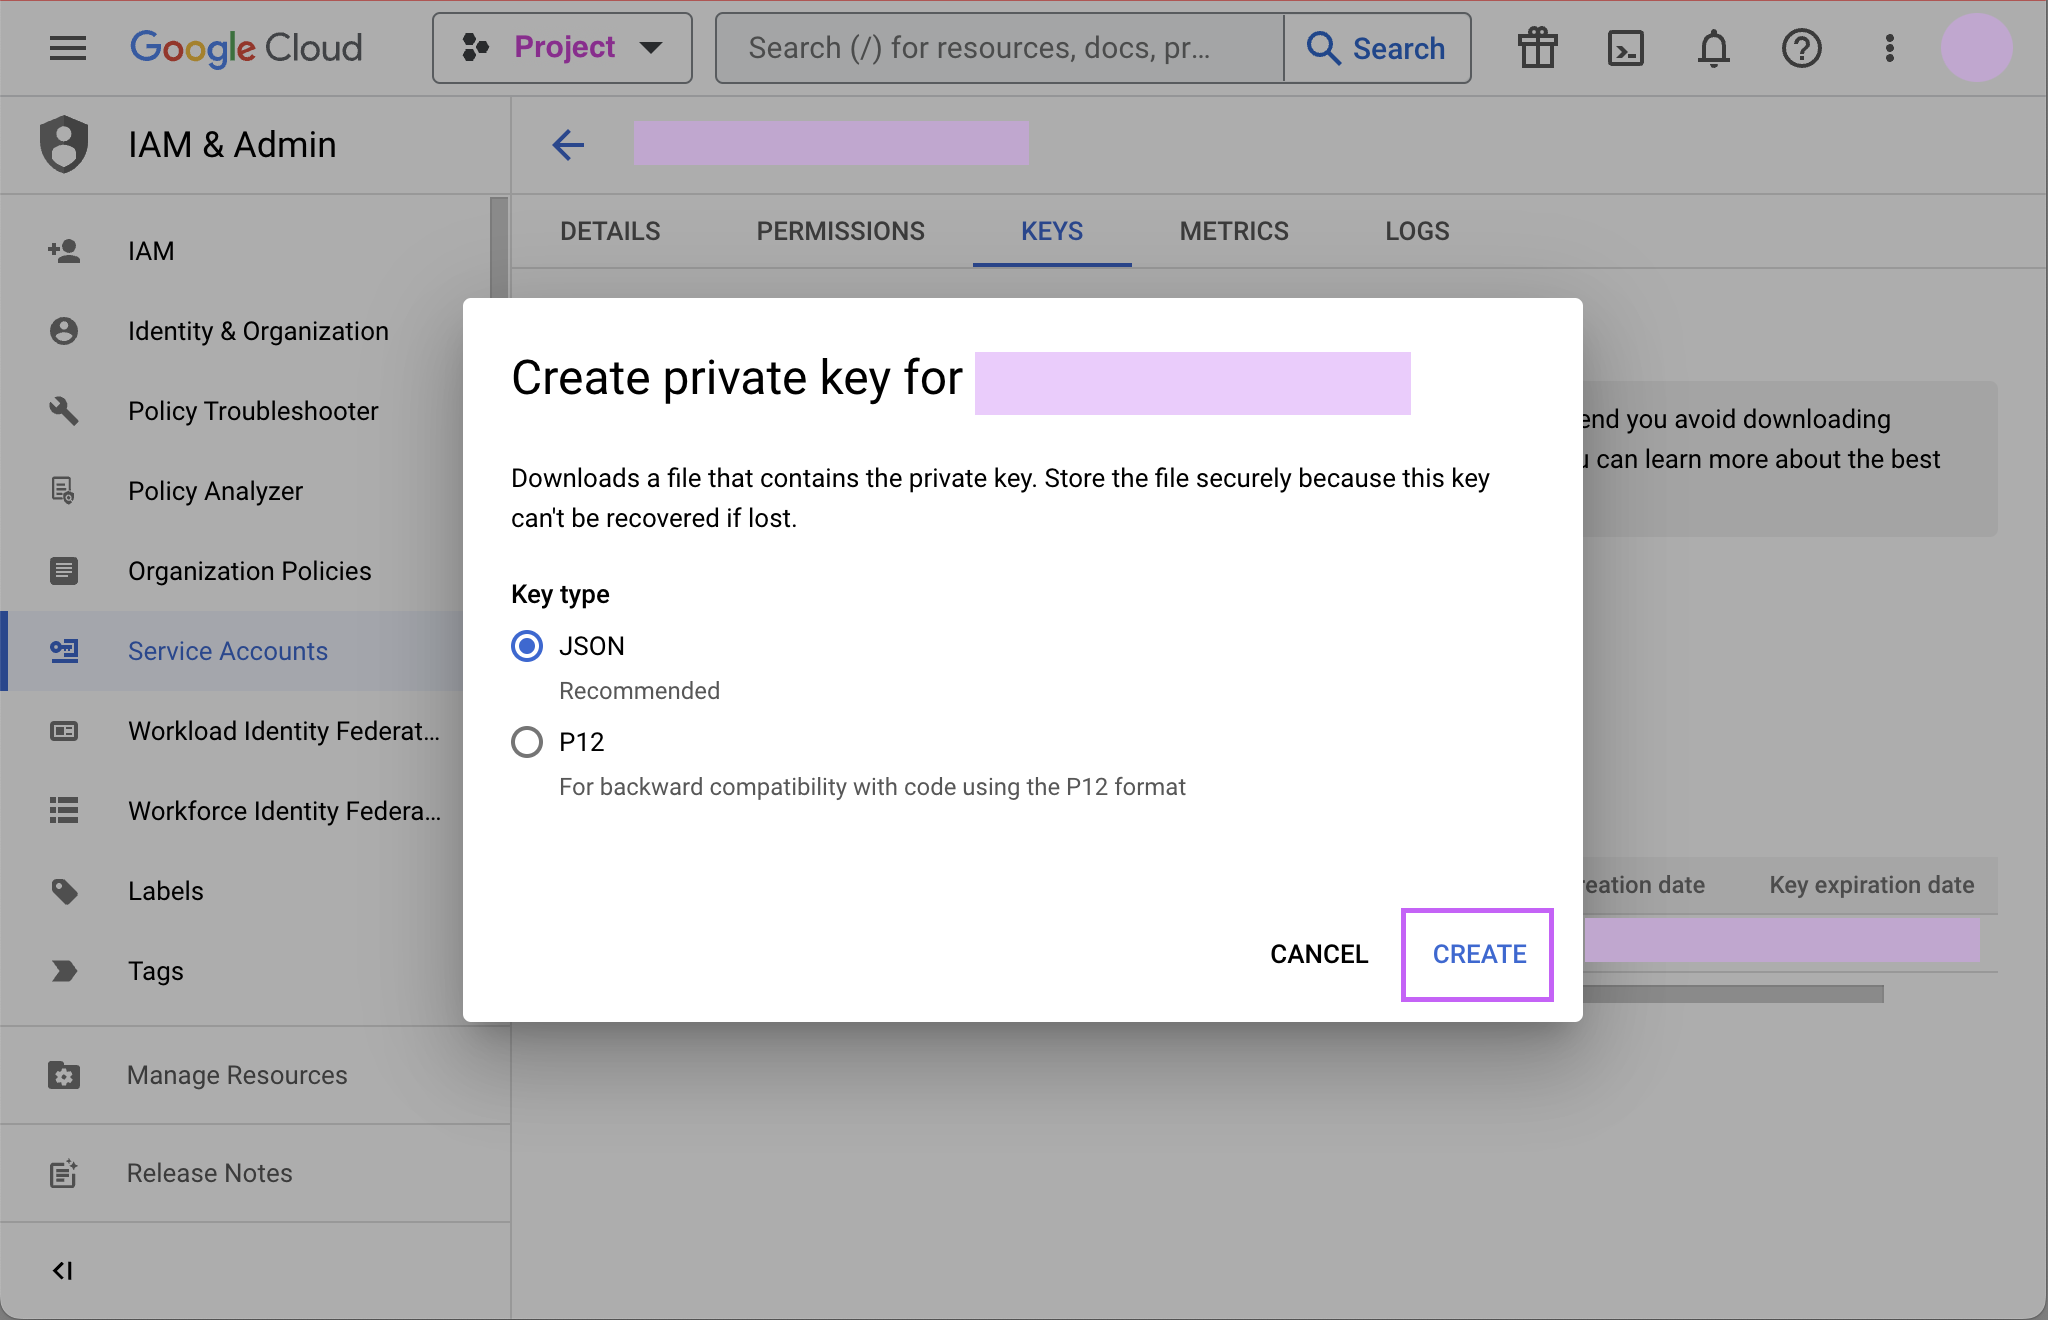
Finally, click Done to create your service account. Now we create the JSON key file. Navigate to Manage keys under the Actions menu for the service account.
-
Navigate to ADD KEY > Create new key.
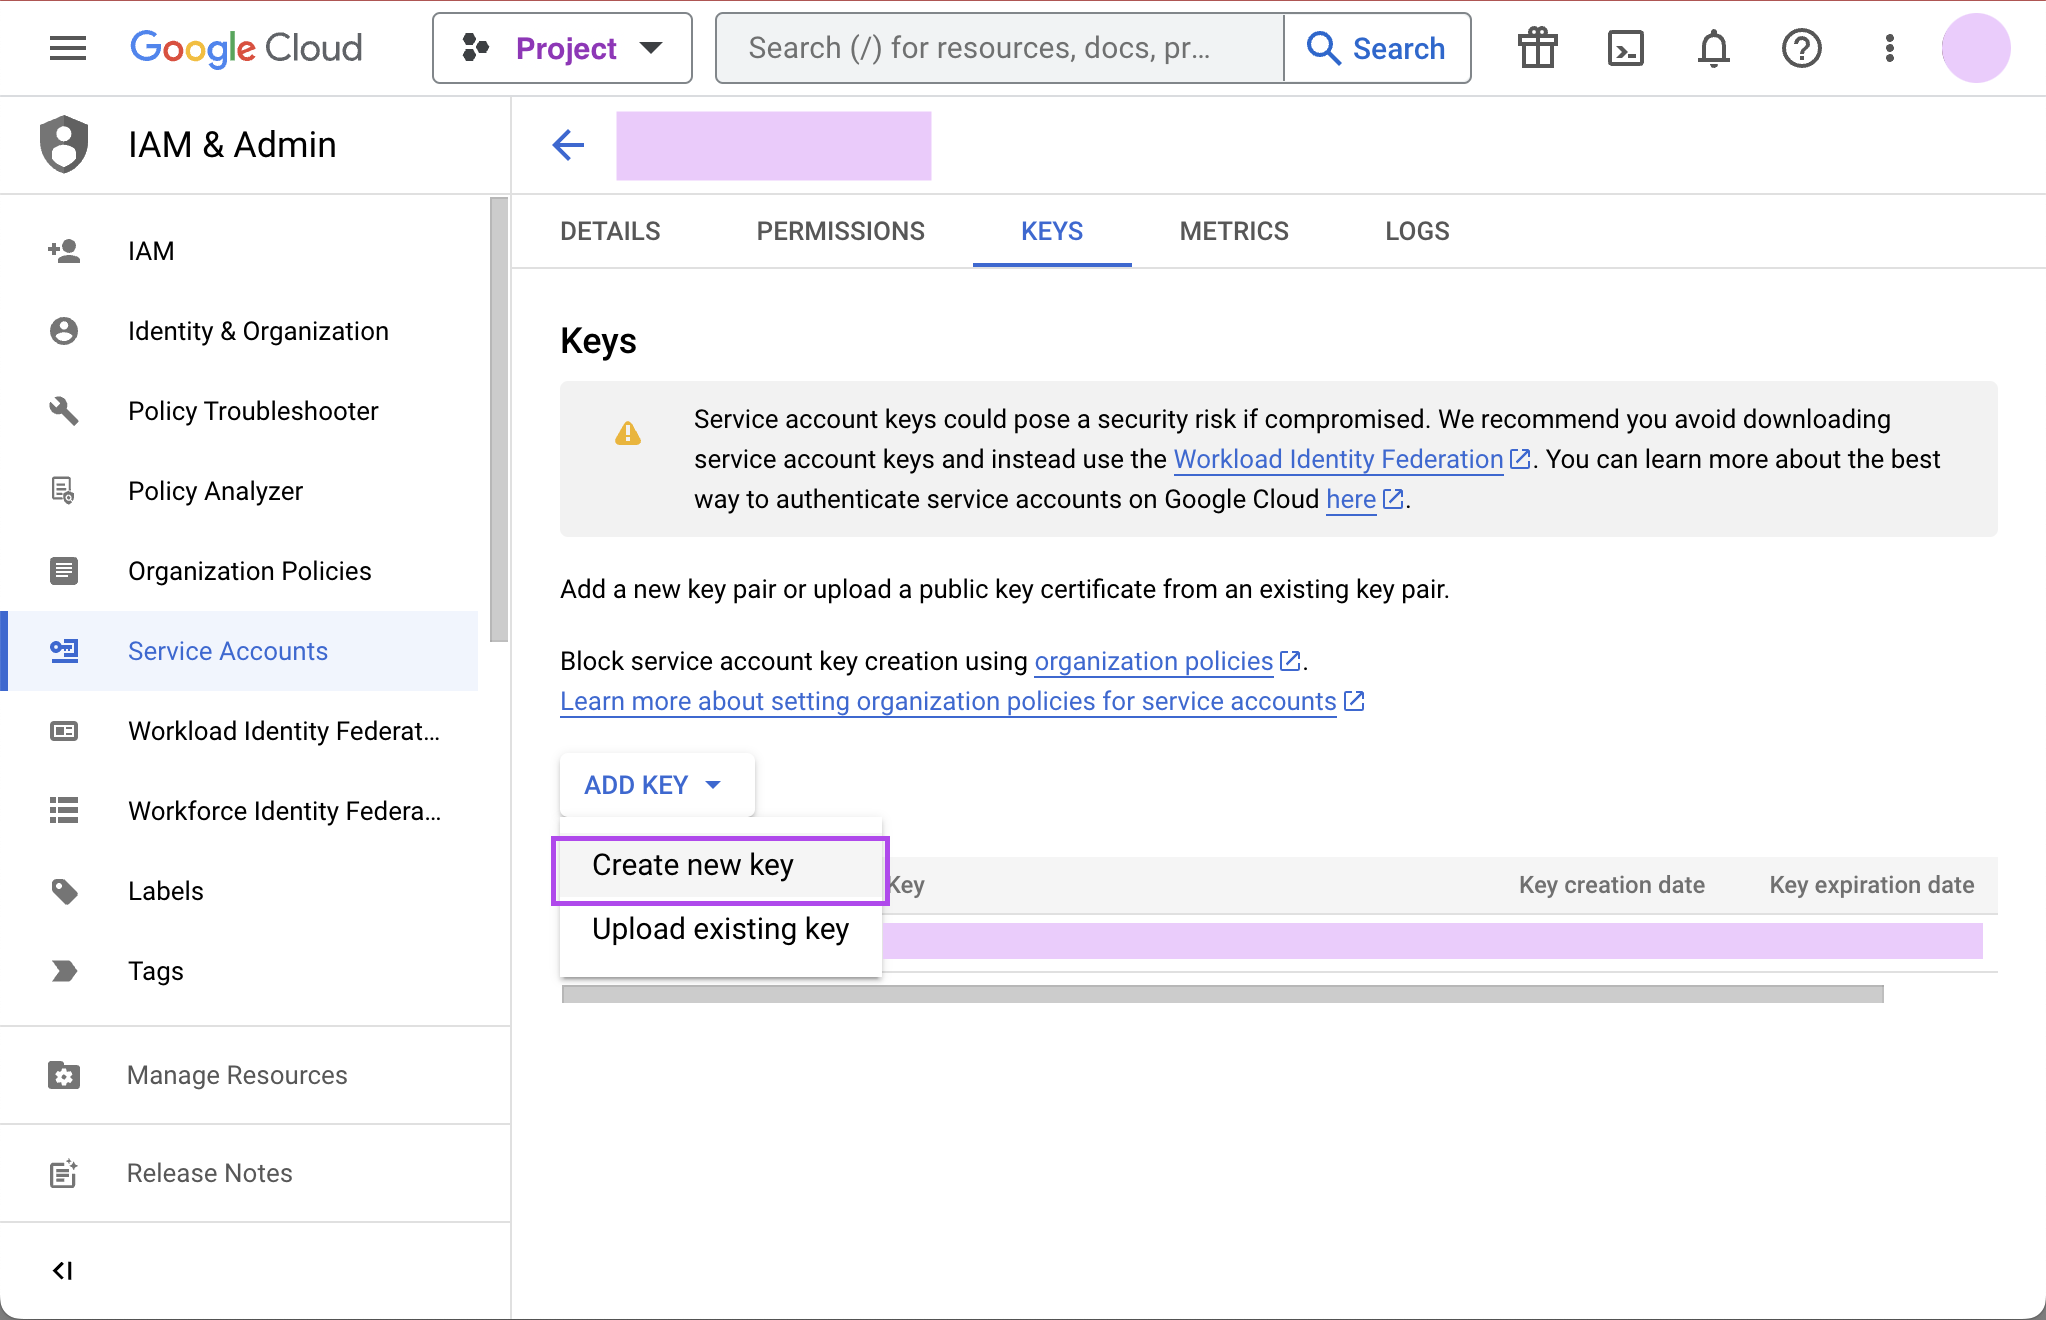
-
Click CREATE to create and download the JSON key file. Save the private key file to a secure place where you can easily retrieve it when setting up the connection in Analyst Studio.
-
Return to Analyst Studio, and begin the process to connect a BigQuery database. When you see the form to enter your BigQuery credentials, first enter a name (internal to Analyst Studio) for the new database connection.
-
In the Project ID field, enter the BigQuery project ID. It can be found in the URL of your Google Developers Console. The URL should be structured like this:
https://console.developers.google.com/apis/library?project=MY_PROJECT_ID -
In the Service Account Email Address field, add your service account’s email address that you noted in step 3.
-
Under the Key field, click Choose File and select the private key file you downloaded in step 6.
-
Click Connect to complete the connection.
Standard vs. legacy SQL
When connecting to BigQuery, you will choose either legacy SQL or standard SQL as the default SQL dialect for that connection. Most users choose standard SQL, which is similar to industry standard SQL dialects used by other databases.
Regardless of your choice as the connection’s default, users can specify which dialect they would like to use on a query-by-query basis by including either #standardSQL or #legacySQL in the Query Editor.
A Workspace admin can change the default SQL preference of a BigQuery connection at any time by following these steps:
-
Navigate to the Data workspace and select Analyst Studio.
-
Click on your name in the upper left corner of the window.
-
Click Workspace Settings.
-
Under the Data section, click Connections.
-
Click on the BigQuery connection you want to update.
-
In the upper right corner of the page, click on Settings.
-
Toggle standard SQL on or off.
-
Before your settings are updated, you will need to re-upload your service account’s P12 key. Learn more about BigQuery service accounts and P12 keys.
-
Click Save Changes.
Take care when changing the default SQL dialect for an existing connection, as any queries written using that connection that are written in the previous default SQL dialect may no longer work.
Connecting to Analyst Studio
-
Return to Analyst Studio, and begin the process to connect a BigQuery database. When you see the form to enter your BigQuery credentials, first enter a name for the new database connection.
-
In the Project ID field, enter the BigQuery project ID. It can be found in the URL of your Google Developers Console. The URL should be structured like this:
https://console.developers.google.com/apis/library?project=MY_PROJECT_ID. -
In the Service Account Email Address field, add your service account’s email address that you noted in step 4.
-
Under the Key field, click Choose File and select the private key file you downloaded in step 3.
-
Click Connect to complete the connection.
Use BigQuery to query Google Sheets
You can use Analyst Studio to query Google Sheets in BigQuery. The first step, enabling your Google Drive API, only needs to be done once.
-
Enable Google Drive API.
Navigate to the Google Developer Console and select your project from the project dropdown menu. From the left menu, click on Library. Under Google Apps API, click on Drive API to enable the API from that page.
-
Create a table in BigQuery from your Google Sheet.
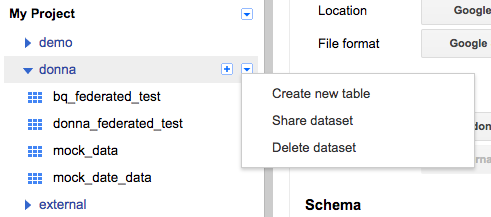
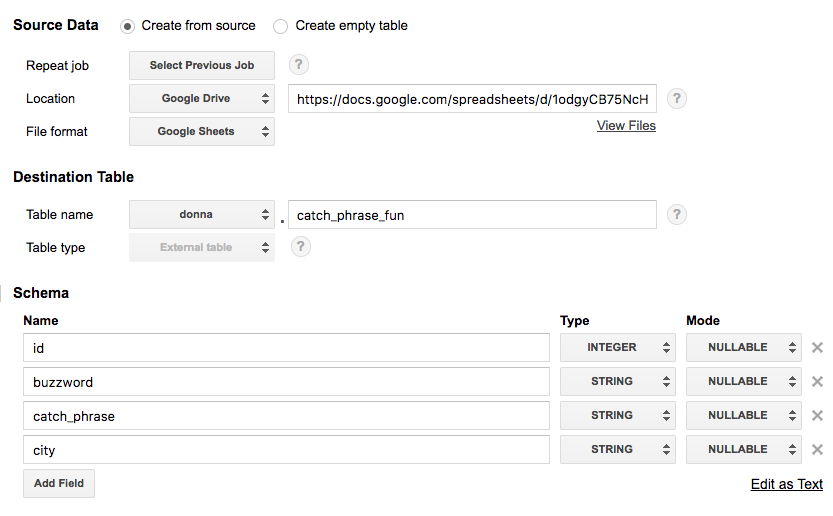
Go to the BigQuery Web UI. In the navigation, hover over a schema name and click the down arrow icon next to the name. Choose Create new table.
Select Google Drive for the new table’s location and paste the Google Sheet URL (not the shared link, but the actual URL you use to view the Sheet) into this field. Choose Google Sheets as the Format. Then add all the column names and types from your Google Sheet under Schema. Click Create Table when ready.
-
Enable Google Sheets for Analyst Studio Use.
-
For Analyst Studio to query your new table, share your Google Sheet with the service account email address you used to connect Analyst Studio to BigQuery. You can also share folders in your drive with this email address, which will allow Analyst Studio to query every sheet in that folder.
-
To get your service account email address, go to your Google Cloud Console, switch to your Project, and click on Service Accounts. Copy the service account email address you used to connect Analyst Studio to BigQuery.
-
To share a sheet or folder, click Share on the Google Sheet or in the folder, and paste the service account email address into the Share email field.
-
Note that BigQuery schemas don’t refresh automatically in Analyst Studio. To see this table appear in your schema browser, go to Workspace Settings and click Connections under the Data section. Choose your BigQuery connection, and click the green Refresh button in the upper right corner to update the schema browser in Analyst Studio.
-
Looker SQL
Supported JDBC drivers and known issues
| Driver | Driver Release Date | Analyst Studio Removal Date |
|---|---|---|
(Recommended) Avatica Looker version 1.24.1 |
8/6/2024 |
|
Avatica Looker version 1.23.4 |
9/20/2023 |
For known limitations, see Looker’s documentation.
Connecting to Analyst Studio
You will also need the following to set up the connection in Analyst Studio:
-
Host: The url of your Looker instance (for example, test123.looker.com).
-
Username: The Client ID portion of the Looker API key.
-
Password: The Client Secret portion of the Looker API key.
Start by connecting a database.
From the dropdown, select Looker SQL.
Writing Looker SQL queries in Analyst Studio
To write a new Looker SQL query, navigate to the SQL editor and select your Looker Open SQL connection from the database dropdown.
By default, this connection will surface all available schemas (LookML Models) and tables (Explores). To reference a field within your query, use the following syntax:
Note to use backticks around schema, table, and column identifiers.
Wrap any LookML measures in the special function AGGREGATE(), whether it is in a SELECT clause, a HAVING clause, or an ORDER BY clause.
You cannot use LookML measures in a GROUP BY clause.
SELECT `view.field`
  FROM `model`.`explore`
  LIMIT 10;
SELECT `customers.state`, `customers.city`,
AGGREGATE(`orders.total_amount`)
FROM `ecommerce`.`orders`
GROUP BY `customers.state`, `customers.city`
HAVING AGGREGATE(`orders.count`) > 10
ORDER BY 3 DESC LIMIT 5;Microsoft SQL Server
Additionally supports: Azure SQL Database, Azure Synapse SQL, Google Cloud SQL for SQL Server
Supported JDBC drivers and known issues
| Driver | Driver Release Date | Analyst Studio Removal Date |
|---|---|---|
Microsoft v 12.8.1 |
8/22/2024 |
|
(Recommended) Microsoft v 9.4.1 |
12/7/2021 |
|
Microsoft v 9.2.1 |
3/2/2021 |
|
Microsoft v 8.2.2 |
3/24/2020 |
There are no known issues for this driver.
Database configuration instructions
Azure SQL Database
To connect your Microsoft Azure SQL instance, you must grant Analyst Studio access to your database.
-
Log in to your Azure account and select SQL Databases from the left navigation.
-
Select the SQL database you would like to connect.
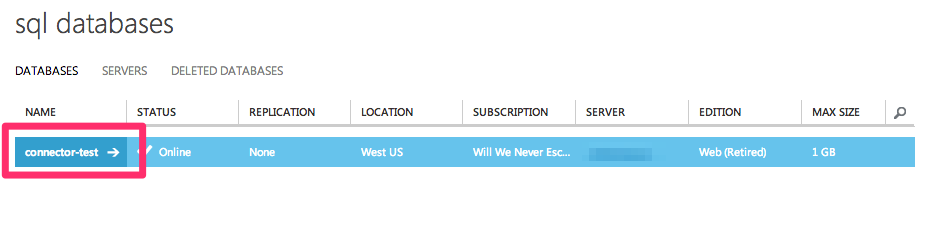
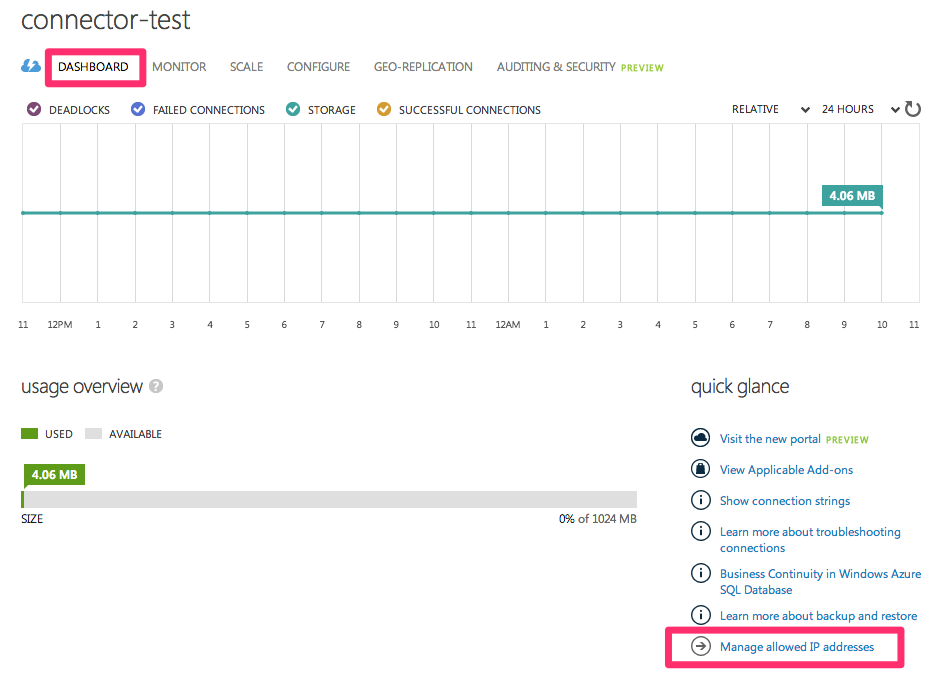
-
Click the Dashboard link at the top of the page and click Manage Allowed IP Addresses.
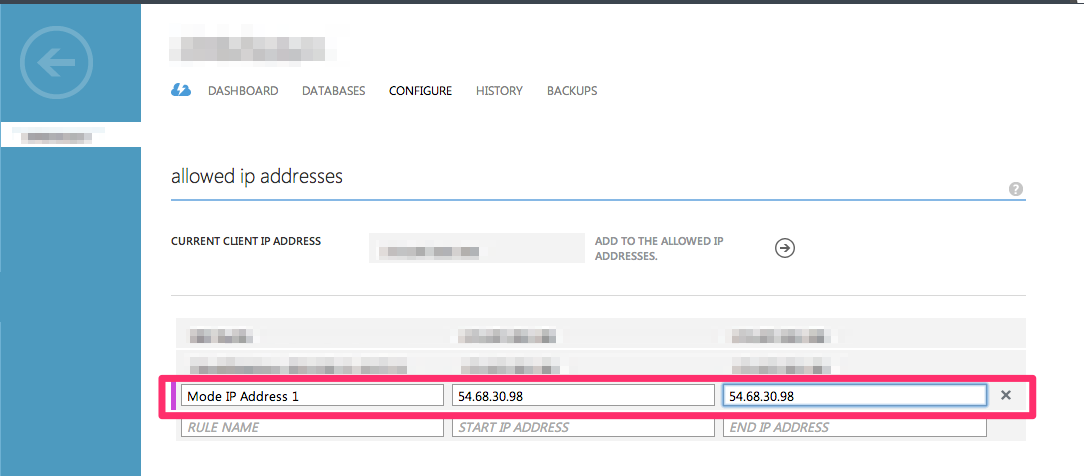
-
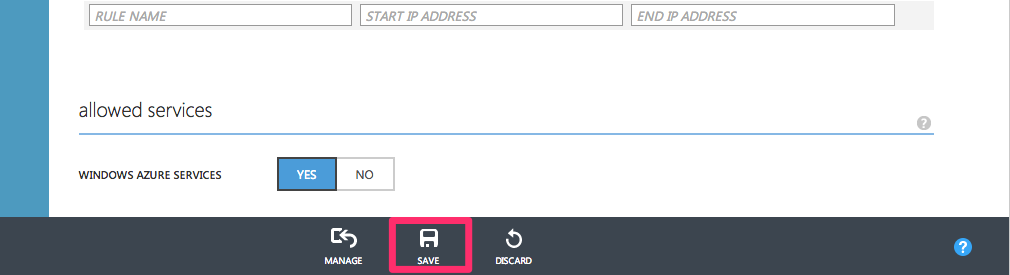
Add a new rule for Analyst Studio’s IP address using the following information:
-
Rule Name: Mode 1
-
Start IP Address:
54.68.30.98 -
End IP Address:
54.68.30.98
-
-
Add a rule for the remaining seven Analyst Studio IP addresses:
-
54.68.45.3 -
34.209.23.118 -
54.188.241.100 -
52.43.195.103 -
3.224.146.111 -
54.221.238.89 -
52.20.173.236
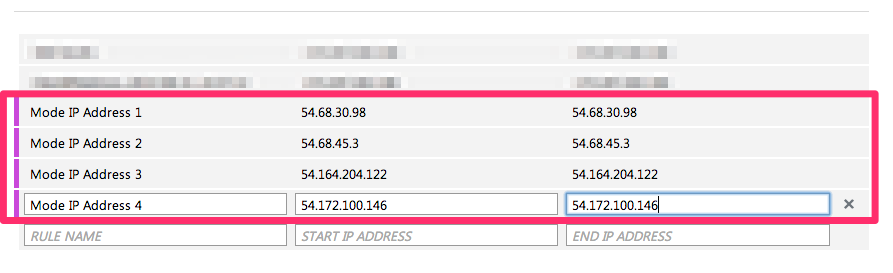
-
-
Click Save at the bottom of the screen.
MySQL
Additionally supports: Amazon Aurora MySQL, MariaDB, SingleStore, Google Cloud SQL for MySQL
Supported JDBC drivers and known issues
| Driver | Driver Release Date | Analyst Studio Removal Date |
|---|---|---|
(Recommended) MySQL Connector/J 9.0.0 |
7/1/2024 |
|
MySQL Connector/J 8.0.33 |
4/18/2023 |
|
MySQL Connector/J 8.0.28 |
1/18/2022 |
|
MySQL Connector/J 8.0.26 |
7/20/2021 |
|
MySQL Connector/J 8.0.23 |
1/18/2021 |
|
MySQL Connector/J 8.0.20 |
4/27/2020 |
The following are known issues with the current supported drivers. Analyst Studio continues to advocate on our customers' behalf for vendors and open-source communities to resolve these issues.
| Driver | Known Issue | Further Details |
|---|---|---|
MySQL Connector/J 8.0.28 |
Removal of TLS v1 and v1.1 support |
Connections should be made using the TLSv1.2 and TLSv1.3 protocols, which are more secure. |
MySQL Connector/J 8.0.20 |
Server Timezone Specification is required |
Customers without a specified Server Timezone for their databases will see queries fail if any of the time zones (application/database servers) are not in the format |
Oracle
Additionally supports: Oracle Autonomous Database
Supported JDBC drivers and known issues
| Driver | Driver Release Date | Analyst Studio Removal Date |
|---|---|---|
Oracle v 23.5 |
7/26/2024 |
|
(Recommended) Oracle v 21.1 |
1/14/2021 |
|
Oracle v 19.11 |
6/4/2021 |
|
Oracle v 19.7 |
4/1/2019 |
There are no known issues for these drivers.
Database configuration instructions
Oracle Autonomous Database (Public Endpoint)
-
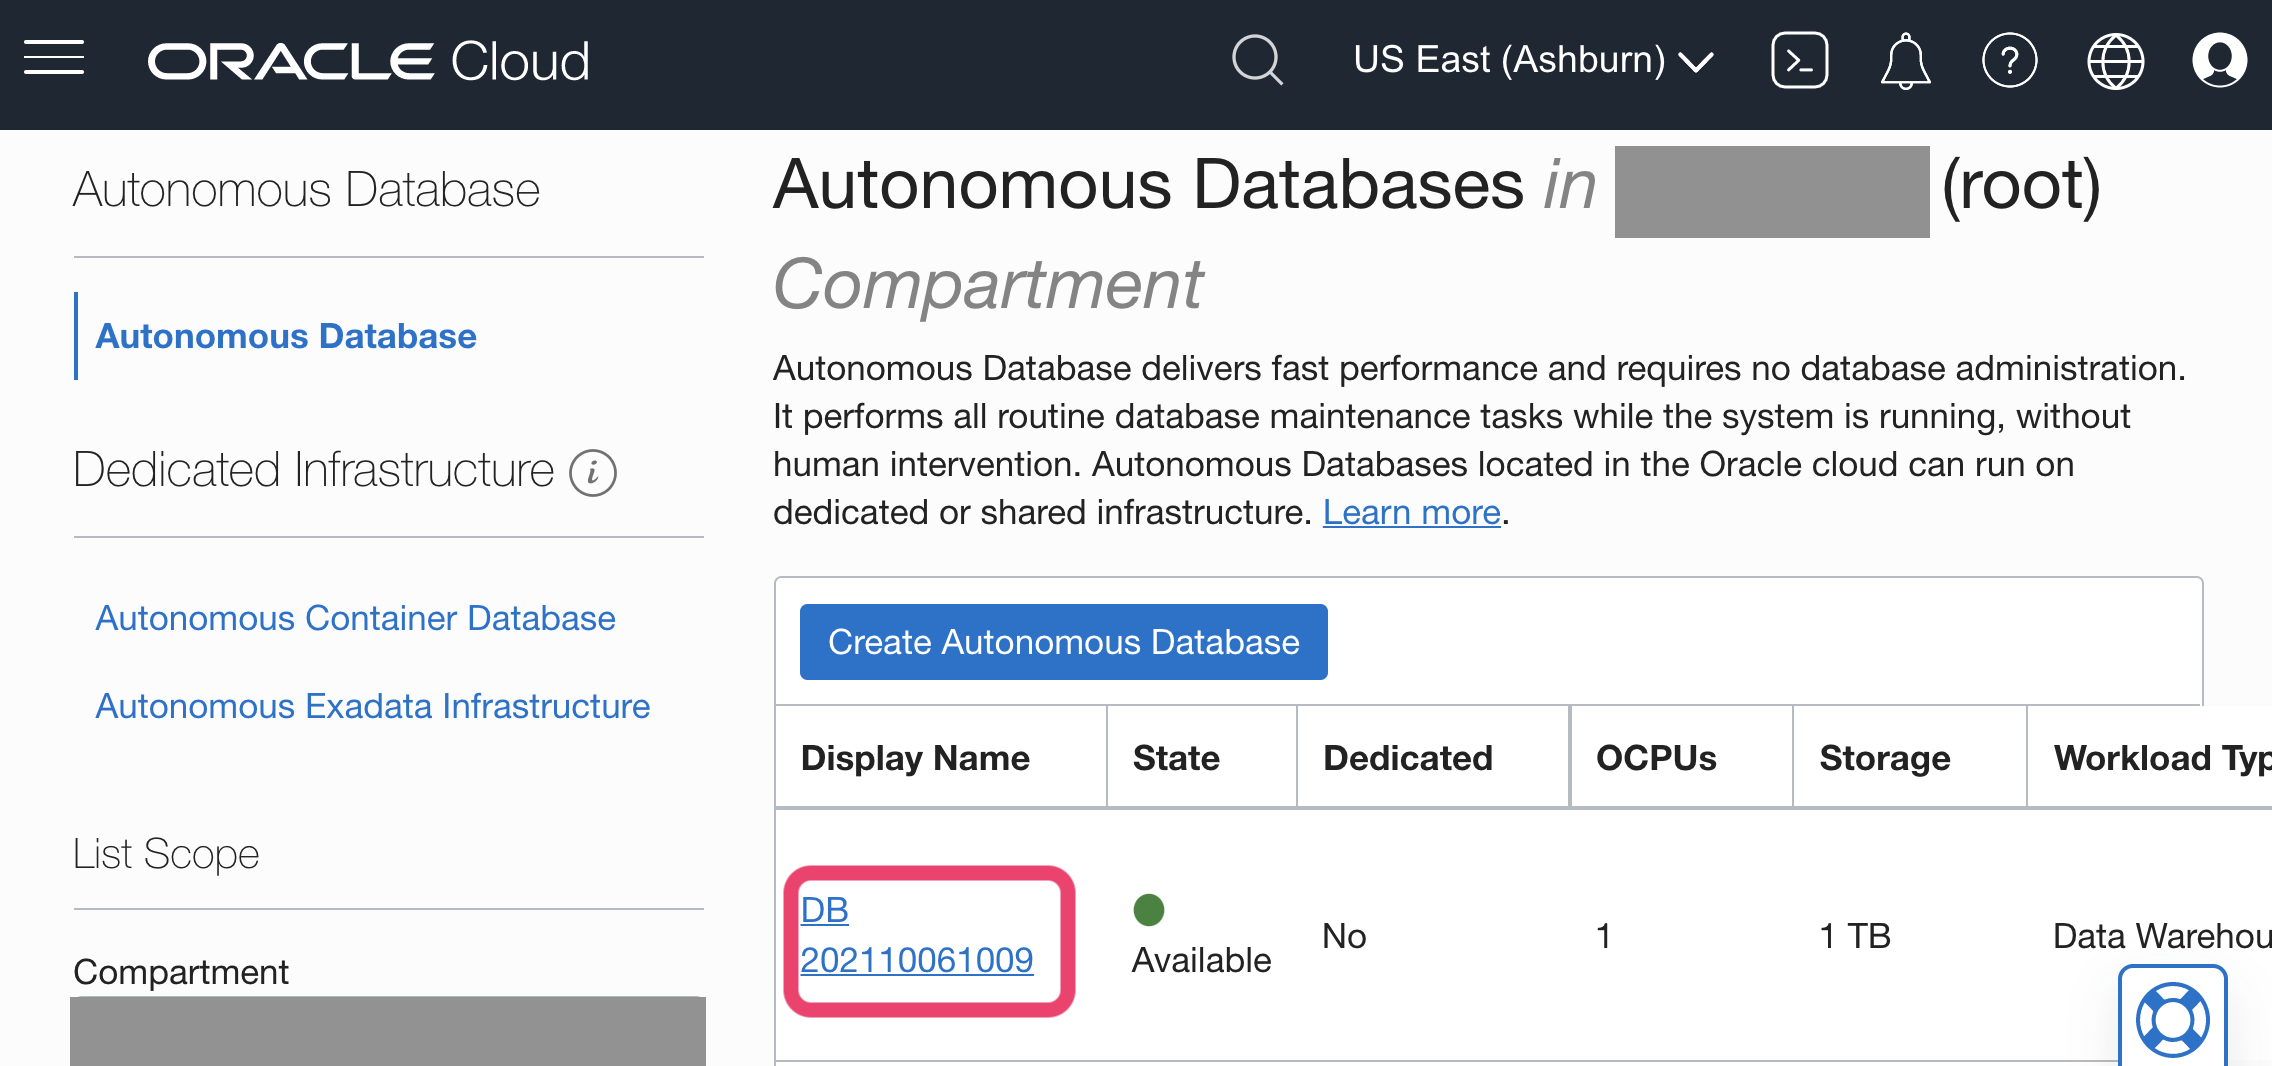
Navigate to your Oracle Cloud Autonomous Databases page and click on your instance.
-
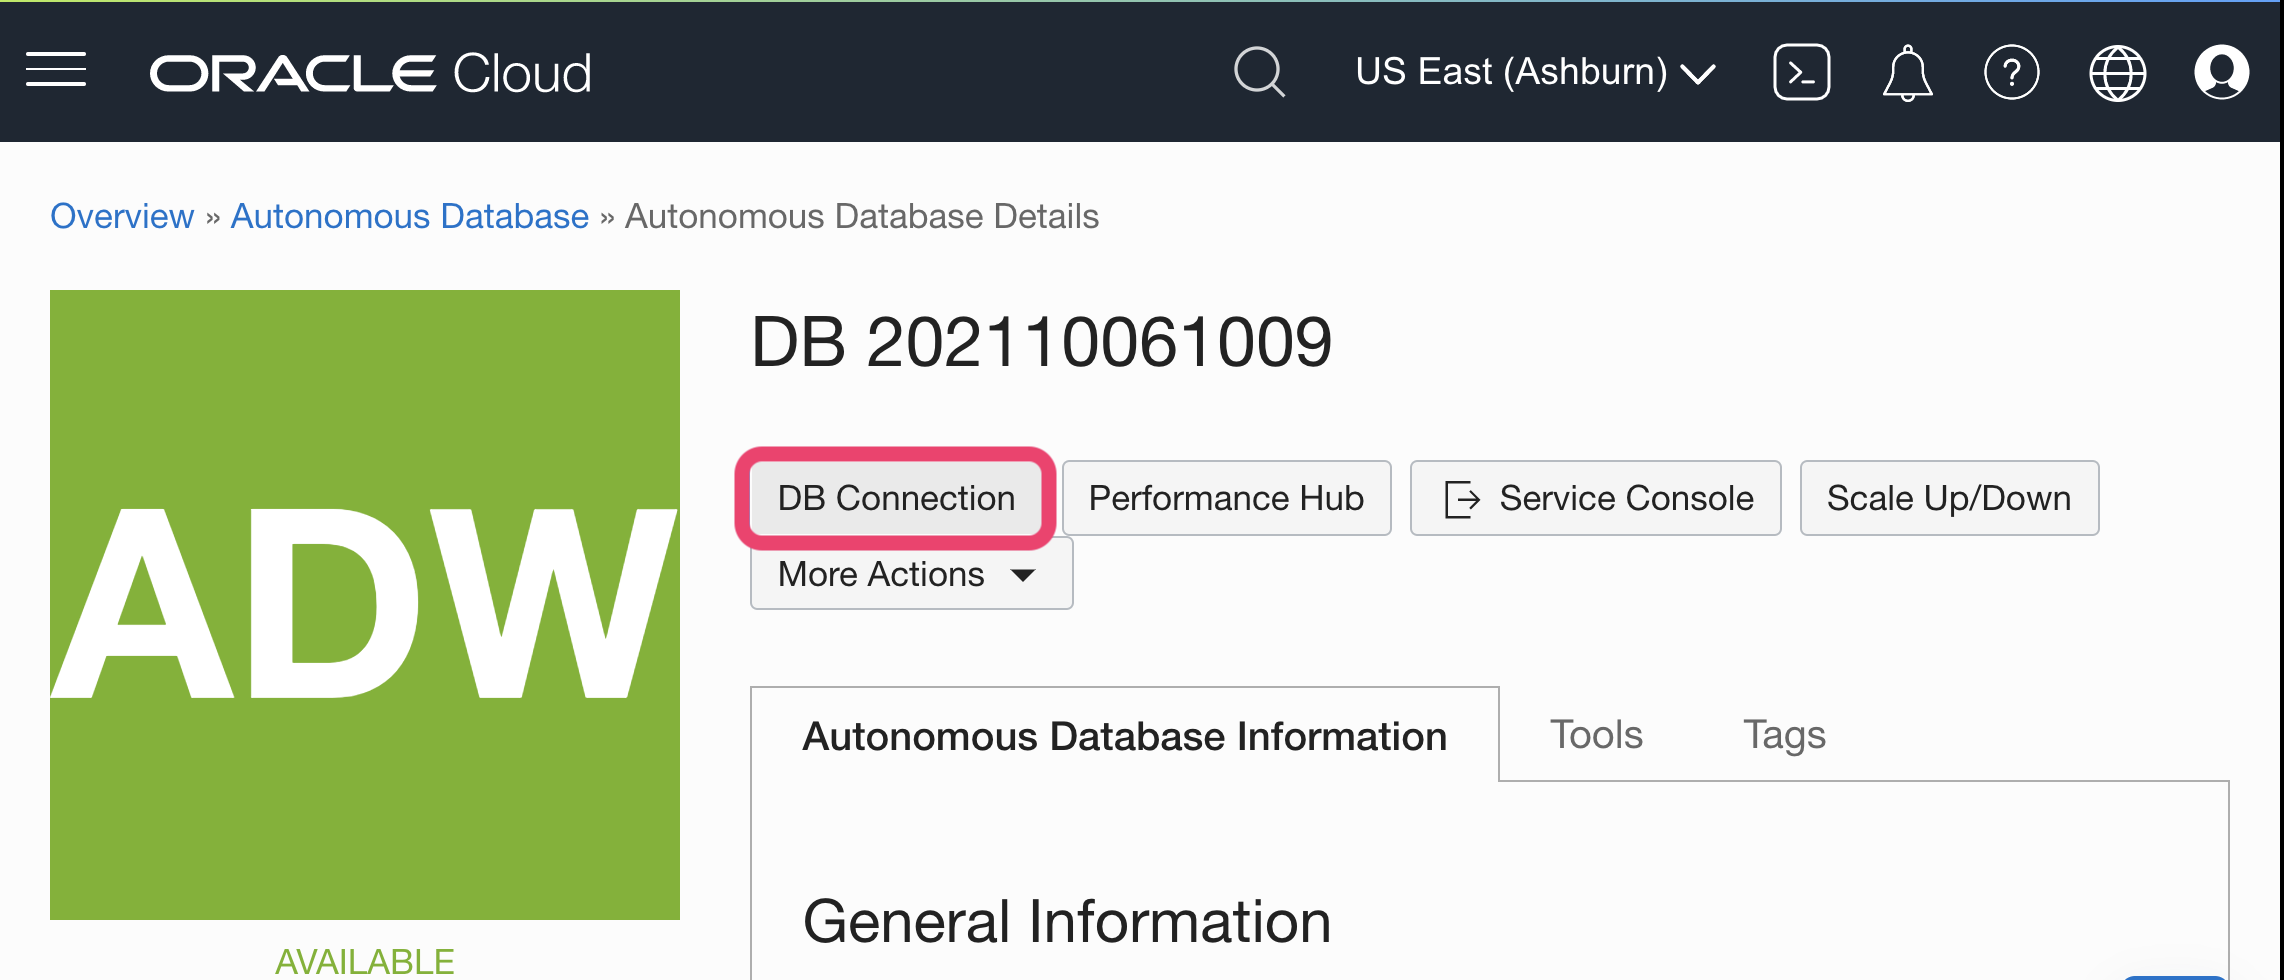
Click on DB Connection.
-
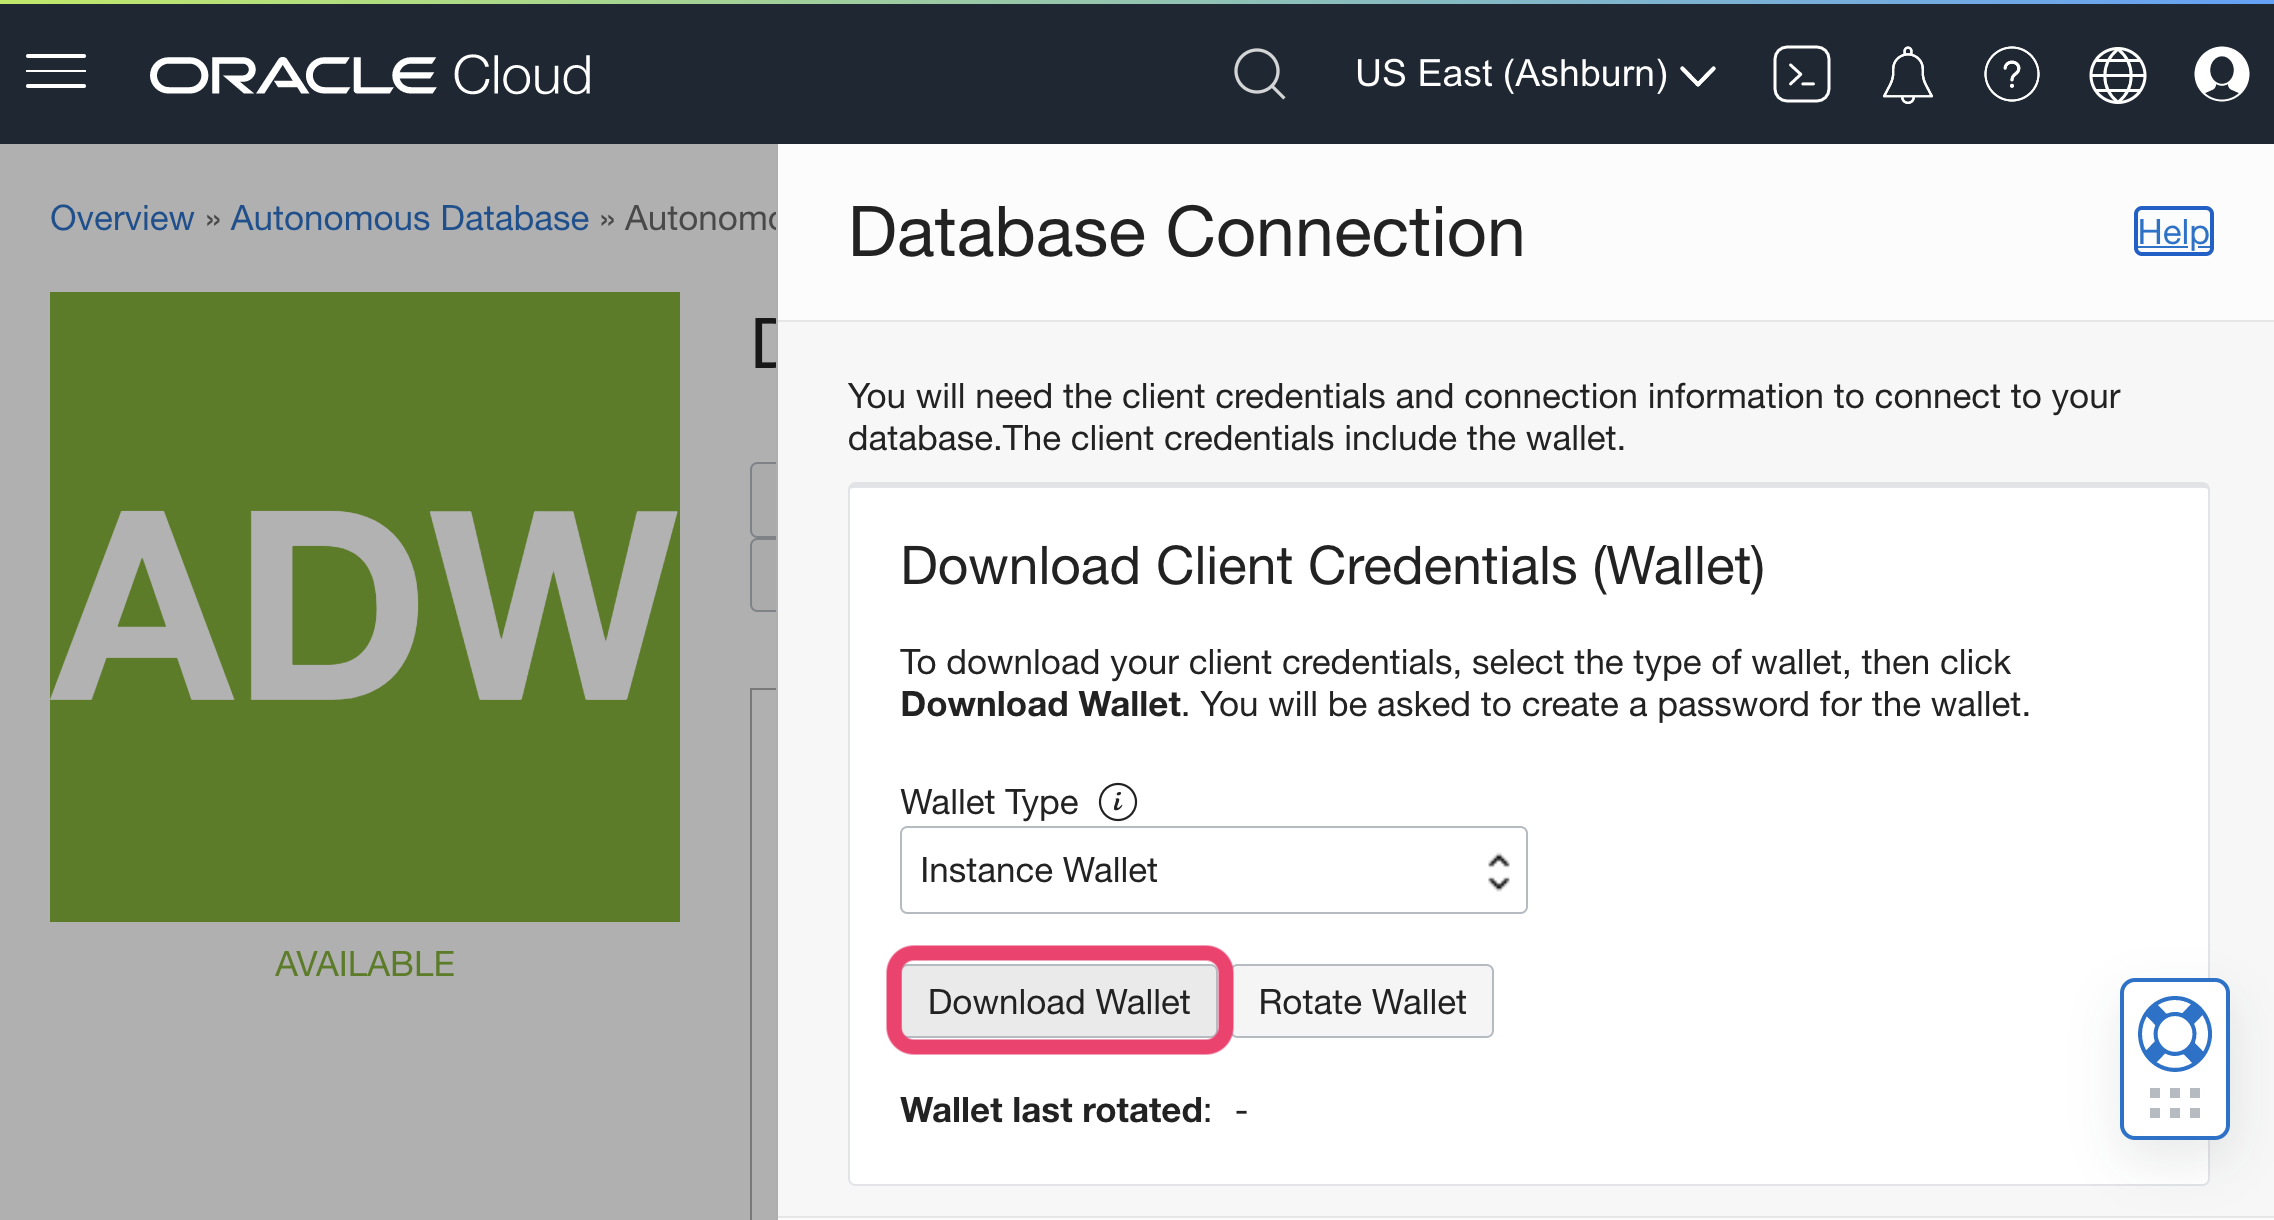
Click on Download Wallet to retrieve the zip file to upload to Analyst Studio (instance wallet contains credentials for single DB and regional contains all DBs in that region).
-
Scroll down to see the Database Service (TNS) Names to copy into Analyst Studio. It is usually the database name + “_” + low, medium or high. These predefined names indicate the amount of resources to each SQL statement; high results in the highest performance, but supports only a few concurrent queries. To restrict access to certain database service names, you can delete the entries from the tnsnames.ora file in the wallet.
Oracle Autonomous Database (Private Endpoint)
| mTLS requirement must be relaxed to allow for TLS (default for ADB is to require mTLS). |
-
Navigate to your Oracle Cloud Autonomous Databases page and click on your instance.
-
Click on DB Connection.
-
Scroll down to select the Connection string to the desired TNS name to copy into Analyst Studio.
PostgreSQL
Additionally supports: Amazon Aurora PostgreSQL, HeapSQL, Timescale, Citus, Cube, Google Cloud SQL for PostgreSQL
Supported JDBC drivers and known issues
| Driver | Driver Release Date | Analyst Studio Removal Date |
|---|---|---|
(Recommended) PostgreSQL v 42.7.4 |
8/23/2024 |
|
PostgreSQL v 42.6.0 |
3/18/2023 |
|
PostgreSQL v 42.3.1 |
2/15/2022 |
|
PostgreSQL v 42.2.23 |
7/6/2021 |
|
PostgreSQL v 42.2.19 |
2/18/2021 |
|
PostgreSQL v 42.2.14 |
6/4/2020 |
There are no known issues with this driver.
Database configuration instructions
HeapSQL
Once you’ve signed up for Heap and enabled Heap SQL, your Customer Success Manager will provide you with your Heap credentials for connecting to your database. If you need your Heap credentials, please email support@heapanalytics.com for help.
Once you have your credentials, follow the steps below to connect Analyst Studio:
-
Log in to Analyst Studio and follow to steps to connect a database to Analyst Studio.
-
Select Heap from the list of databases.
-
Enter your Heap credentials and click Connect. You’ll land on a page that displays your database schema.
-
Click New Query in the top navigation to start writing queries.
Presto
Additionally supports: PrestoDB
Analyst Studio has separated out Trino and Starburst as two new connectors.
Supported JDBC drivers and known issues
| Driver | Driver Release Date | Analyst Studio Removal Date |
|---|---|---|
PrestoDB v 0.287 |
5/19/2024 |
|
(Experimental) PrestoDB v 0.273.3 |
6/14/2022 |
|
Trino v 364 |
11/1/2021 |
|
Trino v 356 |
5/1/2021 |
|
Trino v 350 |
12/18/2021 |
|
(Recommended) PrestoSQL v 338 |
8/31/2020 |
There are no known issues for these drivers.
Snowflake
Supported JDBC drivers and known issues
| Driver | Driver Release Date | Analyst Studio Removal Date |
|---|---|---|
Snowflake v 3.20.0 |
10/30/2024 |
|
(Recommended) Snowflake v 3.16.0 |
4/29/2024 |
|
Snowflake v 3.13.29 |
3/17/2023 |
|
Snowflake v 3.13.27 |
1/30/2023 |
|
Snowflake v 3.13.14 |
1/21/2022 |
|
Snowflake v 3.13.6 |
7/19/2021 |
|
Snowflake v 3.13.1 |
3/1/2021 |
The following are known issues with the current supported drivers. Analyst Studio continues to advocate on our customers' behalf for vendors and open-source communities to resolve these issues.
| Driver | Known Issue | Further Details |
|---|---|---|
All |
Date functions not displaying correctly |
Date functions like DATE_TRUNC do not work as expected due to Analyst Studio’s results formatter. Workaround is to use a function to convert the date to string. |
Snowflake v 3.13.1 |
Timestamps with timezone are not supported |
Analyst Studio does not display timestamp values with the timezone. Instead, convert all timestamps to one timezone for simplicity. SELECT current_timestamp() AS Date, + cast(convert_timezone('US/Eastern', Date) AS datetime) EST_date;
|
Connecting to Analyst Studio via key pair authentication
Please follow the Snowflake documentation for configuring key pair authentication.
-
Generate the private key. There is the option to generate encrypted or unencrypted private keys. Snowflake recommends encrypting with a passphrase to protect the private key.
-
Generate the public key by referencing the private key and assign the public key to the Snowflake user that will be used to access Analyst Studio.
-
Log in to Analyst Studio and follow to steps to connect a database to Analyst Studio.
-
Select Snowflake from the list of databases.
-
Select Authentication method: Key pair in the Analyst Studio connection form.
-
Enter the username of the assigned Snowflake user, upload the private key with a p8 file extension, and include the passphrase if the private key was encrypted.
-
Click Connect. You will land on a page that displays your database schema.
Treasure Data
Supported JDBC drivers and known issues
| Driver | Driver Release Date | Analyst Studio Removal Date |
|---|---|---|
PrestoDB v 0.208 |
8/8/2018 |
There are no known issues with this driver.
Database configuration instructions
Please follow the steps outlined in the Treasure Data documentation to connect Treasure Data to Analyst Studio.
If you need help finding your database credentials, please contact your Treasure Data account manager at info@treasure-data.com.
Cloud environments
Amazon Web Services
Overview
We have two ways of connecting to your RDS instance depending on your AWS settings. If your instance is publicly accessible, then Analyst Studio can connect directly to it. For databases that are not accessible, you can use the Bridge connector. We’ll start by determining if your database is accessible to us.
Accessibility
-
Navigate to your RDS Instance Console.
-
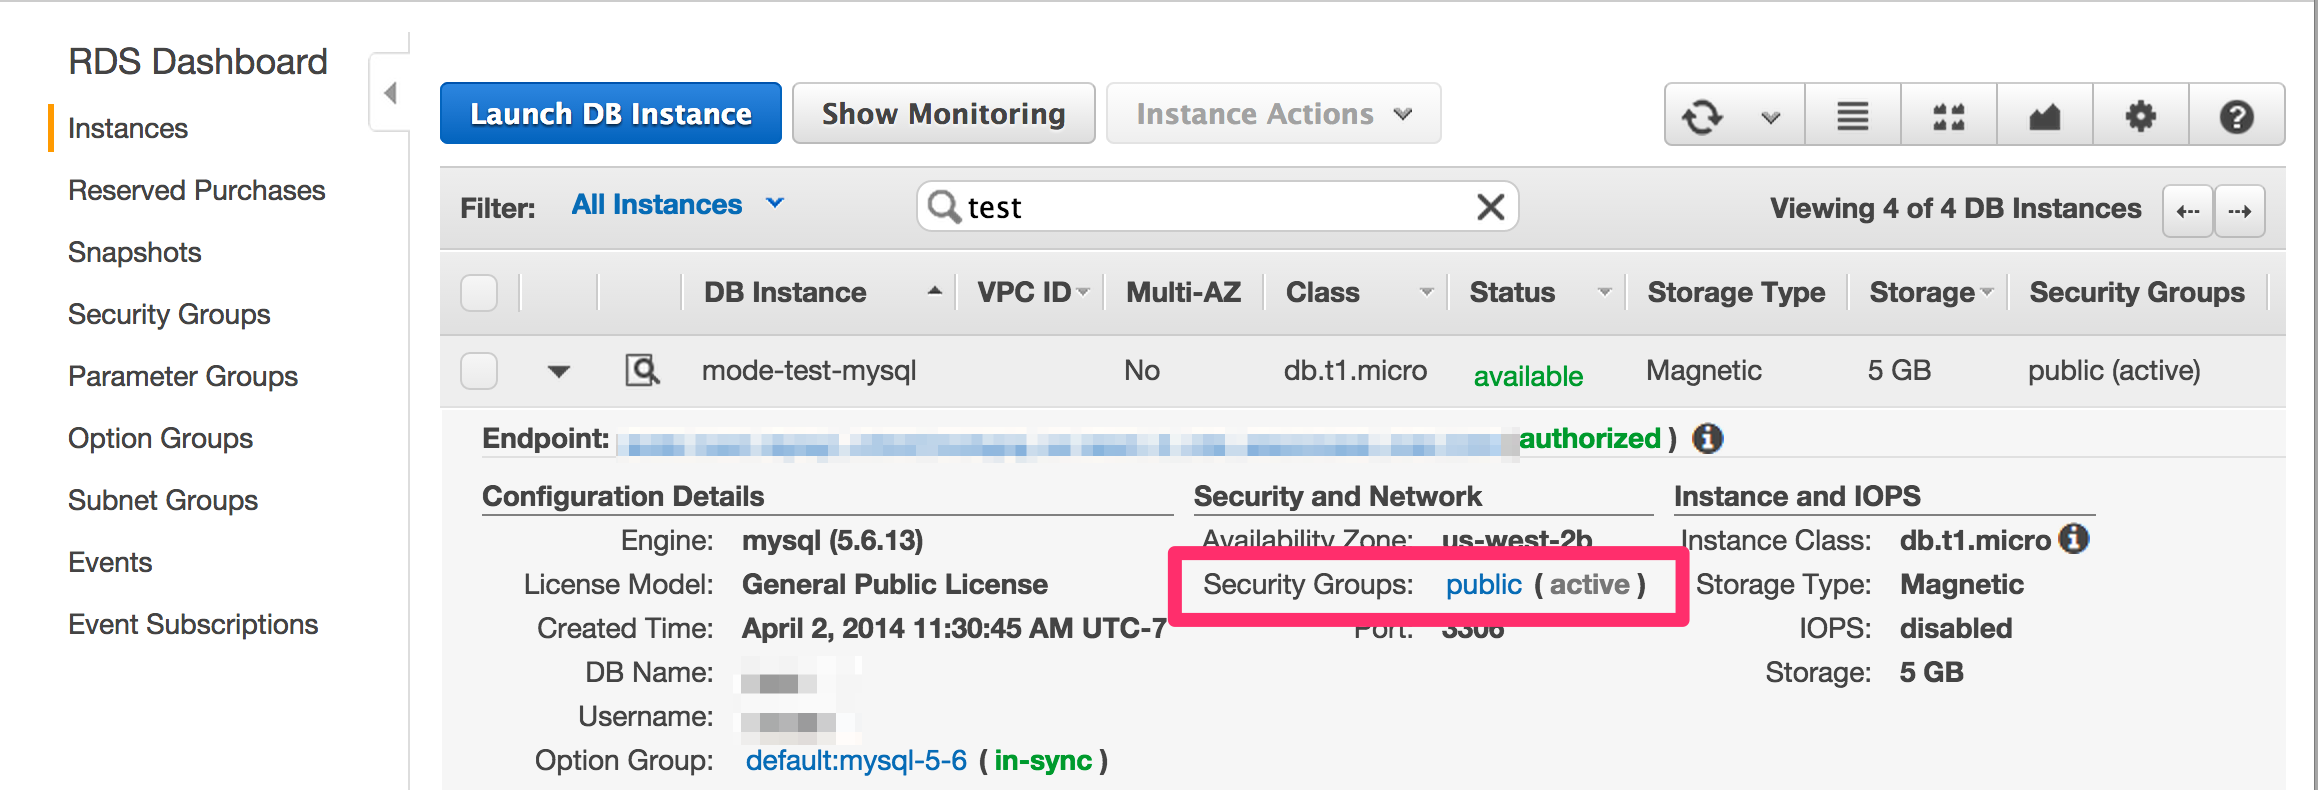
Click the arrow and then magnifying glass to view the details of the instance that you want to connect.
-
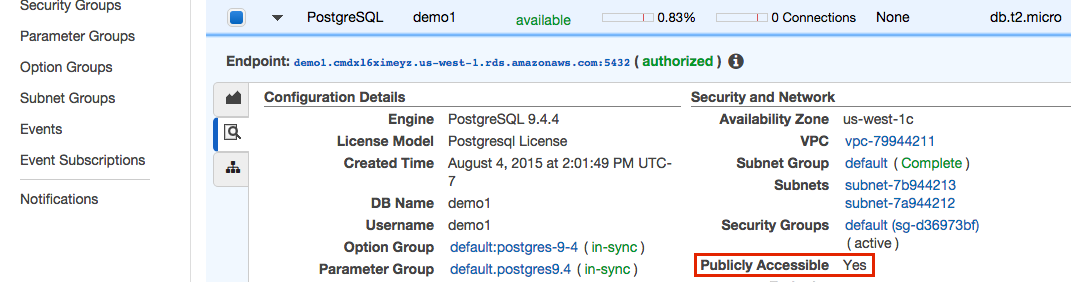
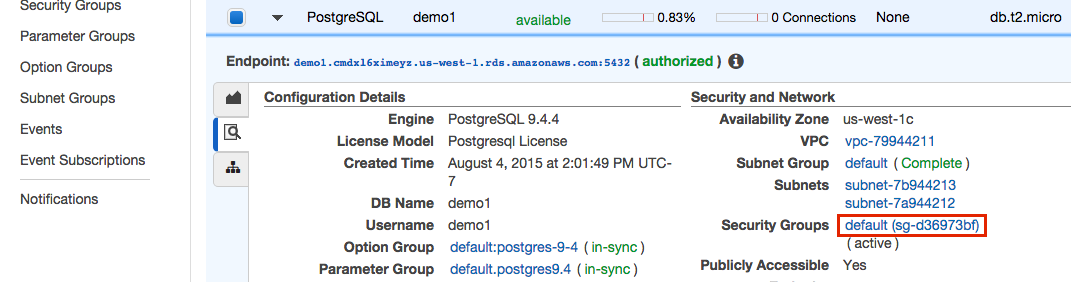
Look under Security and Network. Your instance is in a VPC if there’s an entry labeled VPC. It is typically found below Availability Zone and above Security Groups. If you don’t have an entry here, then your instance is not in a VPC, and you can jump to the Security Groups section below.
-
Instances in VPCs can be public or private. We can find out by looking under Security and Network again. This time for an entry labeled Publicly Accessible. If it is followed by a Yes, then you can jump to the Security Groups section below.
-
To connect to instances in a private VPC, you’ll need to install our Bridge connector.
Security groups
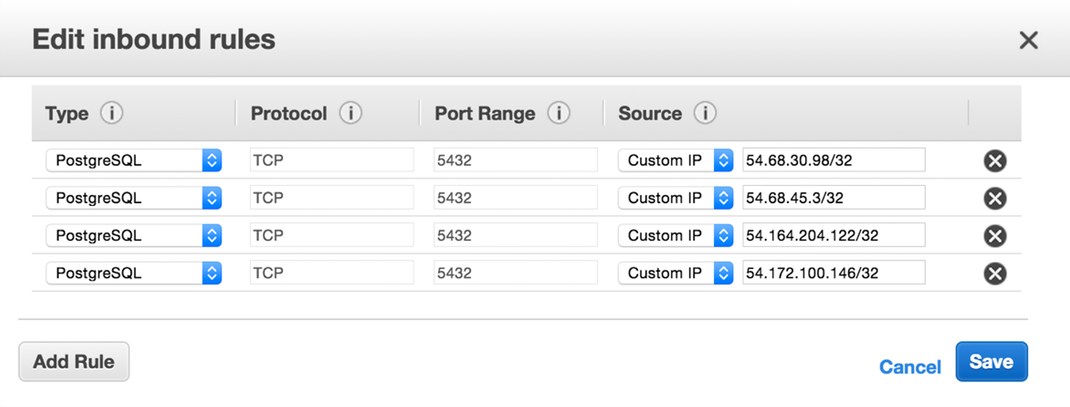
All connections from Analyst Studio will come from one of the eight IP addresses below. In most cases, you’ll need to add these addresses to your RDS instance’s Security Group. We’ve broken the steps down into two sections: VPC and No VPC. Security Groups in a VPC are managed the same between EC2 and RDS. RDS instances outside of a VPC have a different process.
-
54.68.30.98/32 -
54.68.45.3/32 -
34.209.23.118/32 -
54.188.241.100/32 -
52.43.195.103/32 -
3.224.146.111/32 -
54.221.238.89/32 -
52.20.173.236/32 -
18.219.18.49 -
3.20.219.67 -
3.130.46.196 -
18.190.82.112 -
18.219.27.193 -
18.224.75.176 -
3.143.83.15 -
3.22.39.190 -
52.15.221.243
VPC
-
Under Security and Network, click the security group name.
-
A new tab will be opened. Click on the Inbound tab and then Edit.
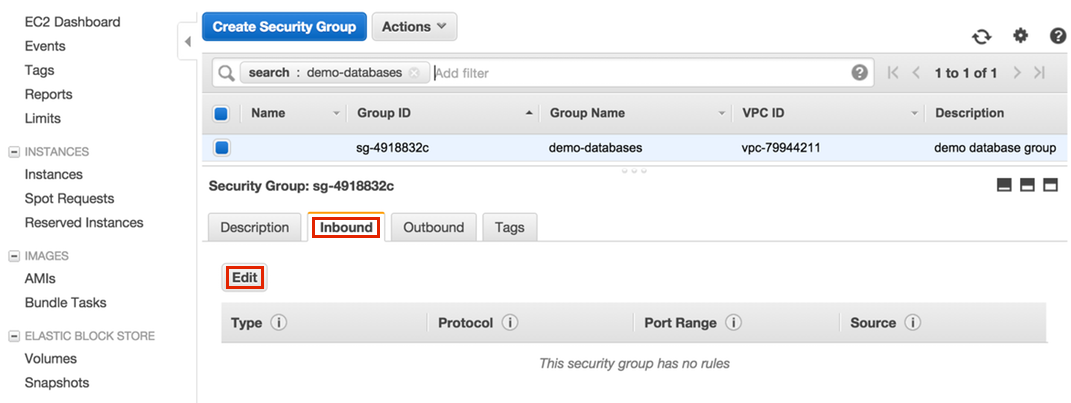
-
Find the RDS type that matches your instance (for example, PostgreSQL), enter each of our addresses, and then click Save.
No VPC
-
Under Security and Network, click the security group to which that database belongs.
-
At the bottom of the page, highlight the Connection Type selector and choose CIDR/IP.
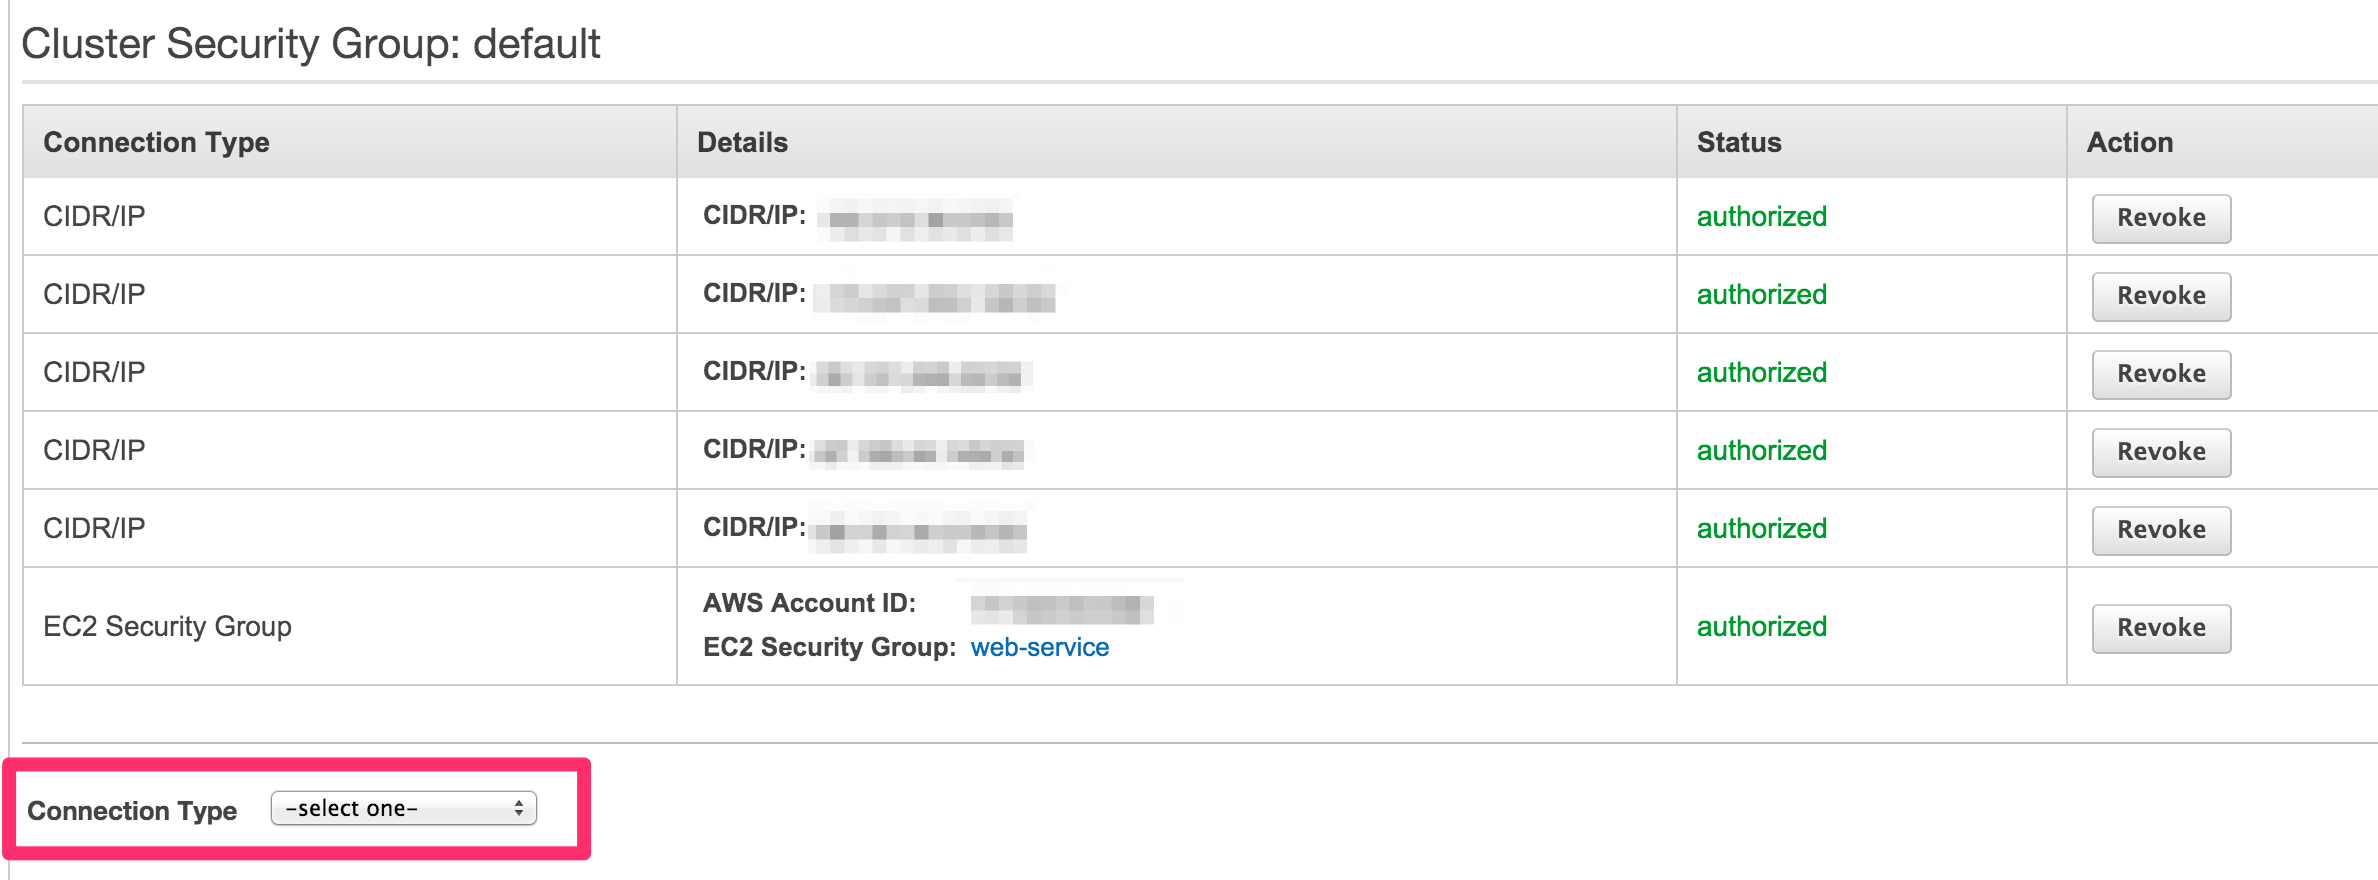
-
In the CIDR/IP to Authorize field, paste address:
54.68.30.98/32.
-
Click the blue Authorize button.
-
Repeat steps 1-4 for each of the addresses listed above.
FAQs
Q: How to import Analyst Studio results into a Google Sheet
While we currently do not support the ability to natively export or import data to and from a Google Sheet, we do have a step-by-step guide on how to query Google Sheets using BigQuery in Analyst Studio. You can also follow the instructions below for a custom way to import data from an Analyst Studio report to a Google Sheet programmatically.
To enable this feature in a Google Sheet, you can begin by following these steps:
-
Go to the Analyst Studio report and click View Details.
-
Click on the query on the left to access the query token in the URL.
-
Copy the query token from the URL
/queries/[QUERY_TOKEN]. -
Save the formula below somewhere safe because we will need to use it on our final step.
=importModeResult("https://app.mode.com/[WORKSPACE]/reports/[REPORT_TOKEN]/queries/[QUERY_TOKEN]")
In the formula above, please be sure to replace "WORKSPACE" with your workspace name as shown in any report URL, "REPORT_TOKEN" with the report token available in the URL, and "QUERY_TOKEN" with the query token that you just copied.
This formula will import the data from the Analyst Studio query into the Google Sheet once the following steps are completed. It will automatically use the last successful run of the query.
Setup
-
From a Google Sheet, click Extensions -> Apps Script from the top menu bar.
-
In the code editor, overwrite the existing code and paste the importModeResults function below ⬇️ into the code editor. Then, save it via the disk file icon.
function importModeResult(url) { var USERNAME = PropertiesService.getScriptProperties().getProperty('username'); var PASSWORD = PropertiesService.getScriptProperties().getProperty('password'); var token = getTokenFromUrl(url); var account = getAccountFromUrl(url); var query = getQueryFromUrl(url); var options = { headers: { 'Authorization': 'Basic ' + Utilities.base64Encode(USERNAME + ':' + PASSWORD, Utilities.Charset.UTF_8) } }; var reportUrl = 'https://app.mode.com/api/' + account + '/reports/' + token; var reportResponse = UrlFetchApp.fetch(reportUrl, options); var reportJSON = JSON.parse(reportResponse); var lastRunPath = reportJSON['_links']['last_successful_run']['href']; var queryRunUrl = 'https://app.mode.com' + lastRunPath + '/query_runs' var queryRunResponse = UrlFetchApp.fetch(queryRunUrl, options); var queryRunJSON = JSON.parse(queryRunResponse); var queryRuns = queryRunJSON['_embedded']['query_runs'] queryRuns.forEach(function(q) { if (q['query_token'] == query) { resultPath = q['_links']['result']['href'] } }) if (resultPath) { var csvPath = 'https://app.mode.com' + resultPath + '/content.csv' var csvResponse = UrlFetchApp.fetch(csvPath, options); var csvTextRaw = csvResponse.getContentText(); var csvText = csvTextRaw.replace(/(["'])(?:(?=(\\?))\2[\s\S])*?\1/g, function(e){return e.replace(/\r?|\r/g, '') }); return Utilities.parseCsv(csvText) } else { return 'Invalid URL!' } function getTokenFromUrl(url) { return url.split('/reports/')[1].slice(0,12) } function getAccountFromUrl(url) { return url.split('.com/')[1].split('/')[0] } function getQueryFromUrl(url) { return url.split('/queries/')[1].slice(0,12) } } -
In the code editor, click the gear icon -> Project Settings in the left-side menu, scroll down to the bottom, and click the Add Script Property tab.
-
Add a separate
usernameandpasswordproperty. The value of the username property should be an Analyst Studio API token. The value of the password property should be an Analyst Studio API secret. You can create a token and secret in the API Tokens tab of your Analyst Studio settings page. Here’s our documentation on how to generate API tokens. -
Once you save these properties, navigate back to your Google Sheet and add the
importModeResultformula into a cell in your Google Sheet. This will populate the query results.
Q: How to upload data via CSV?
Currently, we do not offer CSV uploads to private connections. You can utilize our Google Sheet integration to import flat files as Datasets into Analyst Studio.