Create, edit, or delete a user
You can create users directly in ThoughtSpot, or import users and user groups through SAML or similar protocols.
Create a user in ThoughtSpot
This procedure demonstrates how to create a user manually.
To create a new user and assign that user to groups, follow these steps:
-
Go to the Admin settings tab.
-
Under USER MANAGEMENT select Users from the side navigation bar.
-
Select the Add User button on the upper-right side of the list of users.
The Add user interface opens.
-
In the Add user interface, scroll or use the left-side menu to navigate to the appropriate section of the dialog, and enter the details for the new user.
-
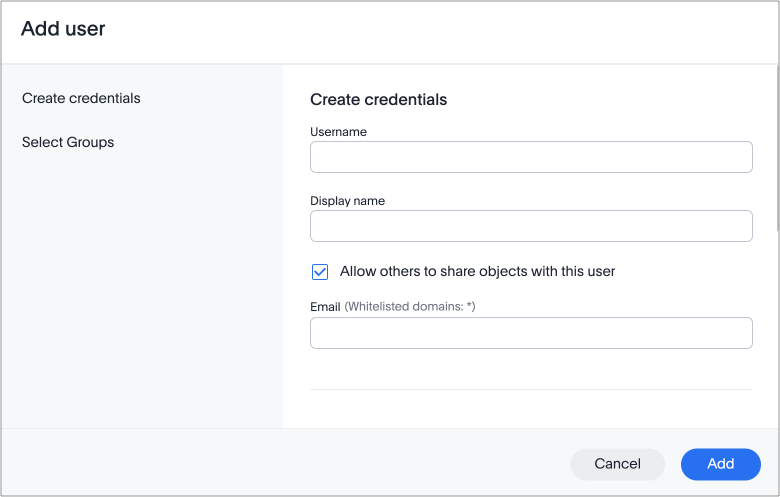
In the Create credentials section enter the following:
Username, Display name and Email are mandatory fields and cannot be left empty. If you attempt to add a user with the same user name as an existing user you will encounter an error. User names must be unique. - Username
-
A login name for the user. Usernames must be unique and lowercase. If you are using Active Directory to authenticate users, and your LDAP configuration requires users to be created manually (they are not created automatically in ThoughtSpot upon authentication), the username you specify has to be domain-qualified (
username@ldap.thoughtspot.com), and you must enter a dummy password.
- Display name
-
A unique name for the user (usually their first and last name).
-
The user’s email address. ThoughtSpot uses this for notification when another user shares something with them, for onboarding, and others.
During cluster configuration, the administrator specifies the email server domain. ThoughtSpot does not accept emails outside this domain. Contact ThoughtSpot Support to add new domains to a list of allowed domains.
-
In the Select Groups section, Search for or select the desired groups from the list of available groups.
The groups displayed are the groups available in the cluster, or the groups available in the specific org that the user is added to if your organization has org enabled.
-
-
Click Add to create the user.
Edit an existing user
As an administrator, you can edit user credentials or modify their group assignments when you edit a user.
To edit an existing user, follow these steps:
-
Go to the Admin settings tab.
-
Under USER MANAGEMENT select Users from the side navigation bar.
-
Click the Name of the user in the list to open the Edit User interface. Alternatively, click on the More options menu inline with the user you want to edit.
If you don’t immediately see the username you plan to edit, try searching for it.
-
In the Edit User interface, interface, scroll or use the left-side menu to navigate to the appropriate section of the dialog, and edit the details for the user.
-
In the Create credentials section edit any of the following:
Username, Display name and Email are mandatory fields and cannot be empty. If you attempt to edit a user to have the same user name as an existing user you will encounter an error. User names must be unique. - Username
-
A login name for the user. Usernames must be unique and lowercase. If you are using Active Directory to authenticate users, and your LDAP configuration requires users to be created manually (they are not created automatically in ThoughtSpot upon authentication), the username you specify has to be domain-qualified (
username@ldap.thoughtspot.com), and you must enter a dummy password.
- Display name
-
A unique name for the user (usually their first and last name).
-
The user’s email address. ThoughtSpot uses this for notification when another user shares something with them, for onboarding, and others.
During cluster configuration, the administrator specifies the email server domain. ThoughtSpot does not accept emails outside this domain. Contact ThoughtSpot Support to add new domains to a list of allowed domains.
-
In the Select Groups section, Search for or select or deselect the desired groups from the list of available groups.
The groups displayed are the groups available in the cluster, or the groups available in the specific org that the user is added to if your organization has org enabled.
-
-
Click Save.
Preview onboarding
While editing a user, select Preview business user onboarding to evaluate this user’s first experience with ThoughtSpot. After previewing the user’s default data source, you may choose to change the Group assignments.
Groups
Follow these steps to change the user’s groups:
-
In the Edit User interface, select the Groups tab.
-
Select the groups you want to add in the list by clicking the box next to the group name.
-
You can also use Search to find groups by name.
-
Deselect the groups you want to remove from the list by clearing the box next to the group name.
-
Select Update to save changes.
Delete users
To delete users, follow these steps:
-
Go to the Admin settings tab.
-
Select Users from the side navigation bar that appears.

-
Select the users you plan to delete by clicking the box next to the username.
If you don’t immediately see the username you plan to delete, try searching for it.
-
Select Delete in the upper-left corner.