Personalized Liveboards
Liveboards that contain consolidated data for all business users can now be personalized for a specific user or group. You can filter values to display only the information that is relevant to you, and save the personalized Liveboard. The personalized Liveboard retains the filter values, and remains synced with the original Liveboard. It also works for both filters and parameters on the Liveboard. This allows you to bookmark a personalized Liveboard for easy access to the information you need, and eliminates the need to create a personal copy of a Liveboard which can result in copies falling out of sync with the original.
Users who don’t have access to the underlying data source can view a Liveboard but can’t interact with it by applying filters. Only users with access to the underlying data source can create and save personalized Liveboards. New filters can’t be added in a personalized Liveboard, they must be added in the original.
| If row level security (RLS) is applied to the cluster, and the creator of a Liveboard sets up default values in a Liveboard filter, the default values will be visible to everyone who has access to the Liveboard in the filter chip preview and in the tooltip. The data is filtered based on RLS, but the filter chip preview and tooltip do not follow RLS. |
| If the original Liveboard is deleted, all personalized versions of it are deleted as well. |
Create a personalized Liveboard view
You can create a personalized view for any Liveboard that you can apply filters to.
-
Open a Liveboard and apply your desired filters. Click Save.
-
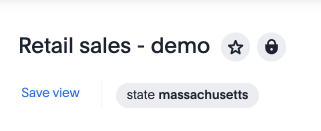
To create a personalized Liveboard view with these filters applied, select Save view.
-
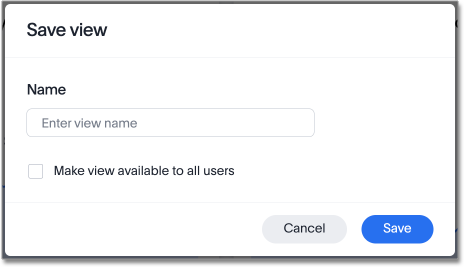
Enter a name for your personalized Liveboard view.
Do not include any sensitive information in the name of your personalized view. See Persistent behavior of a personalized Liveboard. -
Select Make view available to all users if you want the view to others for easy access.
-
If you have edit permission for the Liveboard, you can select Make view available to all users to share your view. This view will then be available to all the users who have access to this Liveboard.
-
If you have view only permissions for the Liveboard, you will not have the option to make any view public.
-
| Where row level security is applied to the data, unauthorized users will see the Liveboard but not the restricted data. |
-
Click Save.
From a personalized Liveboard view, you can create additional views, update a view, manage views, or reset a Liveboard.
Persistent behavior of a personalized Liveboard
Liveboard URLs have view_ID information corresponding to the active personalized view.
For example:
https://172.32.112.80:8443/#/insights/pinboard/9bd202f5-d431-44bf-9a07-b4f7be372125?view=c4a19e23-b554-4a4d-a1ec-aa6dbd649903
Even if this view is private, the URL can be shared with someone else and they can open the Liveboard with that view. However, when you reset the Liveboard to default, it stops showing that view and reverts to the original view.
Update a personalized Liveboard view
You can update a personalized Liveboard view.
-
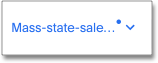
Open a personalized Liveboard view and apply your desired filters. A dot appears next to the view name to indicated that there are unsaved changes.
-
To update the personalized Liveboard view, click on the view name and select Update next to the view name in the drop-down menu.
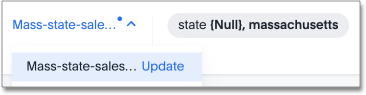
| You can also create an additional new view by selecting Save view from the drop-down menu. |
Manage personalized Liveboard views
You can manage your personalized Liveboard views.
-
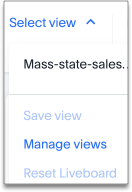
Open a Liveboard and click on Select view.
-
Select Manage views from the drop-down menu.
-
Click the checkbox to allow anyone to view the personalized Liveboard view, or Delete to remove the view.
Limitation
-
Personalized views saved in a Liveboard are not supported in ThoughtSpot Mobile. This means that filters added in personalized views are not used for KPIs and the watchlist. As a result, the numbers that appear in ThoughtSpot Mobile for them are different.
Migrate personalized views across environments
Starting with ThoughtSpot Cloud 26.11.0.cl, you can migrate personalized Liveboard views between environments, such as from development to production, without losing them.
Smart Merge TML import
When you import a Liveboard TML file that contains personalized views, ThoughtSpot can preserve those views instead of overwriting them. This behavior is called Smart Merge. To enable Smart Merge, set the enable_personalized_view_upsert field to true in your request to the existing TML import endpoint:
POST /api/rest/2.0/metadata/tml/import
When Smart Merge is enabled (enable_personalized_view_upsert is set to true), the import operation:
-
Creates any personalized views that do not already exist on the target Liveboard
-
Updates existing personalized views with the imported filter and parameter values
-
Preserves personalized views on the target Liveboard that are not included in the import
For full API details, refer to the ThoughtSpot Developer Documentation.
| Smart Merge TML import is only available using the REST API. |
Ownership metadata in TML
Personalized views in the Liveboard’s TML now include explicit owner metadata. Administrators can use this metadata to transfer ownership of personalized views between users during migration. The current owner may not be the original creator of a view, for example if an administrator has transferred ownership.
When exporting a Liveboard TML, each entry in the views section includes an author block with the following attributes:
-
username— the username of the view owner -
user_email— the email address of the view owner
Administrators can modify the author attributes before importing the TML to a new environment to reassign views to a different user.
Best practices for migrating personalized views
-
Always set
enable_personalized_view_upserttotruein the TML import request when migrating Liveboards with personalized views. Standard TML import without this field may overwrite or remove existing views on the target. -
Review
authorassignments before importing into production. Modify theusernameanduser_emailvalues in the TML to reassign views as needed. -
After migration, verify that personalized views appear correctly for their assigned users on the target environment.
-
If personalized views are missing after migration, confirm that
enable_personalized_view_upsertwas set totrueduring import, and check theauthorattributes in the TML file.
| If you encounter issues migrating personalized views, contact ThoughtSpot Support. |
We highly recommend that you register for the free Introduction to Liveboards course in ThoughtSpot University that covers the information in this article, and watch the Personalized Liveboard Views lesson.
See other training resources at ThoughtSpot University.

