Create a custom calendar
Before you begin
You must have administrator-level permissions to create a table in the database of the cloud data warehouse of the connection.
|
Oracle on-premises
Boolean values are not supported in Oracle. As a result, when creating your custom calendar you must use numbers instead of values. |
Methods of creating a custom calendar
Use one of the following methods to create a custom calendar:
-
Create a calendar
-
Upload a file
-
Use an existing table
Creating a custom calendar
You can create one of the following calendar types:
-
Month offset
-
Four Four Five
-
Four Five Four
-
Five Four Four
If you need to create a different type of calendar, including one that uses a different language for the names of months or days of the week, you must upload your custom calendar file. In this case, ThoughtSpot suggests you first create a calendar in one of the supported calendar types to use as a template, by following these steps. After that, you can download and update it to your specific requirements.
To create a custom calendar, do the following:
-
Navigate to Data workspace > Utilities.
-
Click Add/modify custom calendar.
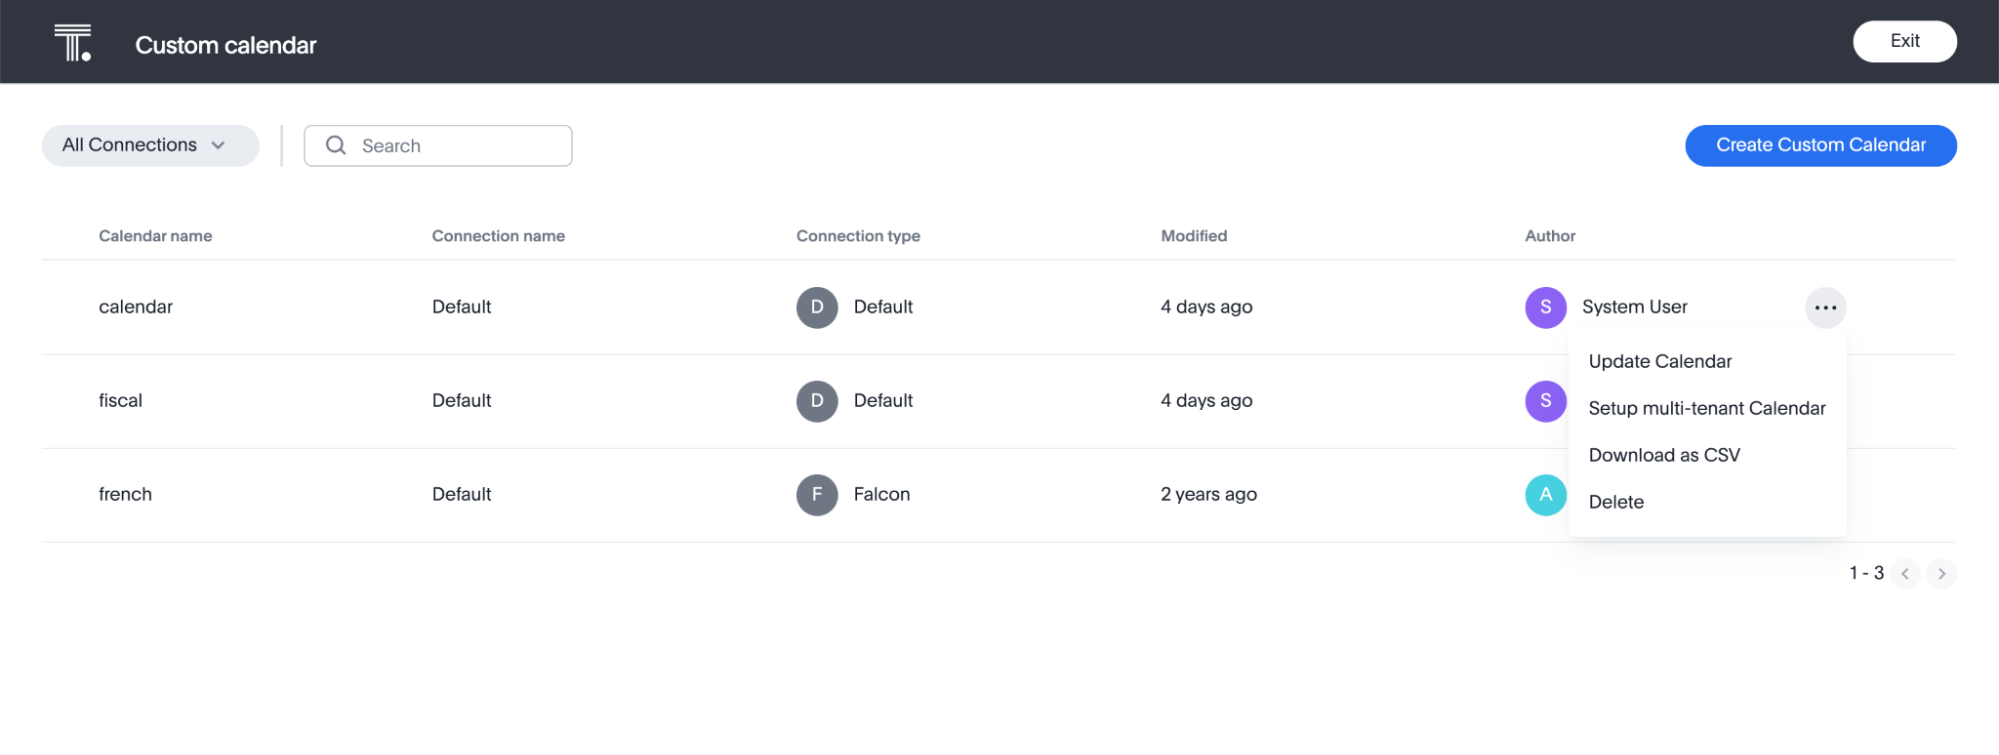
The Custom calendar page appears.
-
Select Create Custom Calendar.
The Create Custom Calendar dialog appears.
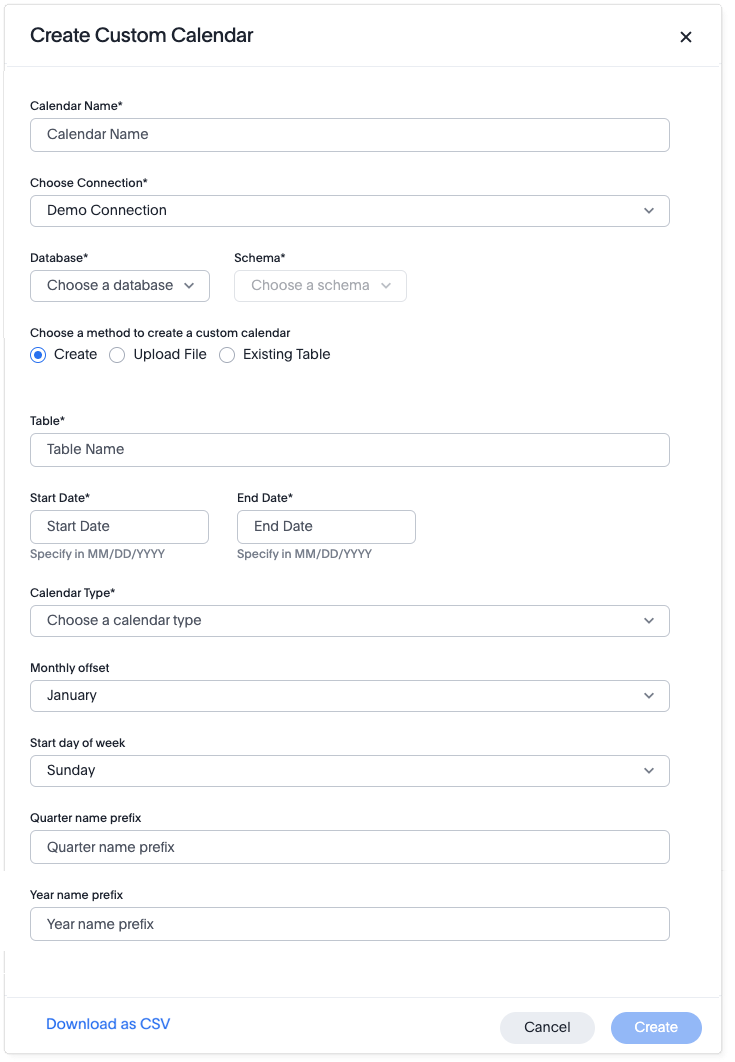
-
For Calendar Name, enter a name for your calendar.
The calendar name must be unique in the cluster. -
Open the Choose Connection menu, and select the connection where you want to use your custom calendar.
-
For Database, open the Choose a database menu, and select the database you want to use with your custom calendar.
-
For Schema, select the Choose a schema menu, and choose the schema you want to use with your custom calendar.
-
Make sure Create is selected.
-
For Table, enter a name for the table that will be created for your custom calendar.
-
For Start Date, enter the date you want your custom calendar to start.
Both Start Date and End Date must be in MM/DD/YYYY format. -
For End Date, enter the date you want your custom calendar to end.
-
For Calendar Type, select the Choose a calendar type menu, and choose the type of calendar you want to create. Possible types include:
-
MONTH_OFFSET
-
FOUR_FOUR_FIVE
-
FOUR_FIVE_FOUR
-
FIVE_FOUR_FOUR
-
-
For Monthly offset, open the menu and select a month.
-
For Start day of week, open the menu and select a day.
-
For Quarter name prefix, enter the prefix you’d like to use for quarter numbers.
Example: Q
-
For Year name prefix, enter the prefix you’d like to use for years.
Example: FY
-
Select Create.
The Custom calendar page appears again, with the message "Custom calendar created successfully!"
Your custom calendar appears in the list of calendars.
Uploading a file for a custom calendar
This option provides you the ability to upload a calendar file. You can update an existing calendar by downloading it, making changes to it, and then uploading it.
Many organizations use unique fiscal calendars (for example, 4-4-5). Manually creating a full custom calendar table with around 30 columns can lead to errors that cause incorrect query results. The recommended approach is to start with a simplified 10-column table from your existing master date table, and then leverage ThoughtSpot’s built-in routine to automatically generate the full, accurate calendar table. Follow these steps to prepare your data and upload it to ThoughtSpot.
Prerequisites
To complete this process, you’ll need:
-
Access to your organization’s master date table.
-
A SQL client to query and reformat your data.
-
Access to ThoughtSpot’s data utilities.
-
Knowledge of your custom calendar’s structure (for example, fiscal year start date, week definitions).
Get and reformat the master date table
First, you’ll query your existing master date table to create a simplified, 10-column CSV file. This file will contain the core information ThoughtSpot needs to generate the full calendar. The key is to correctly name and reformat these columns using SQL.
-
Use a SQL query similar to the Example SQL provided below to select and format the 10 required columns.
-
Ensure the following columns are created with the exact specified names and data types. Note that the column names must be lowercase:
-
date: The date in MM/DD/YYYY format.
-
day_of_week: String representing the name of the day (for example, 'Monday' or 'Mon').
-
month: String representing name of the month (for example, 'January' or 'Jan').
-
quarter: String representing the fiscal quarter (for example, '1' or 'Q1').
-
year: String representing the fiscal year (for example, '2025' or 'FY2025').
-
day_number_of_week: The numerical day of the week (for example, 1 for Monday when Monday is the start of the week).
-
week_number_of_month: The week number within the fiscal month.
-
week_number_of_quarter: The week number within the fiscal quarter.
-
week_number_of_year: The week number within the fiscal quarter.
-
is_weekend: A boolean value (TRUE or FALSE) indicating if the date is a weekend. Note that this could be used to indicate a holiday rather than just limited to weekends. However, the users would need to be aware of this change.
-
-
Sort the data: Your SQL query should include ORDER BY date ASC to ensure the data is in chronological order, which is a mandatory requirement for the upload process.
Select
    ---A.CalendarDay AS “date_original”,
    TO_CHAR(A.CalendarDay, ‘MM/DD/YYYY’) AS “date”,
    --dayname(A.CalendarDay) AS day_of_week_short,
    DECODE(DAYNAME(A.CalendarDay),
           ‘Mon’,‘Monday’,
           ‘Tue’,‘Tuesday’,
           ‘Wed’,‘Wednesday’,
           ‘Thu’,‘Thursday’,
           ‘Fri’, ‘Friday’,
           ‘Sat’, ‘Saturday’,
           ‘Sun’, ‘Sunday’
          ) as “day_of_week”,
    --MONTHNAME(A.FISCALMONTH) as “month”,
    DECODE(MONTHNAME(A.FISCALMONTH),
           ‘Jul’,‘July’,
           ‘Aug’,‘August’,
           ‘Sep’,‘September’,
           ‘Oct’,‘October’,
           ‘Nov’, ‘November’,
           ‘Dec’, ‘December’,
           ‘Jan’, ‘January’,
           ‘Feb’,‘February’,
           ‘Mar’,‘March’,
           ‘Apr’,‘April’,
           ‘May’, ‘May’,
           ‘Jun’, ‘June’
          ) as “month”,
    CONCAT(‘Q’,A.FISCALQUARTERNUMBER) as “quarter”,
    CONCAT(‘FY’,A.FISCALYEAR) as “year”,
    A.WEEKDAYNUMBER as “day_number_of_week”,
    A.WEEKOFFISCALMONTH as “week_number_of_month”,
    CASE
        WHEN A.FISCALQUARTERNUMBER = 1 THEN A.FISCALWEEKNUMBER
        ELSE A.FISCALWEEKNUMBER - MAX_FISCALWEEKNUMBER
    END as “week_number_of_quarter”,
    A.FISCALWEEKNUMBER as “week_number_of_year”,
    DECODE(DAYNAME(A.CalendarDay),
           ‘Mon’,FALSE,
           ‘Tue’,FALSE,
           ‘Wed’,FALSE,
           ‘Thu’,FALSE,
           ‘Fri’,FALSE,
           ‘Sat’,TRUE,
           ‘Sun’,TRUE
          ) as “is_weekend”
from “CUSTOM_CALENDAR”.“PUBLIC”.“MASTER_FISCAL_CALENDAR” A
LEFT JOIN
  (
    Select
      FISCALYEAR,
      FISCALQUARTERNUMBER,
      MAX(FISCALWEEKNUMBER) AS MAX_FISCALWEEKNUMBER
    FROM “CUSTOM_CALENDAR”.“PUBLIC”.“MASTER_FISCAL_CALENDAR”
    GROUP BY
      FISCALYEAR,
      FISCALQUARTERNUMBER
  ) B ON A.FISCALYEAR=B.FISCALYEAR AND A.FISCALQUARTERNUMBER-1=B.FISCALQUARTERNUMBER
  ORDER BY A.CalendarDay ASC
;
Prepare the CSV file
After running your SQL query, download the result set as a CSV file. Before uploading, double-check these critical requirements:
-
The file must be in UTF-8 format to prevent character encoding errors.
-
The data must be sorted chronologically by date in ascending order.
-
All dates must be in MM/DD/YYYY format.
As a best practice for error handling, attempt to upload the CSV to a database like Snowflake first. Snowflake’s robust error handling can quickly identify issues like special characters, malformed data, or incorrect column types that might case the ThoughtSpot upload to fail.
Upload the file in ThoughtSpot
Now you’re ready to use ThoughtSpot’s data utilities.
-
Navigate to the Data workspace.
-
Click Utilities in the side navigation bar, and select Add/modify custom calendar.
The Custom calendar page appears.
-
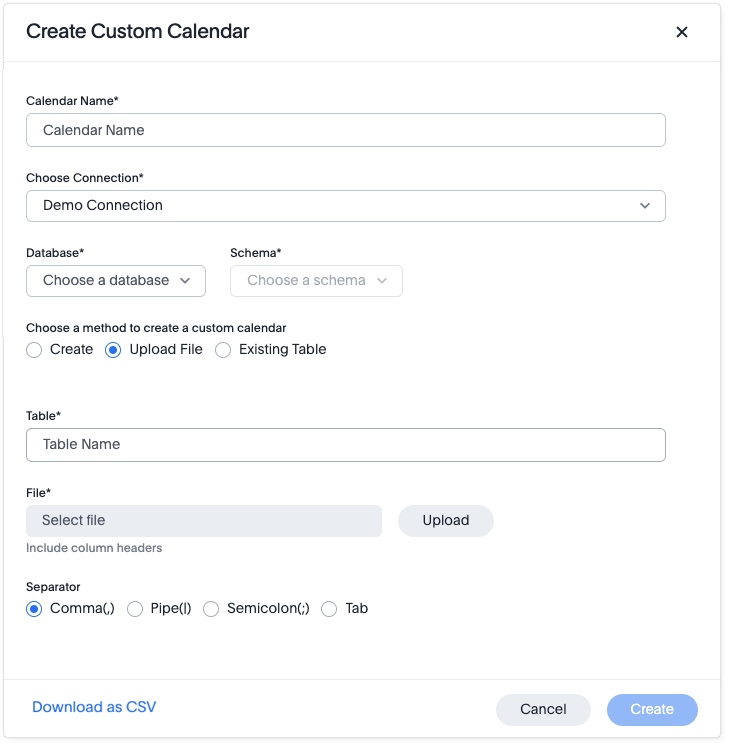
Select Create Custom Calendar.
The Create Custom Calendar dialog appears.
-
For Calendar Name, enter a name for your calendar.
The calendar name must be unique in the cluster. -
Open the Choose Connection menu, and select the connection where you want to use your custom calendar.
-
For Database, open the Choose a database menu, and select the database you want to use with your custom calendar.
-
For Schema, open the Choose a schema menu, and select the schema you want to use with your custom calendar.
-
Select Upload File.
-
For Table, enter a name for the table that will be created for your custom calendar.
-
For File, select the Upload button, choose the file, and select Open. ThoughtSpot will use this file to automatically generate all columns (around 30) of the full custom calendar table. This new, complete table will be created in your Snowflake instance (or other connected database).
-
For Separator, select delimiter format used in your calendar file.
Supported delimiters include: Comma(
,), Pipe(|), Semicolon(;), and Tab.If you do not have permissions to create a table in the database, you can click Download as CSV. You can then send the CSV file to your database administrator to edit and upload. -
Select Create.
The Custom calendar page appears again, with the message "Custom calendar created successfully!"
Your custom calendar appears in the list of calendars.
No database write access (optional)
If your client’s ThoughtSpot instance doesn’t have write-back permissions to the database, you’ll need to manually create the final table.
-
After uploading the file into ThoughtSpot, download the newly-generated 30-column table from ThoughtSpot as a CSV.
-
Work with your database administrator or internal systems team to manually create a new table in the client’s database using the downloaded file. This ensures the full, correct calendar table is available for other applications.
-
Once the table is in the database, go back to ThoughtSpot’s data utilities.
-
Select Create a Custom Calendar, and this time reference the table you just created in the database. This final step connects the fully-defined calendar table to ThoughtSpot for use in your reporting and analytics.
Use an existing table for a custom calendar
This option provides you the ability to use an external table in your connection as a calendar.
To use an external table as a custom calendar, do the following:
-
Select Data in the top navigation bar.
The Data workspace appears.
-
Click Utilities in the side navigation bar, and select Add/modify custom calendar.
The Custom calendar page appears.
-
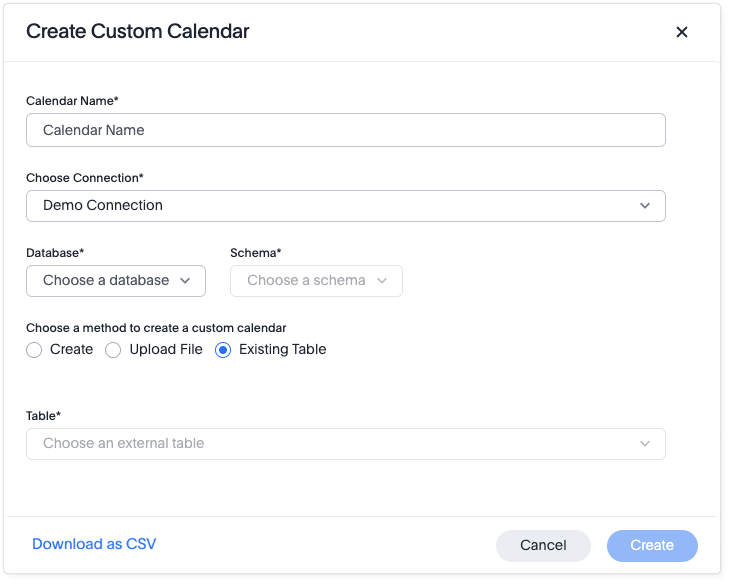
Select Create Custom Calendar.
The Create Custom Calendar dialog appears.
-
For Calendar Name, enter a name for your calendar.
The calendar name must be unique in the cluster. -
Open the Choose Connection menu, and select the connection where you want to use your custom calendar.
-
For Database, open the Choose a database menu, and select the database you want to use with your custom calendar.
-
For Schema, open the Choose a schema menu, and select the schema you want to use with your custom calendar.
-
Select Existing Table.
-
For Table, select an external table to use for creating your custom calendar.
-
Select Create.
The Custom calendar page appears again, with the message "Custom calendar created successfully!"
Your custom calendar appears in the list of calendars.
Formatting the calendar table
The following DDL shows the custom calendar table creation for Snowflake. Other data warehouses will have a similar structure. The name of the table isn’t important, you will specify the name to ThoughtSpot. The columns and type are important, however.
create or replace TABLE FISCAL_CAL(
  "date" DATE,
  "day_of_week" VARCHAR(),
  "month" VARCHAR(),
  "quarter" VARCHAR(),
  "year" VARCHAR(),
  "day_number_of_week" BIGINT,
  "week_number_of_month" BIGINT,
  "week_number_of_quarter" BIGINT,
  "week_number_of_year" BIGINT,
  "is_weekend" BOOLEAN,
  "monthly" VARCHAR(),
  "quarterly" VARCHAR(),
  "day_number_of_month" BIGINT,
  "day_number_of_quarter" BIGINT,
  "day_number_of_year" BIGINT,
  "month_number_of_quarter" BIGINT,
  "month_number_of_year" BIGINT,
  "quarter_number_of_year" BIGINT,
  "absolute_week_number" BIGINT,
  "start_of_week_epoch" DATE,
  "end_of_week_epoch" DATE,
  "absolute_month_number" BIGINT,
  "start_of_month_epoch" DATE,
  "end_of_month_epoch" DATE,
  "absolute_quarter_number" BIGINT,
  "start_of_quarter_epoch" DATE,
  "end_of_quarter_epoch" DATE,
  "absolute_year_number" BIGINT,
  "start_of_year_epoch" DATE,
  "end_of_year_epoch" DATE,
 PRIMARY KEY ("date" )
);
Populating the calendar
Once the table has been created, you need to populate the table with the appropriate data. The date (first column) is the actual calendar date that will be used to map to the custom date values. The following example shows a few records. In this case, the day and month names have been changed to Spanish, the first month is June, and the first day of the week is Monday.
2021-06-01,martes,junio,QTR1,YR2021,2,1,1,1,false,junio YR2021,QTR1 YR2021,1,1,1,1,1,1,1,2021-06-01,2021-06-08,1,2021-06-01,2021-07-01,1,2021-06-01,2021-09-01,1,2021-06-01,2022-06-01
2022-05-28,sábado,mayo,QTR4,YR2021,6,5,13,52,true,mayo YR2021,QTR4 YR2021,28,89,362,3,12,4,52,2022-05-23,2022-05-30,12,2022-05-01,2022-06-01,4,2022-03-01,2022-06-01,1,2021-06-01,2022-06-01
Using your custom calendar in your connection
After you create your custom calendar, you must specify where to use it in your connection.
To use your custom calendar, do the following:
-
Sign in to your ThoughtSpot cluster and select Data > Connections.
-
Select the name of the connection where you want to use your calendar.
-
Select the name of the table where you want to use your calendar.
-
Find the column where you want to use your calendar.
The column must use the DATE or DATE_TIME data type. -
Refresh the page to make sure your custom calendar is available.
-
Scroll horizontally to the CALENDAR TYPE column.
-
In the CALENDAR TYPE column for the column(s) you chose, double-click the existing calendar name (example: "None"), and then select your custom calendar.
-
Select Save Changes.
Now, date-related searches in the selected table use your custom calendar.
After creating a custom calendar, you can easily look at it to confirm it is set up the way you want. For details, see View a custom calendar.
View a custom calendar
After creating a custom calendar, you can easily open it from the ThoughtSpot UI to look at its configuration.
To view a custom calendar, do the following:
-
Sign in to your ThoughtSpot cluster.
-
Select Data in the top navigation bar.
The Data workspace appears.
-
Click Utilities in the side navigation bar, and select Add/modify custom calendar.
The Custom calendar page appears.
-
Select the name of the custom calendar you want to view.
Your custom calendar opens in a window displaying all columns and rows. You can scroll through these to verify your calendar is set up the way you want.
-
When you’re done viewing your calendar, close the window by selecting Done.
Set up row-level security in a custom calendar
The following example shows how to set up a custom calendar with row-level security, based on a Snowflake cloud data warehouse.
-
Create a custom calendar. For the purposes of this example, we will create a calendar with Saturday set as the start of the week, and name it
saturdaycalendar. -
Open the Choose Connection menu, and select the connection where you want to use your custom calendar.
-
For Database, open the Choose a database menu, and select the database you want to use with your custom calendar.
-
For Schema, select the Choose a schema menu, and choose the schema you want to use with your custom calendar.
-
Make sure Create is selected.
-
For Table, enter the same name as the calendar,
saturdaycalendar. -
For Start Date, enter the date you want your custom calendar to start. For End Date, enter the date you want your custom calendar to end. For this calendar, set the start date as Saturday, January 1st, 2000, and the end date as Tuesday, December 31st, 2030.
-
For Calendar Type, select the Choose a calendar type menu, and choose MONTH_OFFSET.
-
For Start day of week, open the menu and select Saturday.
-
Select Create.
-
If you open the Snowflake connection and run the SQL command,
select * from <database>.“saturdaycalendar”;, you can see that the table shows Saturdays as the first day of the week. -
Repeat the steps above to create a second calendar with Monday as the start day of the week, titled
mondaycalendar. -
Use the same connection, database, and schema as used above.
-
Name the table
mondaycalendarand enter the same start and end dates as used above. -
Set the type as MONTH_OFFSET. Set Start day of week as Monday.
-
Select Create.
-
If you reopen the Snowflake connection and run the SQL command,
select * from <database>.“mondaycalendar”;, you will see that the table shows Mondays as the first day of the week. -
Create a view that is a union of the two calendars just created, which can be searched in ThoughtSpot. Use the following SQL command:
Create or replace view <database>.”rlscalendar” as ( select *, ‘tsCalendar1’ as ts_calendar_group from <database>.”saturdaycalendar” union all select *, ‘tsCalendar2’ as ts_calendar_group from <database>.”mondaycalendar” );This command adds an additional column called ts_calendar_group that we will use for row-level security.
-
Return to ThoughtSpot and create a custom calendar called rlsCalendar.
-
Use the same connection, database, and schema as used above.
-
Under Choose a method to create a custom calendar, select Existing Table.
-
Under Table, choose rlscalendar.
-
Click Create.
-
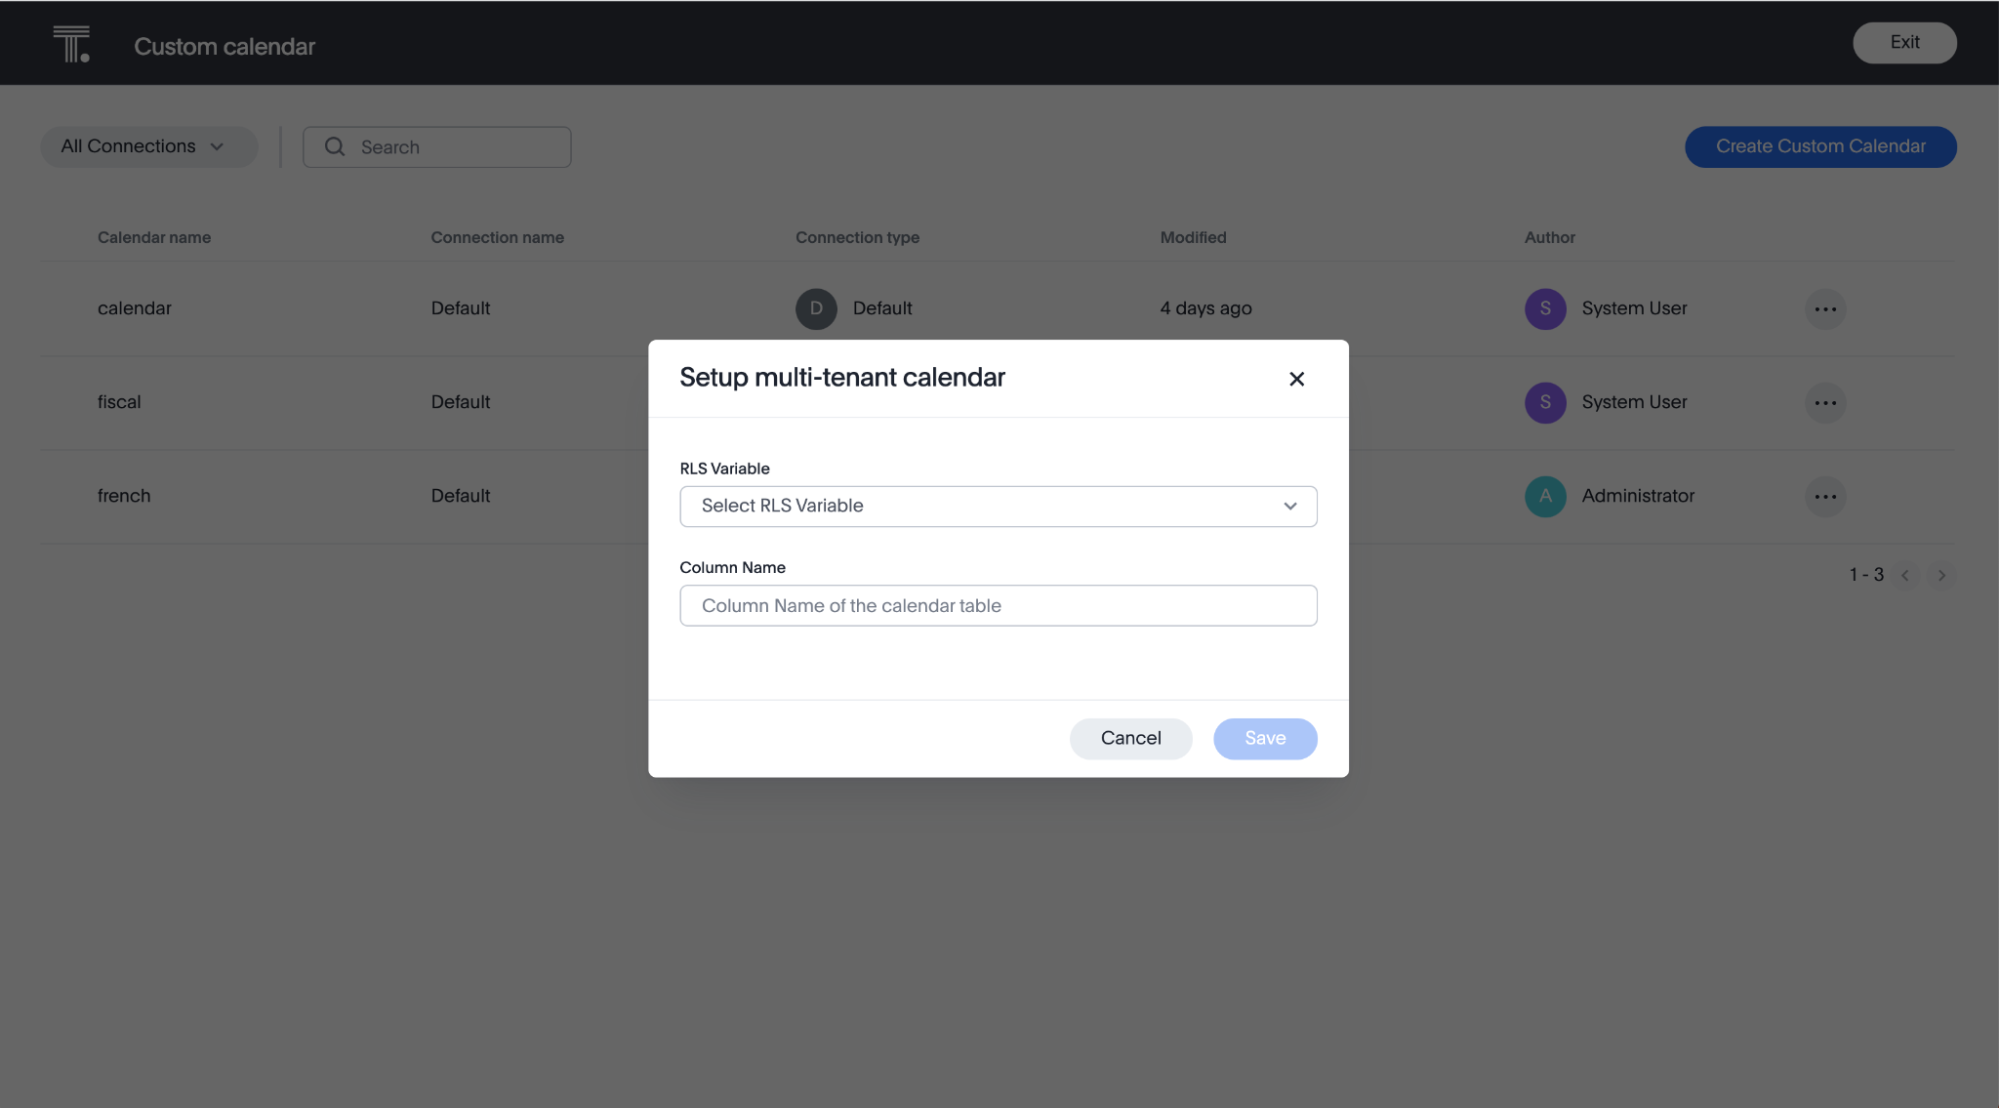
Select the more options icon next to the row of the new custom calendar “rlsCalendar” and click Setup multi-tenant calendar. This option appears only if row-level security is enabled for custom calendars on your cluster.
-
Toggle to enable multi-tenant custom calendar.
-
For Select RLS variable, choose the system variable you will use for row-level security of the following options:
-
TS_GROUPS
-
TS_USERNAME
-
TS_ORG
-
TS_EMAILDOMAIN
-
TS_GROUPS_INT
-
-
For this calendar, select TS_GROUPS.
-
For Select column name, choose TS_CALENDAR_GROUP. Click Save.
-
Navigate to the Search data page and select your dataset. Search
Quantity daily last week rlsCalendar day of week. If you sort by order date daily, you can see that the current user’s start date of the week depends on the rls group they’re assigned. Users in tsCalendar1 see a Saturday start date, while users in tsCalendar2 see a Monday start date.
| A user can only be a member of one row-level security group. If you are a member of multiple, then the results will be incorrect. If a user is not a member of any groups, then no data will be returned. |
Limitations
Search Suggestions are not aware of the row level security applied to custom calendars. Therefore, the string values should be the same. For example: If calendar1 has the values Aug, Sep, Oct and calendar2 has August, September, October, then the search suggestions will list both Aug and August if a user types in 'Au'. This is a applicable for all string columns, including Day, Week, Month, Quarter, and Year values.