Create an anomaly alert
Using anomaly alerts, you can receive alerts when data of KPIs you are subscribed to fall outside the predicted value range. When creating an alert, you can specify the time and frequency at which ThoughtSpot checks the KPI’s data against the values predicted by ML models trained on the data.
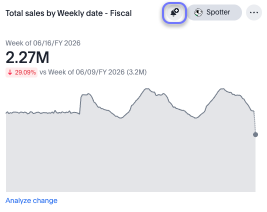
For example, you can create an alert for a sales weekly KPI, and specify that ThoughtSpot monitor the values every Monday at 5 PM. You may also add individual subscribers to the alert. If the KPI’s data falls outside the predicted range, ThoughtSpot sends an alert to your email and, if applicable, your subscribers' emails.
Note that ThoughtSpot checks your KPI data against the expected data range at the time period you define. If your KPI data temporarily exceeds the expected range, but does not satisfy the condition at the time the condition is next checked, you will not receive an alert notification.
For all alert types, when the frequency is set to hourly, then it means we send alerts at 30- or 60-minute mark.
| You can create alerts directly from watchlist KPIs on the home page. |
To create an anomaly alert, follow these steps:
-
Select the KPI you want to monitor, either by accessing a Liveboard, or by searching within the Answers.
Optionally, create a KPI and save it as an Answer, then select Create alert from the more options menu. Note that you must save the Answer before creating an alert. -
If in a Liveboard, hover over the KPI visualization and select the Monitor icon.
-
The pop-up Select an alert type window appears.
-
Select Unexpected changes in KPI. Click Next.
-
[Optional] Edit the Alert name.
-
Below the Alert name text box, ThoughtSpot displays the cadence at which it will check the KPI against the expected data range. To change this cadence, select Change and choose from the following options:
-
If Every N minutes, enter a minute interval to receive an alert notification Every N minutes.
-
If Hourly, enter an hour interval to receive an alert notification Every n hours.
-
If Daily, select a time of day to receive an alert notification. When setting up an alert, you can specify the desired timezone (e.g., "America/Los_Angeles") for when the alert should be sent. [Optional] Choose whether to receive an alert notification on weekends.
-
If Weekly, choose a minimum of one weekday to receive an alert notification. Select a time of day to receive an alert notification in the desired timezone.
-
If Monthly, choose a minimum of one date to receive an alert notification.
Enter the date as a numerical value or a comma-separated list (for example, "5, 10, 15" to receive an alert on the fifth, tenth and fifteenth of each month). Select a time of day to receive an alert notification in the desired timezone.
-
-
Your name automatically appears under Subscribers. Enter the names of one or more teammates to subscribe them to your KPI alert schedule.
You must have view access to the data source underlying the KPI to schedule notifications for teammates who also have view access to the data source. You must have edit access to the data source underlying the KPI to schedule notifications for teammates regardless of whether they have access to the data source. You can also add groups as Subscribers to the alert. Users subscribed through a group must be removed from the group to be removed from the alert schedule.
-
[Optional] Select the checkbox next to Add custom message and type your custom message in the text box.
-
Select Create alert.
-
The Add view access window appears. If you have added subscribers to your KPI alert that do not have view access to the underlying data source, you can remove them from your KPI alert or give them view access here.
Row-level security applies to your KPI alert subscriptions. For example, if you create a threshold-based alert for a KPI on Salesin all regions, you receive a notification when total sales reaches your defined threshold. Another user subscribed to your alert whose access is limited to the "West" region would receive an alert only when sales in the "West" region reached the threshold defined in your alert.


