Create an alert by attributes
You can now set KPI alerts to trigger at changes to a selected attribute. This can include changes in the value of the attribute, such as an increase in sales by percentage by state, or a scheduled alert to trigger on a weekly basis. For example, if you wanted to create an alert for a KPI tracking sales of different phones by brand, you could choose the intended brands as attributes and set an alert to be notified when sales for those specific brands dropped by 5%.
Alerts by attribute also allow you to create an alert that satisfies the need to set an alert on a line or column chart. For example, say you have a line chart on the Monthly Sales of each State, and you want to create an alert on some or all of the States dropping below a threshold. Now, you can do so by creating an attribute alert on the KPI for Monthly Sales by choosing the State attribute.
Note that alerts by attribute respect row-level security and column-level security for each subscriber at the attribute level.
For all alert types, when the frequency is set to hourly, then it means we send alerts at 30- or 60-minute mark.
| You can create alerts directly from watchlist KPIs on the home page. |
Threshold attribute alerts
To set up a threshold attribute alert, follow these steps:
-
Select the KPI you want to monitor, either by accessing a Liveboard, or by searching within the Answers.
Optionally, create a KPI and save it as an Answer, then select Create alert from the more options menu. -
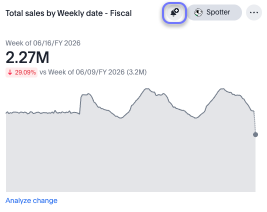
Hover over the KPI visualization and select the Monitor icon.
-
The pop-up Select an alert type window appears.
-
For threshold alerts across attributes, select Values of an attribute crosses a set limit. Click Next.
-
(Optional) Edit the alert name.
-
Use the Select an attribute dropdown to choose your attribute.
-
Under Select values, choose values by searching or by selecting the checkbox next to their names.
If you use the Select all option, and new values are added to the attribute you select after the alert is created, ThoughtSpot automatically adds them to the alert. 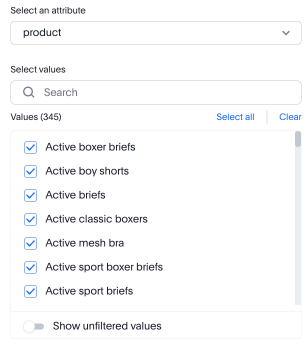
-
Under Alert condition, choose the mathematical operator for your KPI alert:
-
Greater than
-
Greater than or equal to
-
Less than
-
Less than or equal to
-
Equal to
-
Not equal to
If your KPI includes a time-series keyword (such as
weekly), you may also select the following options for percentage changes in your KPI within the defined time bucket:-
Changes by (%)
-
Increases by (%)
-
Decreases by (%)
-
-
-
Under Threshold value, select the numerical value that defines your threshold.
-
Below the Alert condition text box, ThoughtSpot displays the threshold condition at which it will check the KPI against the expected data range. To change this cadence, select Change and choose from the following options:
-
If Every N minutes, enter a minute interval to receive an alert notification Every N minutes.
-
If Hourly, enter an hour interval to receive an alert notification Every n hours.
-
If Daily, select a time of day to receive an alert notification. When setting up an alert, you can specify the desired timezone (e.g., "America/Los_Angeles") for when the alert should be sent. [Optional] Choose whether to receive an alert notification on weekends.
-
If Weekly, choose a minimum of one weekday to receive an alert notification. Select a time of day to receive an alert notification in the desired timezone.
-
If Monthly, choose a minimum of one date to receive an alert notification.
Enter the date as a numerical value or a comma-separated list (for example, "5, 10, 15" to receive an alert on the fifth, tenth and fifteenth of each month). Select a time of day to receive an alert notification in the desired timezone.
-
-
Select the notification channel, either Email or Custom channel. Custom channel notifications can be configured with the use of webhooks.
-
Your name automatically appears under Subscribers. Enter the names of one or more teammates to subscribe them to your KPI alert schedule.
You must have view access to the data source underlying the KPI to schedule notifications for teammates who also have view access to the data source. You must have edit access to the data source underlying the KPI to schedule notifications for teammates regardless of whether they have access to the data source. You can also add groups as Subscribers to the alert. Users subscribed through a group must be removed from the group to be removed from the alert schedule.
-
[Optional] Select the checkbox next to Add custom message and type your custom message in the text box.
-
[Optional] Select View KPI query or scroll down to see the details of the query that defines your KPI.
-
Select Create alert.
Scheduled attribute alerts
To set up a scheduled attribute alert, follow these steps:
-
Select the KPI you want to monitor, either by accessing a Liveboard, or by searching within the Answers.
Optionally, create a KPI and save it as an Answer, then select Create alert from the more options menu. -
Hover over the KPI visualization and select the Monitor icon.
-
The pop-up Select an alert type window appears.
-
For scheduled alerts across attributes, select Regular updates on values of an attribute. Click Next.
-
(Optional) Edit the alert name.
-
Use the Select an attribute dropdown to choose your attribute.
-
Under Select values, choose values by searching or by selecting the checkbox next to their names.
If you use the Select all option, and new values are added to the attribute you select after the alert is created, ThoughtSpot automatically adds them to the alert.
-
Under How often, choose whether to receive an alert notification hourly, daily, weekly, or monthly.
-
If Hourly, enter an hour interval to receive an alert notification Every n hours.
-
If Daily, select a time of day to receive an alert notification. ThoughtSpot displays the time zone in which your cluster deploys. [Optional] Choose whether to receive an alert notification on weekends.
-
If Weekly, choose a minimum of one weekday to receive an alert notification. Select a time of day to receive an alert notification.
-
If Monthly, choose a minimum of one date to receive an alert notification.
Enter the date as a numerical value or a comma-separated list (for example, "5, 10, 15" to receive an alert on the fifth, tenth and fifteenth of each month). Select a time of day to receive an alert notification.
-
-
Select the notification channel, either Email or Custom channel. Custom channel notifications can be configured with the use of webhooks.
-
Your name automatically appears under Subscribers. Enter the names of one or more teammates to subscribe them to your KPI alert schedule.
You must have view access to the data source underlying the KPI to schedule notifications for teammates who also have view access to the data source. You must have edit access to the data source underlying the KPI to schedule notifications for teammates regardless of whether they have access to the data source. -
[Optional] Select the checkbox next to Add custom message and type your custom message in the text box.
-
[Optional] Select View KPI query or scroll down to see the details of the query that defines your KPI.
-
Select Create alert.
Alerts by attribute limitations
Alerts by attribute have the following limitations:
-
Alerts by attribute are currently not supported for hourly KPIs.
-
Alerts by attribute are currently not supported for KPIs containing the following keywords:
-
growth of
-
vs
-
percentage
-
of
-
to date
-
group aggregate keywords like group_sum and group_average
-
-
With the select all option, attributes are selected up to a limit of 1000. If you want to select more, you can manually add values. Note that alerts created on high cardinal attributes may cause performance issues.