Configuring Microsoft Entra ID (OIDC) as an Identity Provider for ThoughtSpot
ThoughtSpot supports single sign-on (SSO) through OpenID Connect (OIDC). This walks through configuring Microsoft Entra ID (formerly Azure AD) as an OIDC identity provider (IdP) for ThoughtSpot.
Configuration spans two consoles, and you move between them in the following order:
-
Microsoft Entra admin center — register an application, create a client secret, and (optionally) configure token claims.
-
ThoughtSpot Admin settings — create the OIDC connection using the values from Entra, then map claims to ThoughtSpot user attributes.
-
Back in Microsoft Entra — add the ThoughtSpot callback URL as a redirect URI and assign users/groups to the application.
-
Back in ThoughtSpot — enable the connection and test the sign-in.
Before you begin
-
Access to the Microsoft Entra admin center with permission to create app registrations and assign users.
-
Administrator access to ThoughtSpot (Admin > Single Sign On).
-
Your ThoughtSpot instance URL.
Part 1 — Register the application in Microsoft Entra ID
Step 1.1 Create the app registration
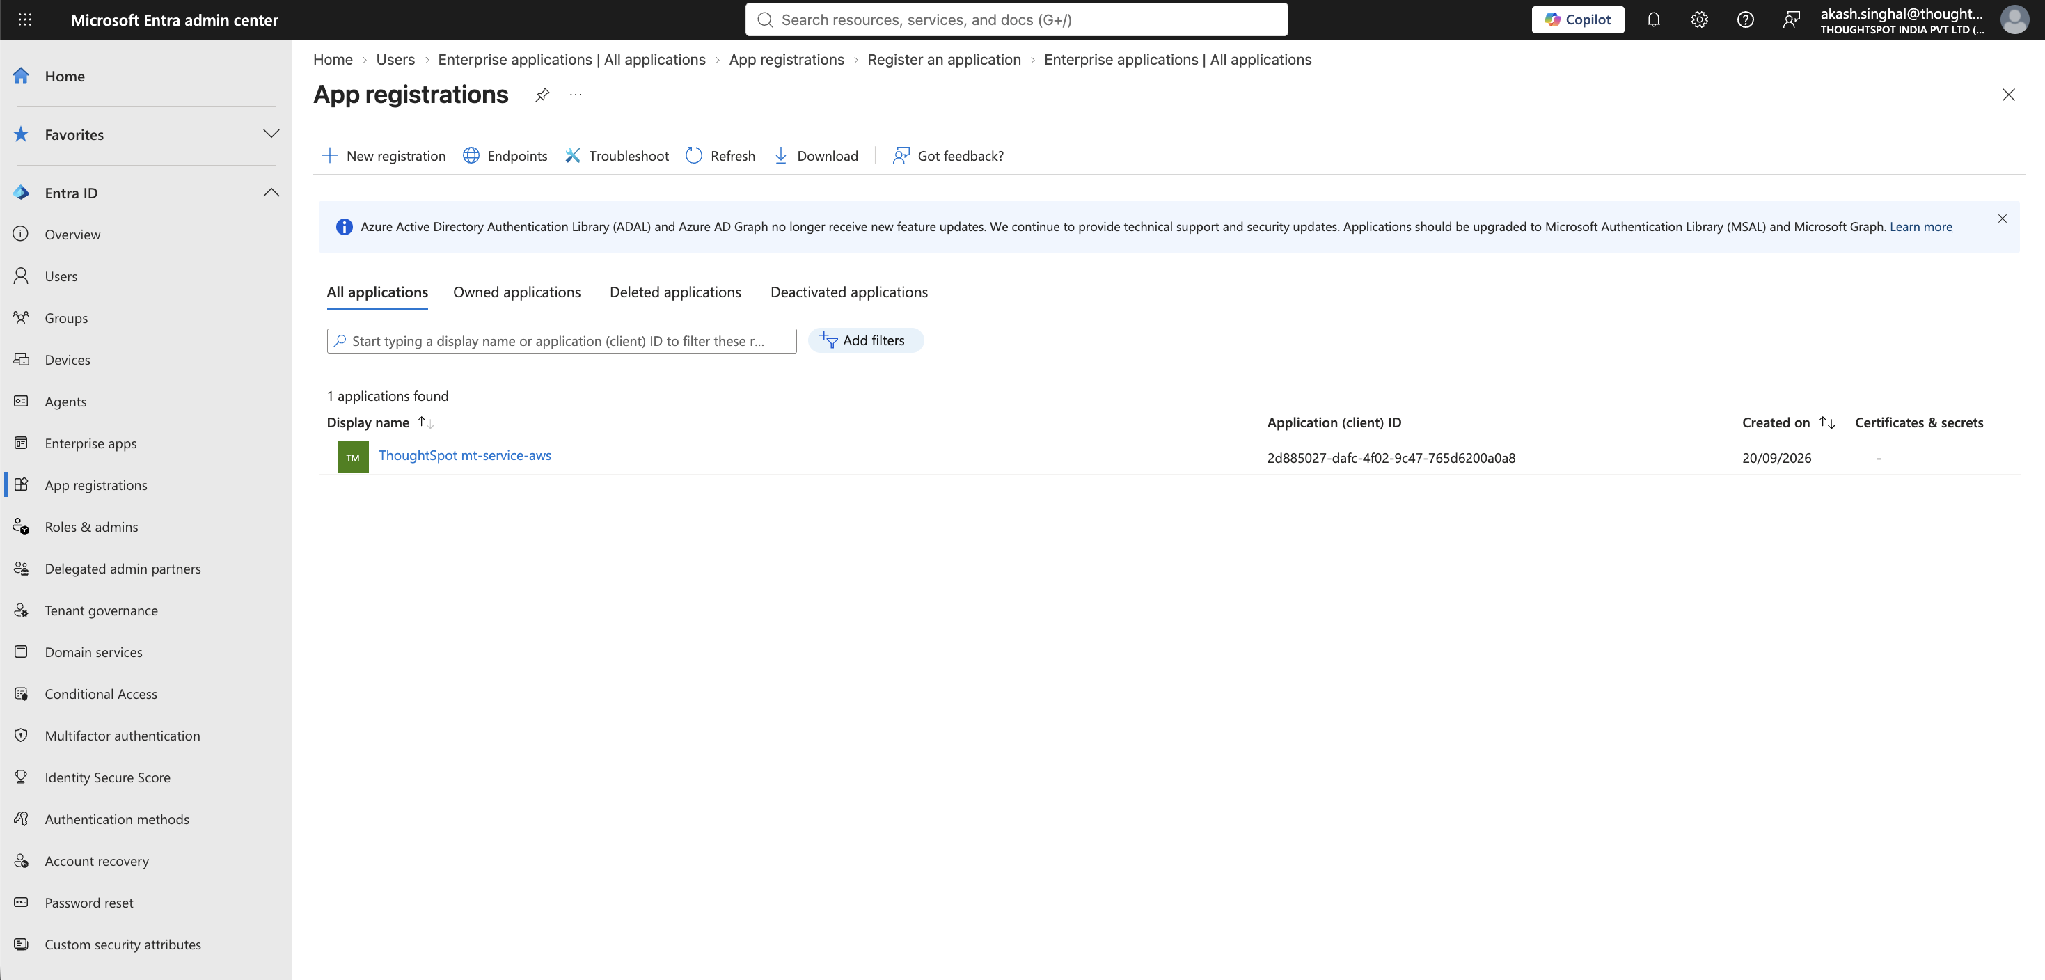
In the Microsoft Entra admin center, go to Entra ID > App registrations and select New registration.
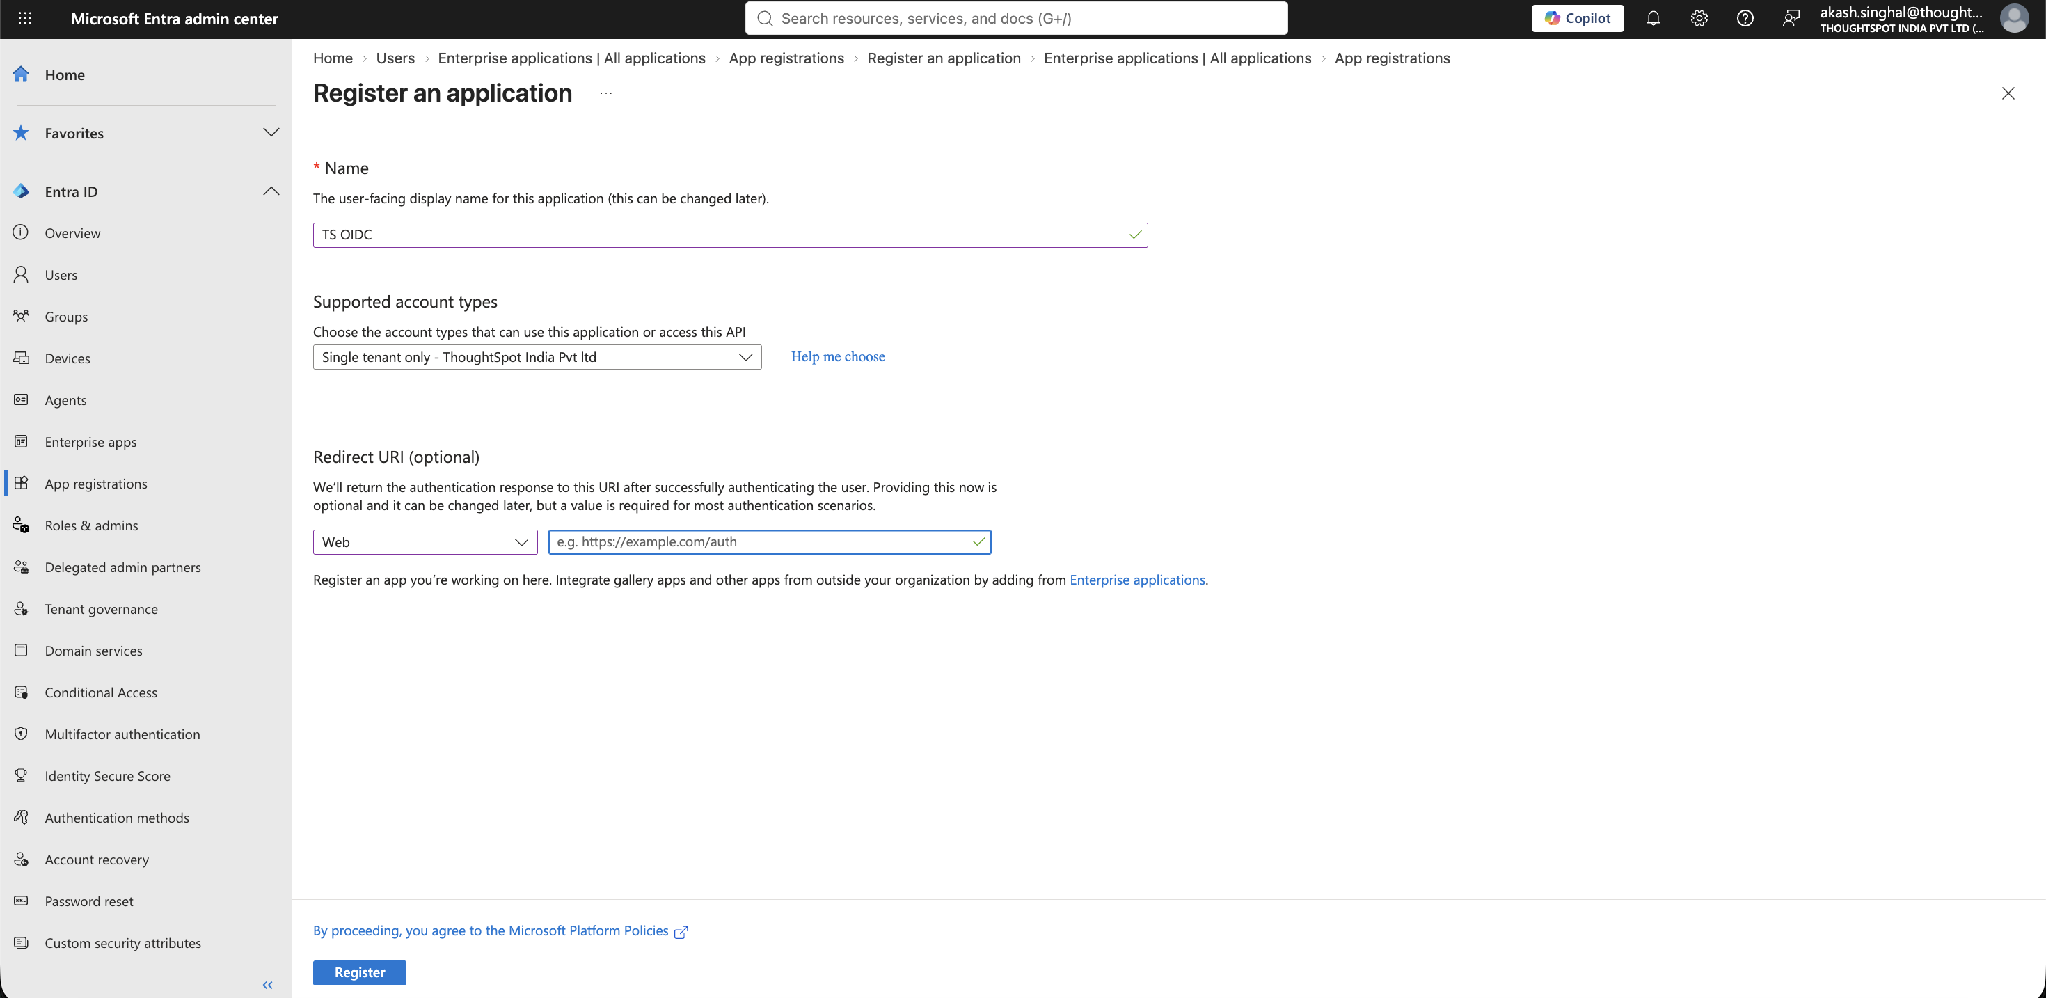
Enter a Name (for example, TS OIDC), choose the Supported account types appropriate for your organization (Single tenant for a single directory), and leave Redirect URI blank for now — you will add it in Part 3. Select Register.
Step 1.2 Record the application identifiers
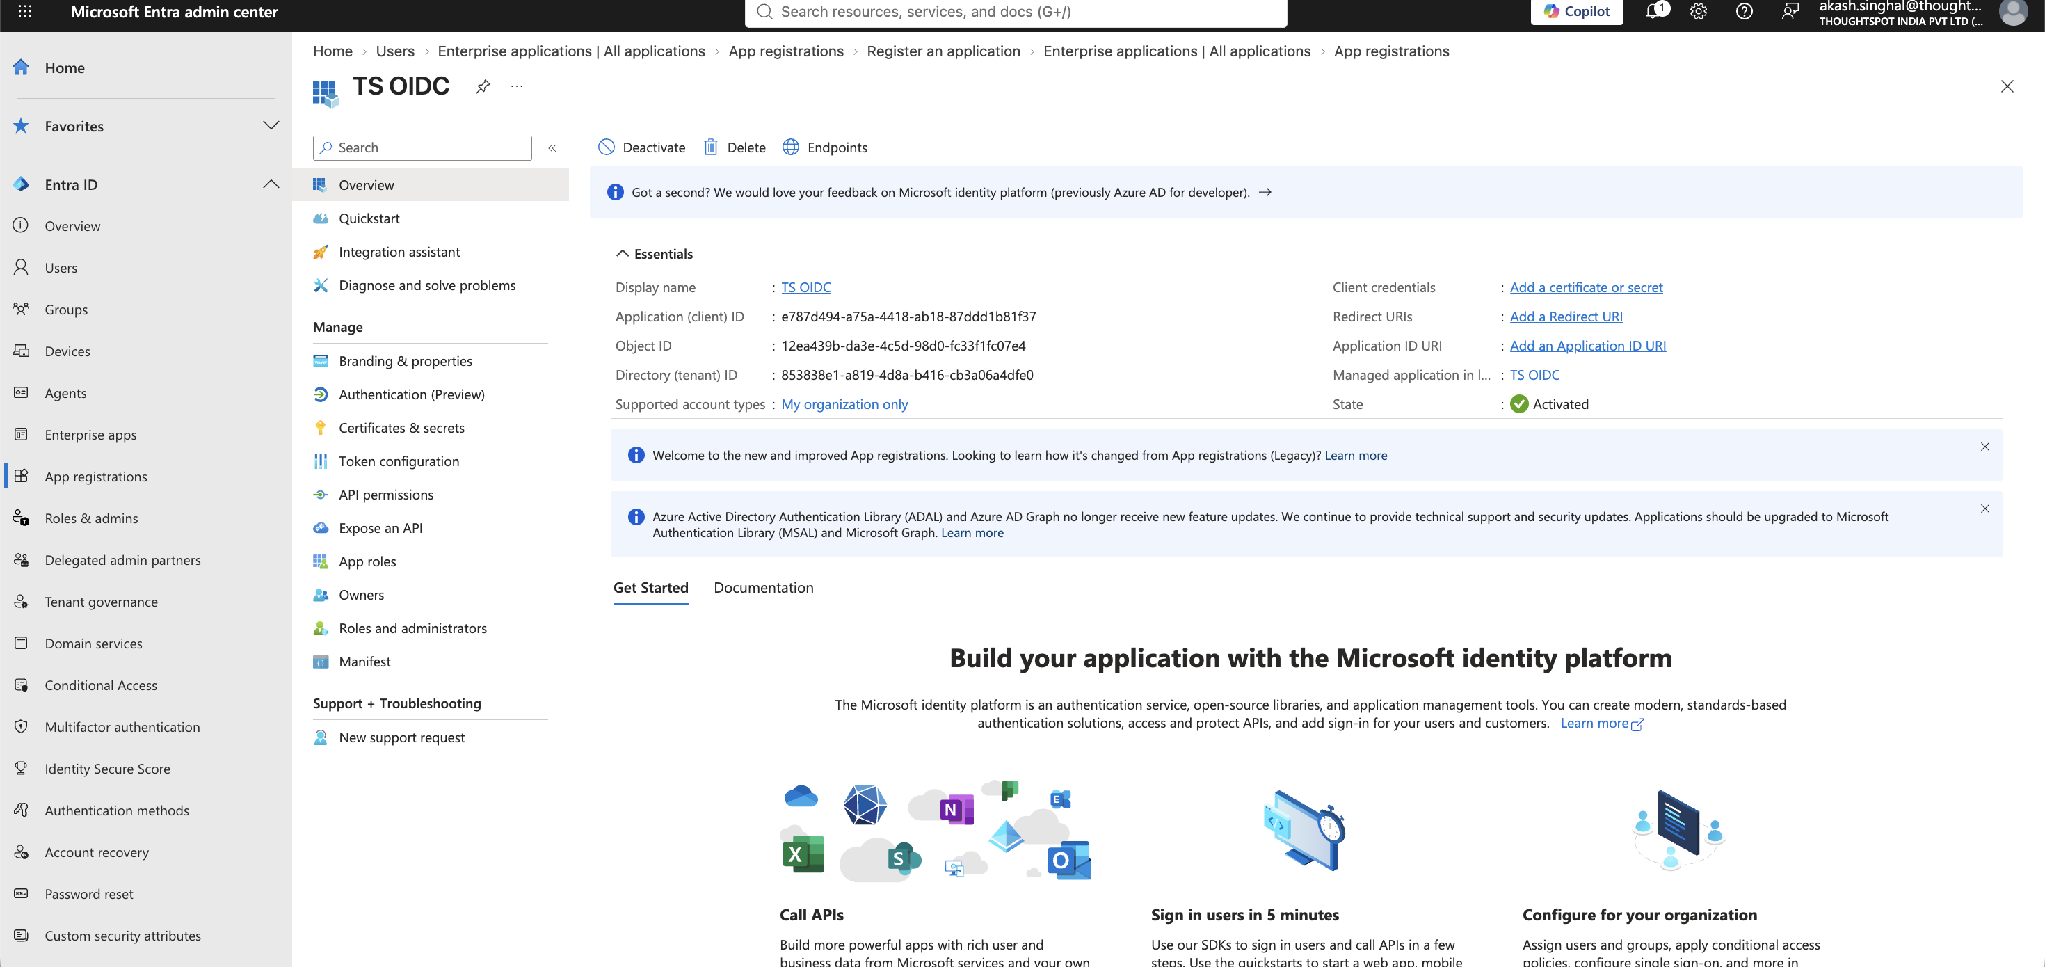
On the application Overview page, copy the Application (client) ID and the Directory (tenant) ID. You will need both when configuring ThoughtSpot.
Step 1.3 Create a client secret
Go to Certificates & secrets > Client secrets and select New client secret.
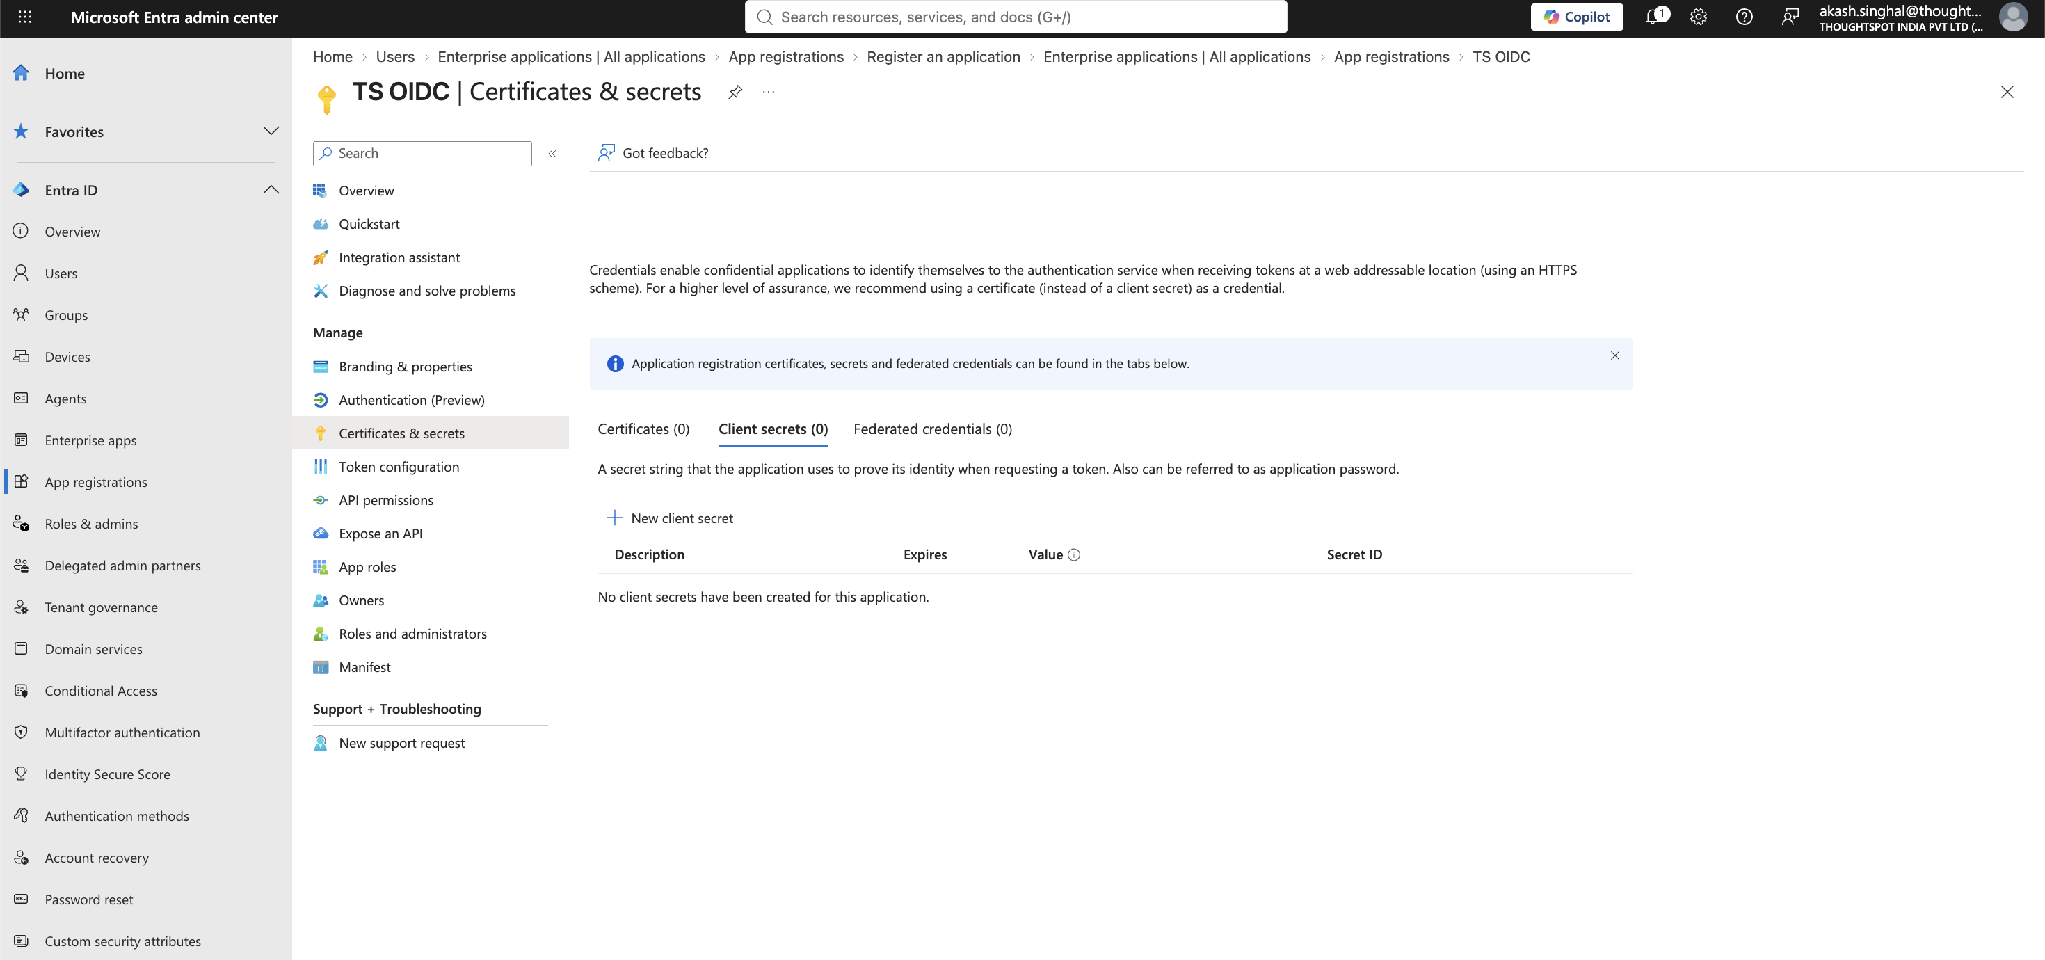
Enter a Description and choose an Expires period, then select Add.
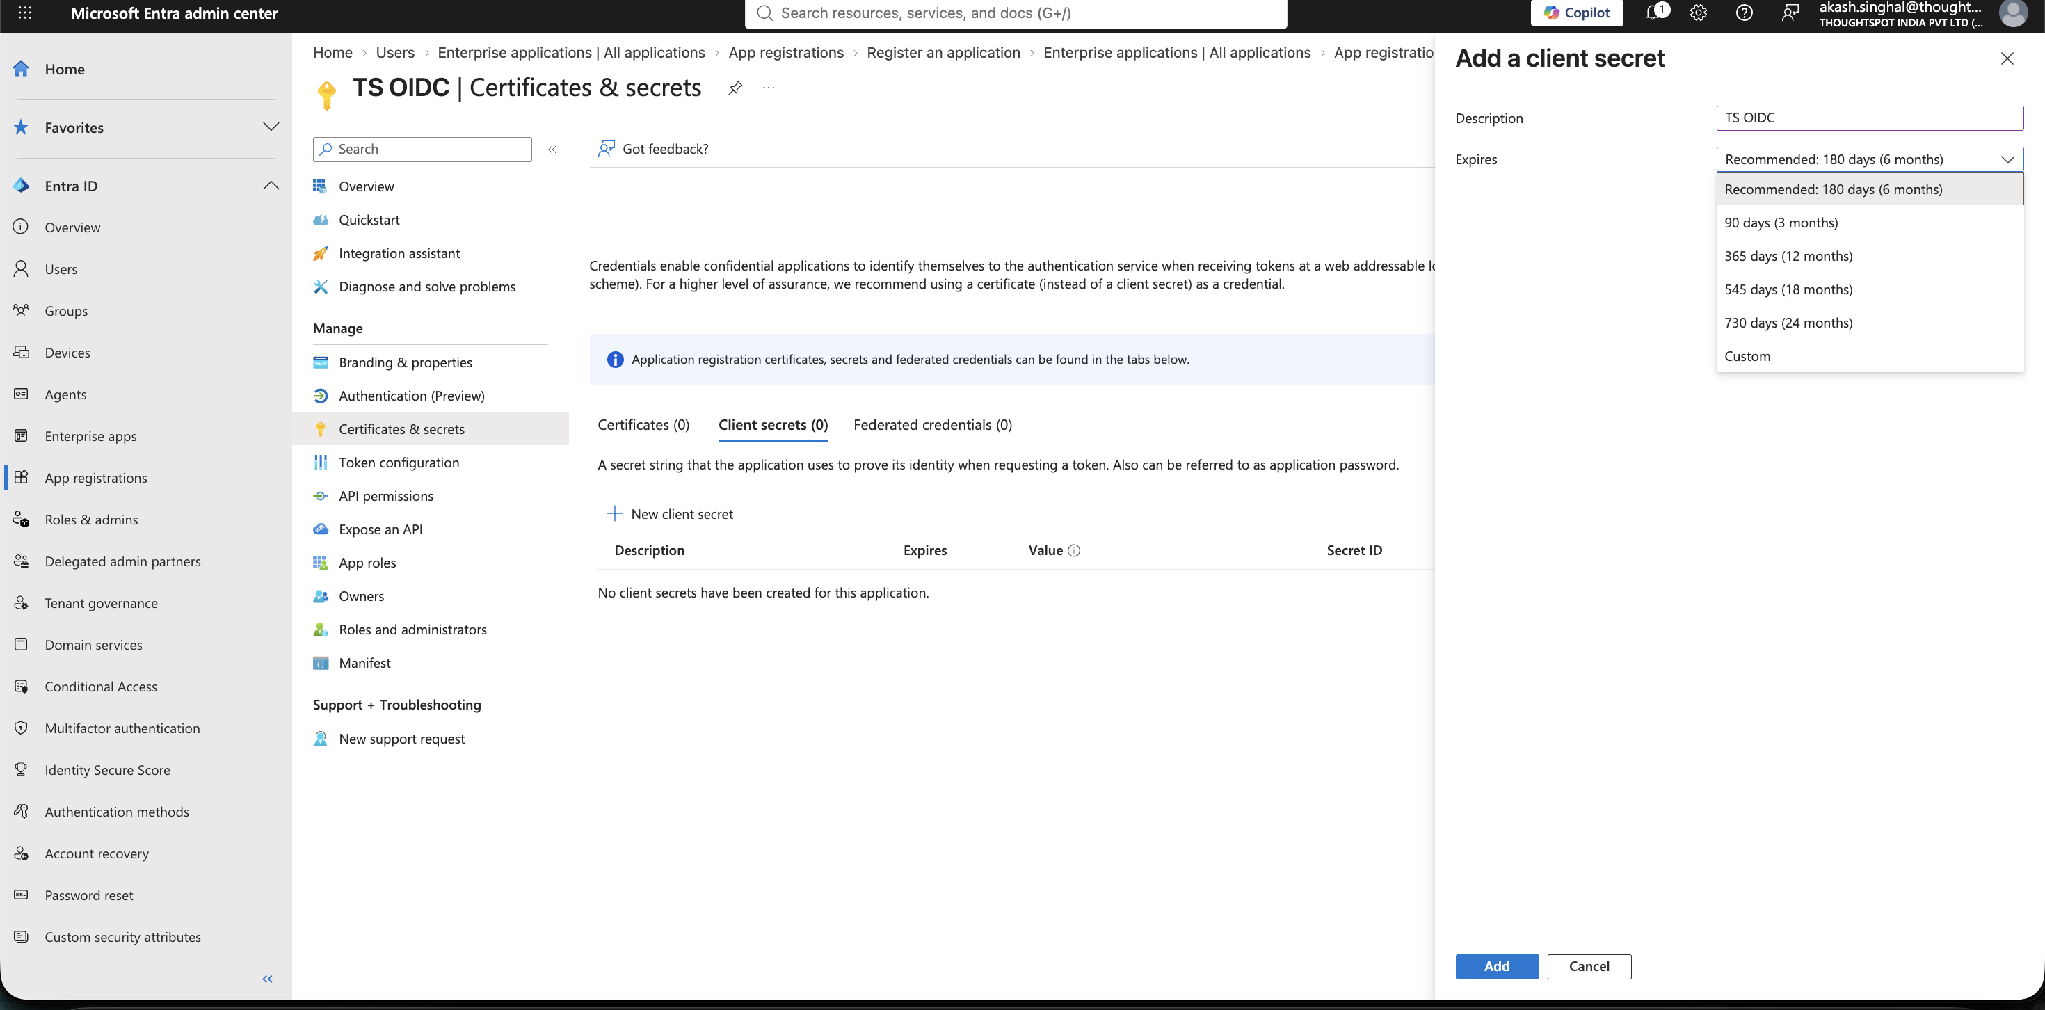
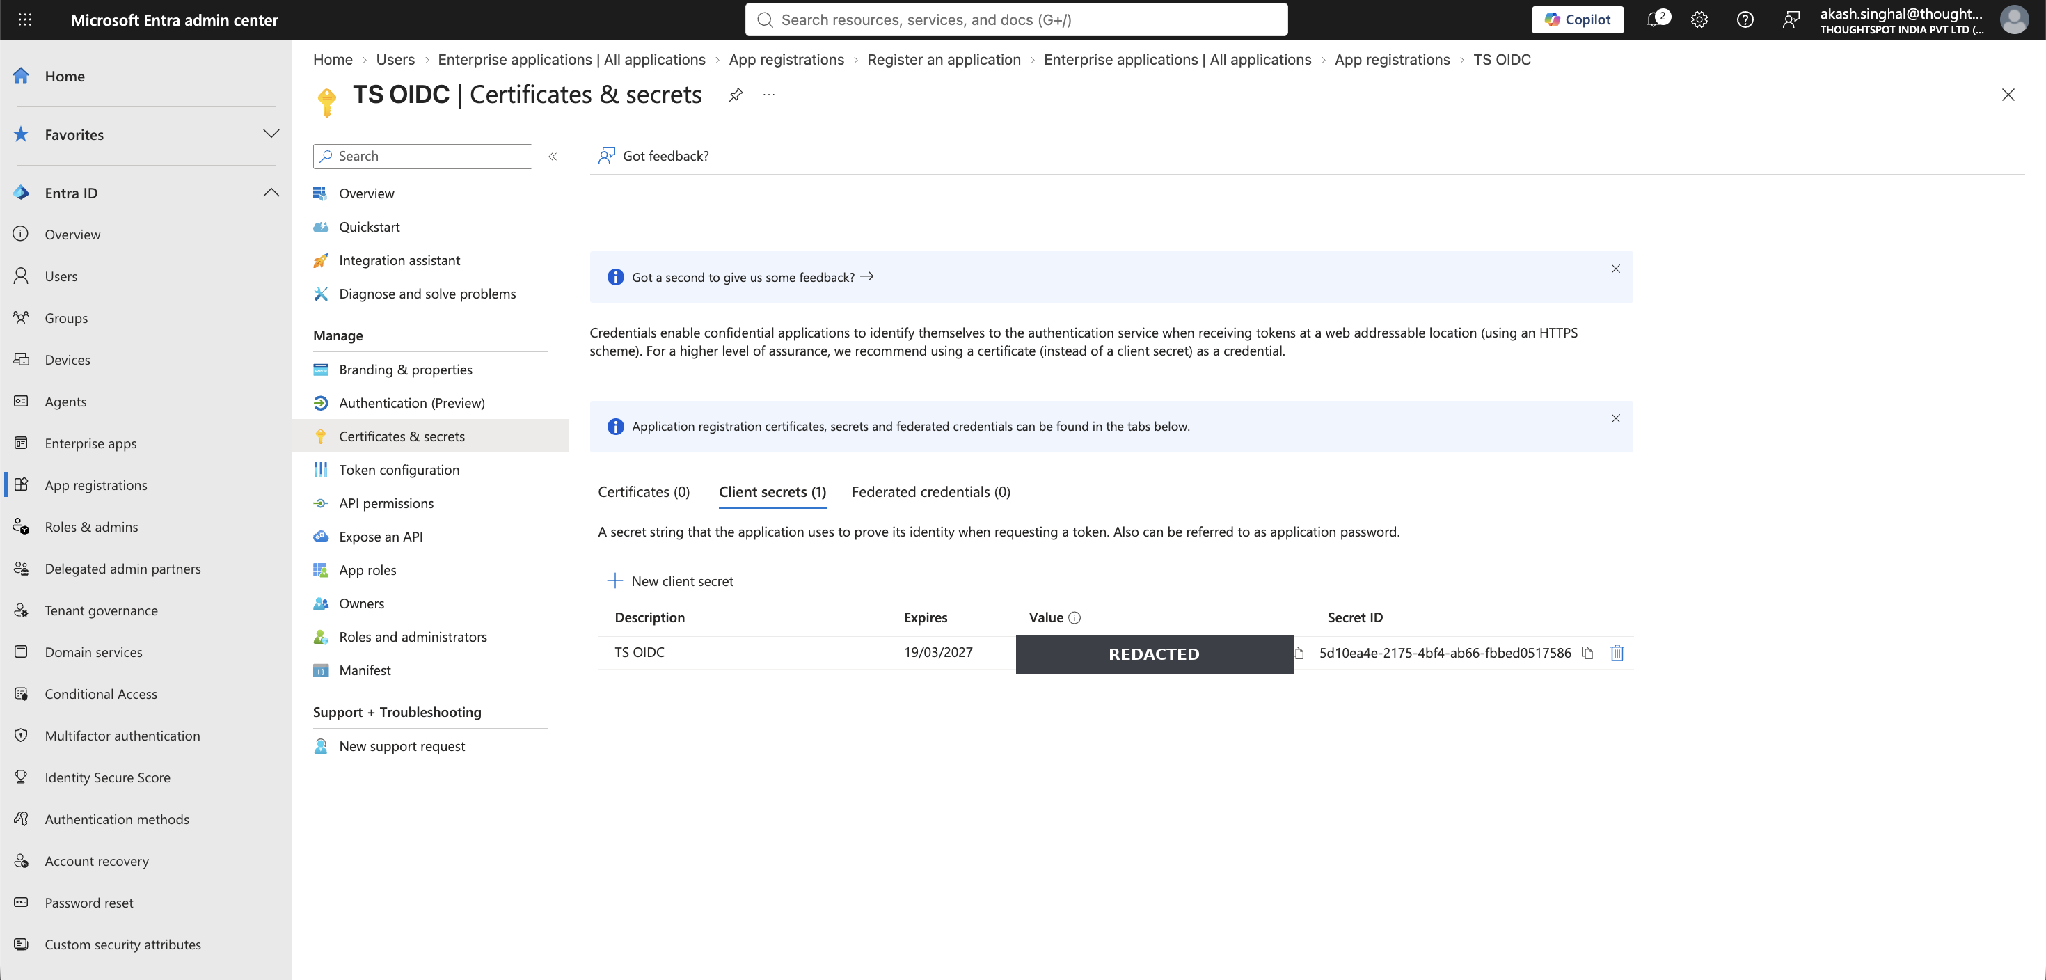
Copy the secret Value immediately and store it securely.
| The client secret Value is displayed only once, at creation. Copy it now — you cannot retrieve it later. Record the expiry date and set a reminder to rotate the secret before it expires. |
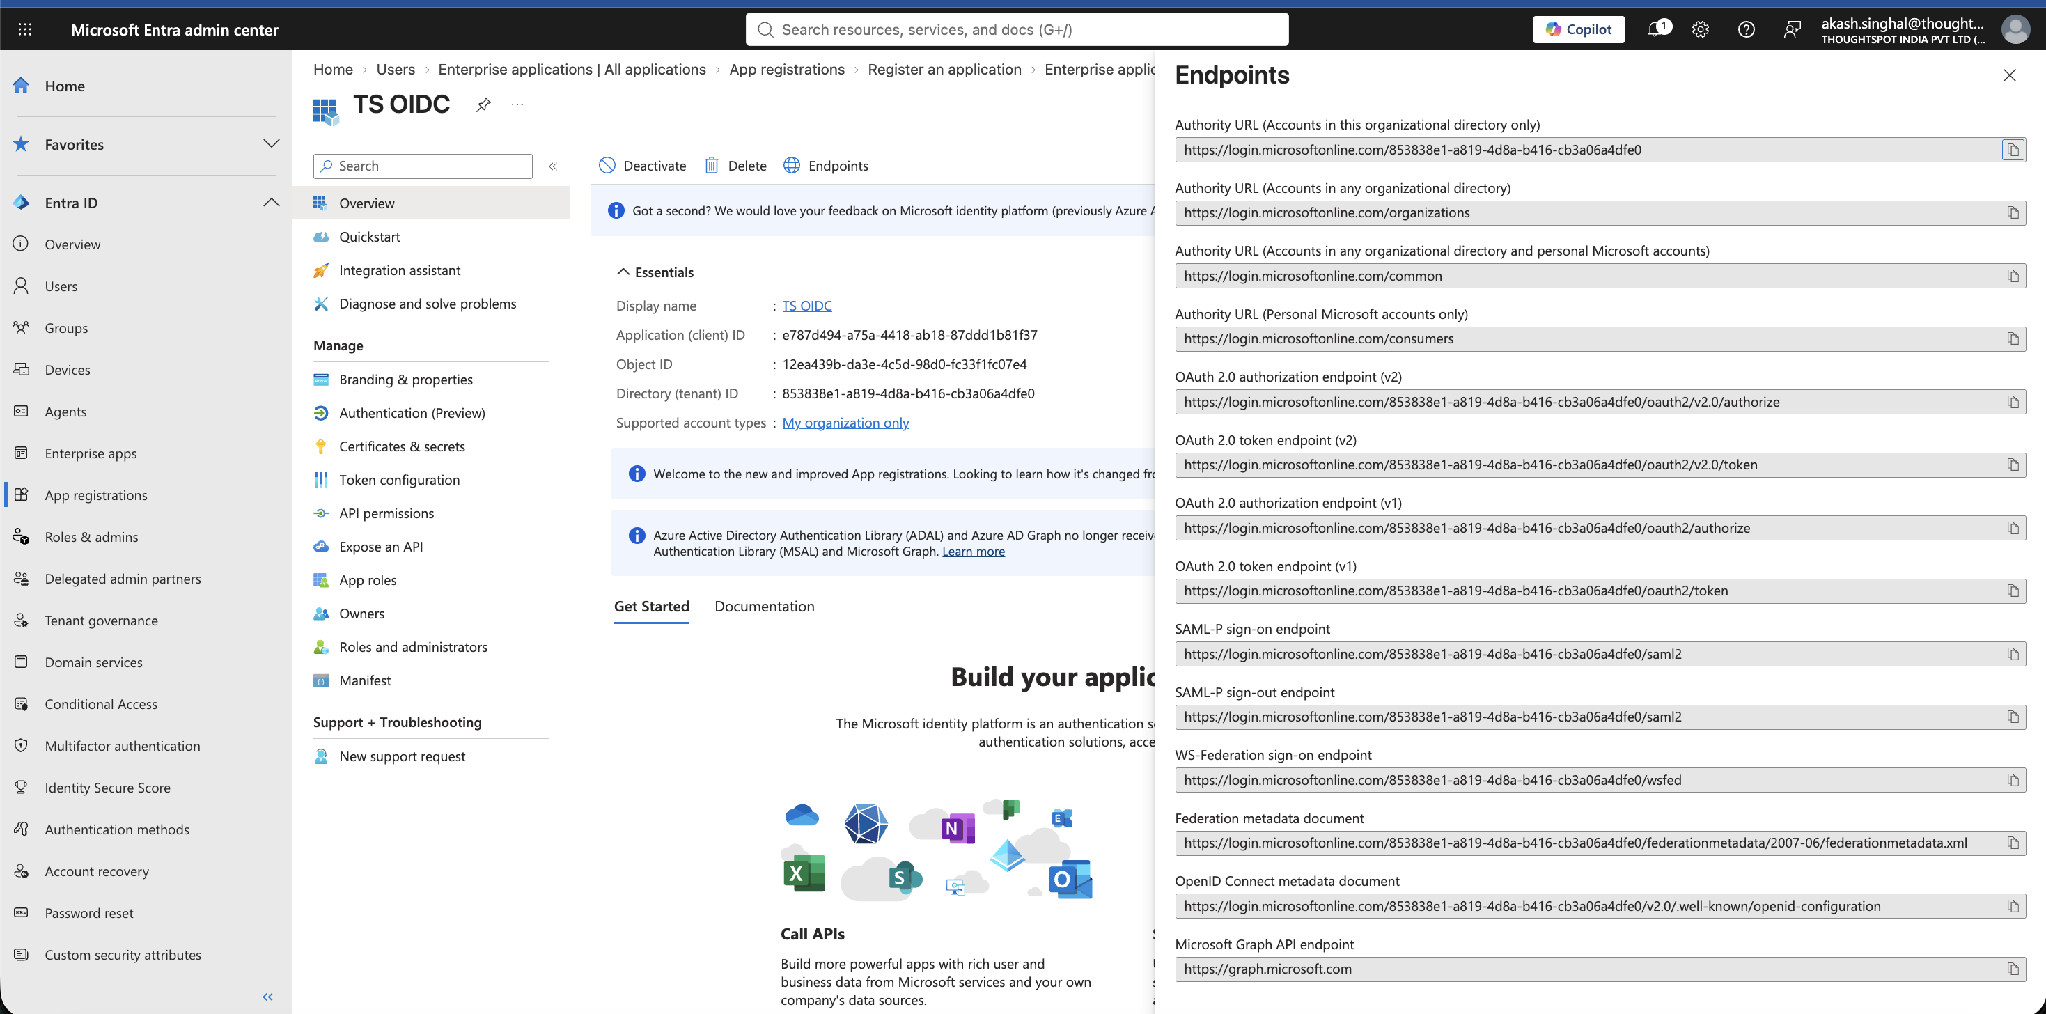
Step 1.4 Retrieve the OIDC endpoints
On the application Overview, select Endpoints. You can also open the OpenID Connect metadata document directly to read every value.
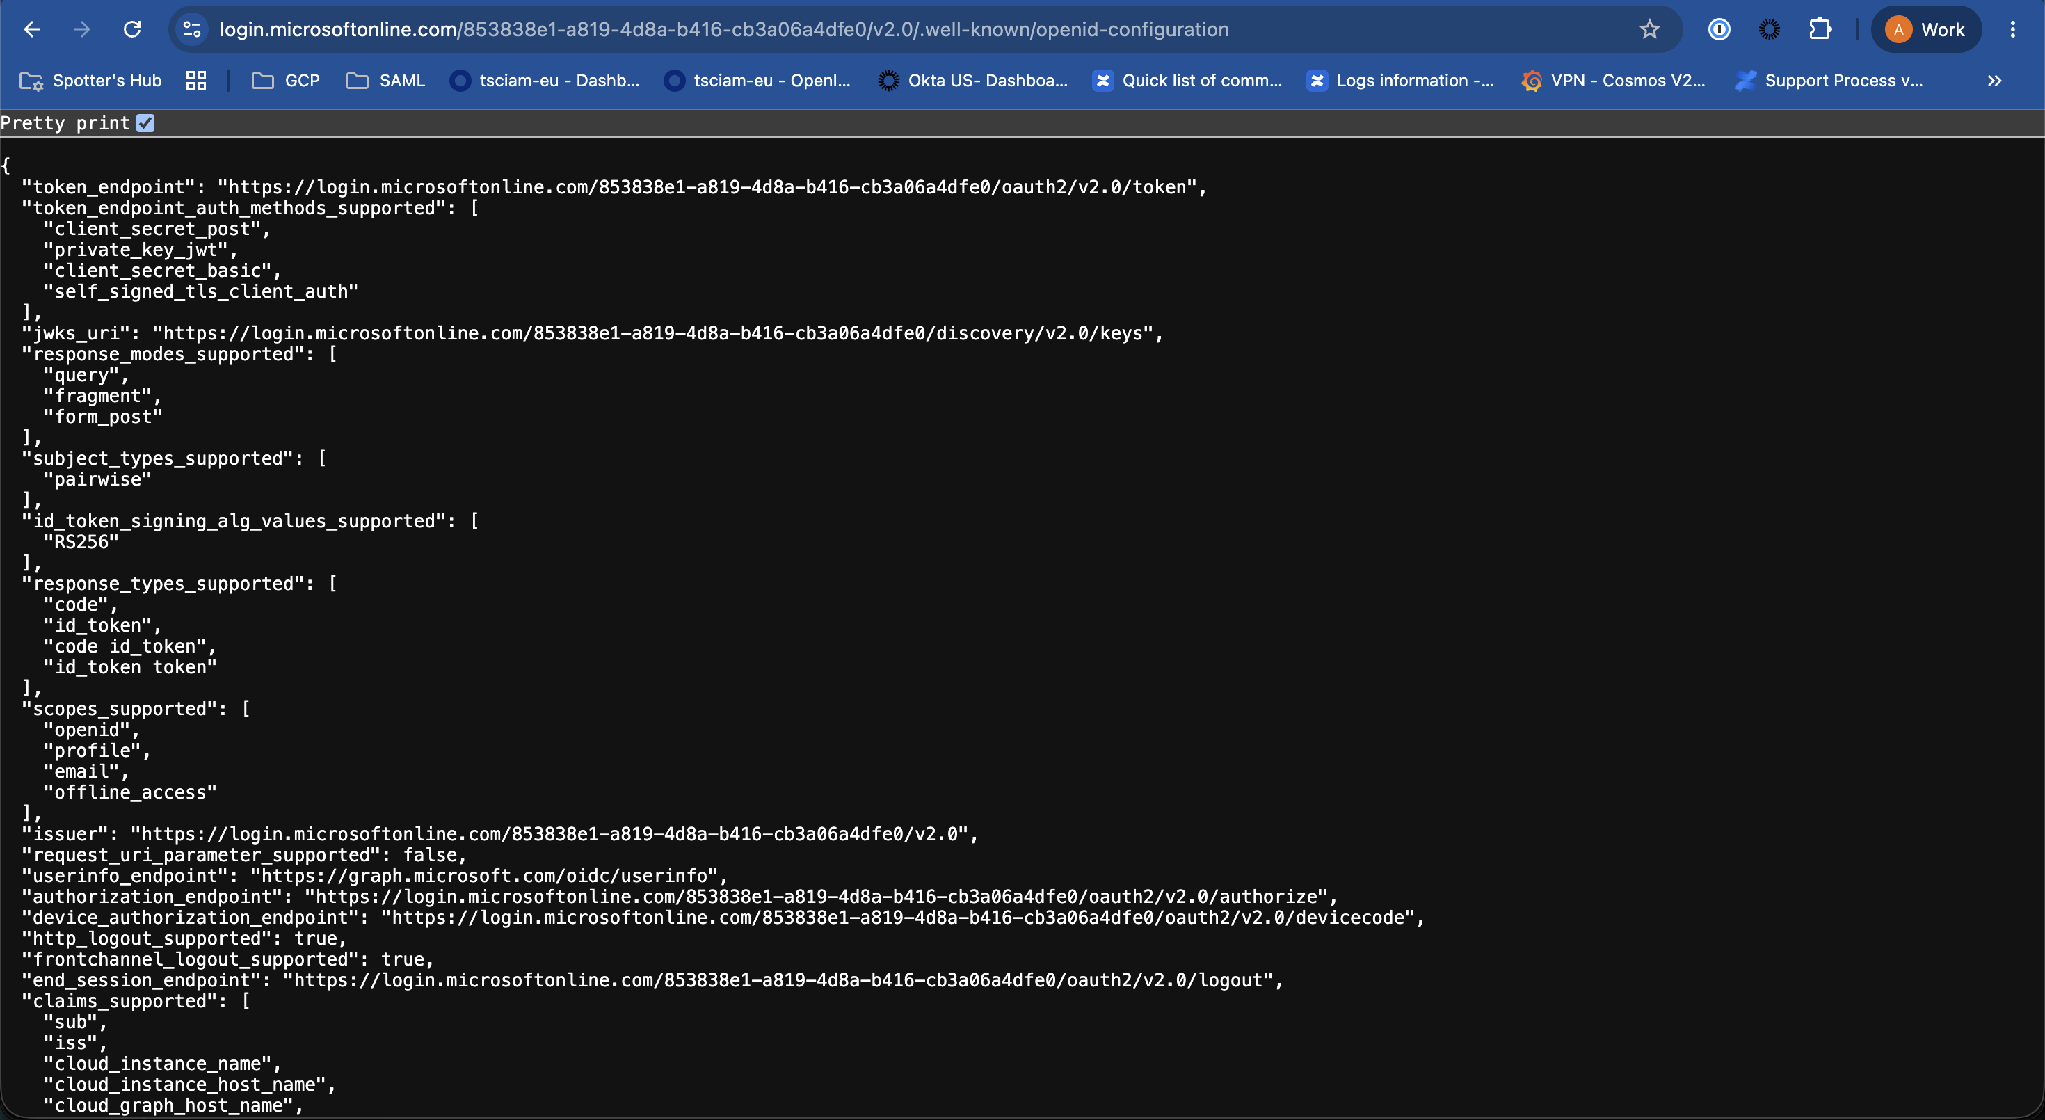
The OpenID Connect metadata document is at: https://login.microsoftonline.com/<tenant-id>/v2.0/.well-known/openid-configuration
From it, note the following values (used in Part 2):
-
authorization_endpoint -
token_endpoint -
issuer(single-tenant form:https://login.microsoftonline.com/<tenant-id>/v2.0) -
jwks_uri -
userinfo_endpoint(optional)
Step 1.5 (Optional) Configure a groups claim
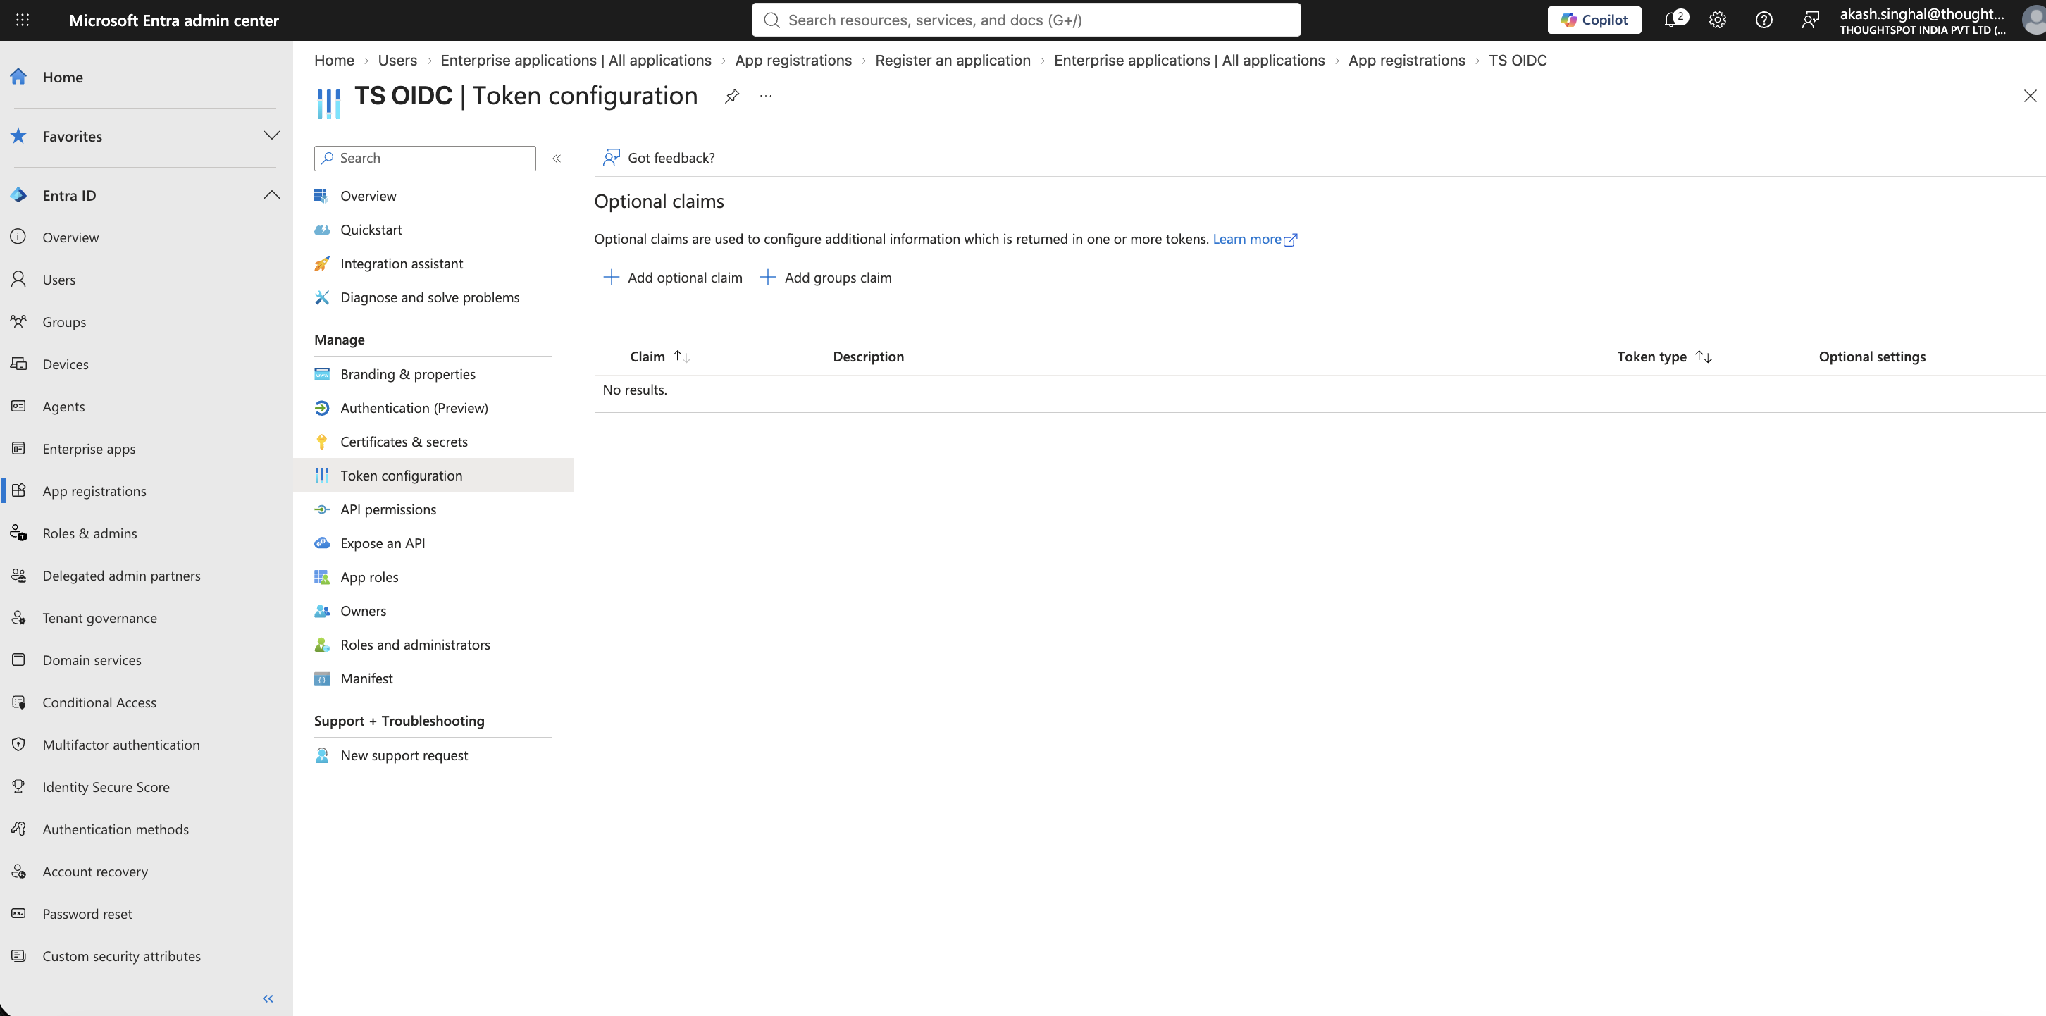
OIDC includes default claims such as email and name automatically. To also pass group membership to ThoughtSpot, add a groups claim. In Token configuration, select Add groups claim.
The claim name is groups. groups is the default OIDC claim for group membership, so there is nothing custom to define — you simply map ThoughtSpot roles to the groups claim in Part 2.
|
In the Edit groups claim panel, choose which group types to include. For most deployments, select Groups assigned to the application — this emits only the groups assigned to this application (Part 3) and avoids exceeding the limit on the number of groups a token can emit.
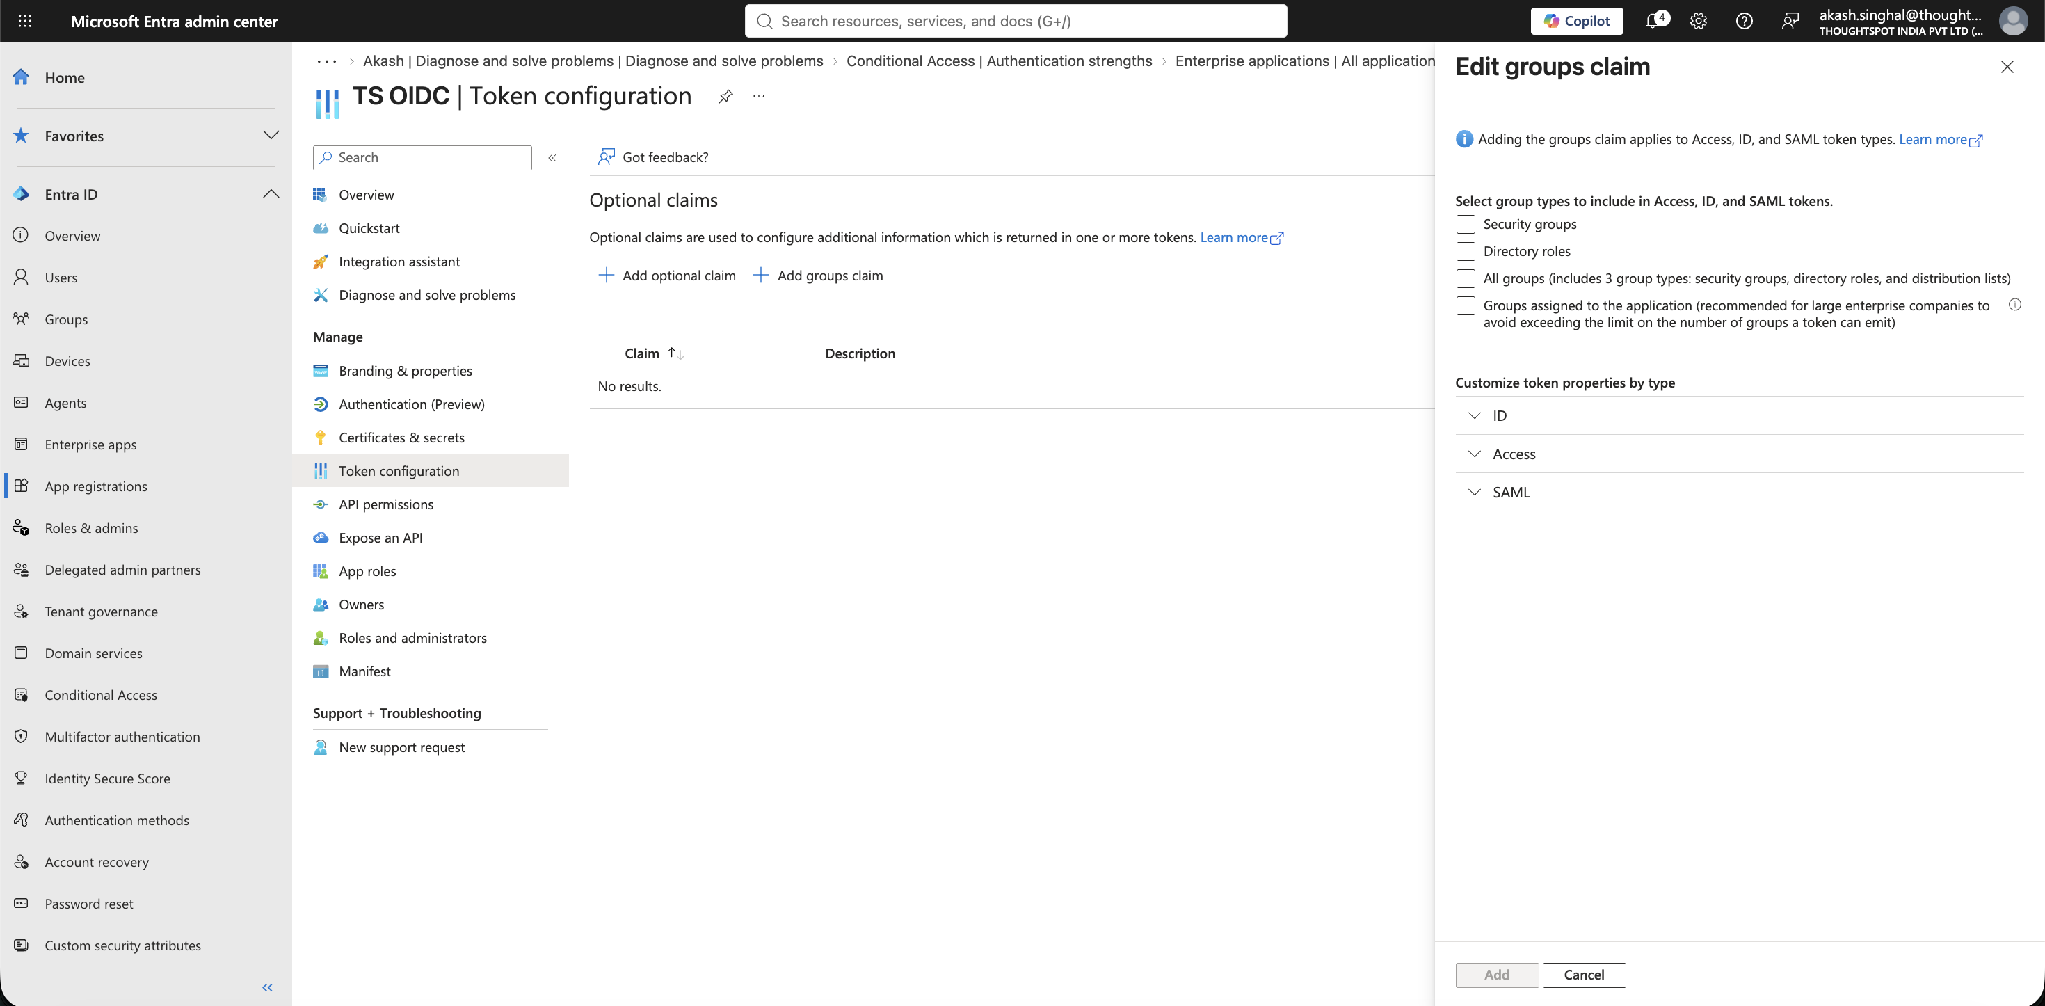
Under Customize token properties by type, you can choose a format (for example, sAMAccountName) to emit the group name instead of the group Object ID.
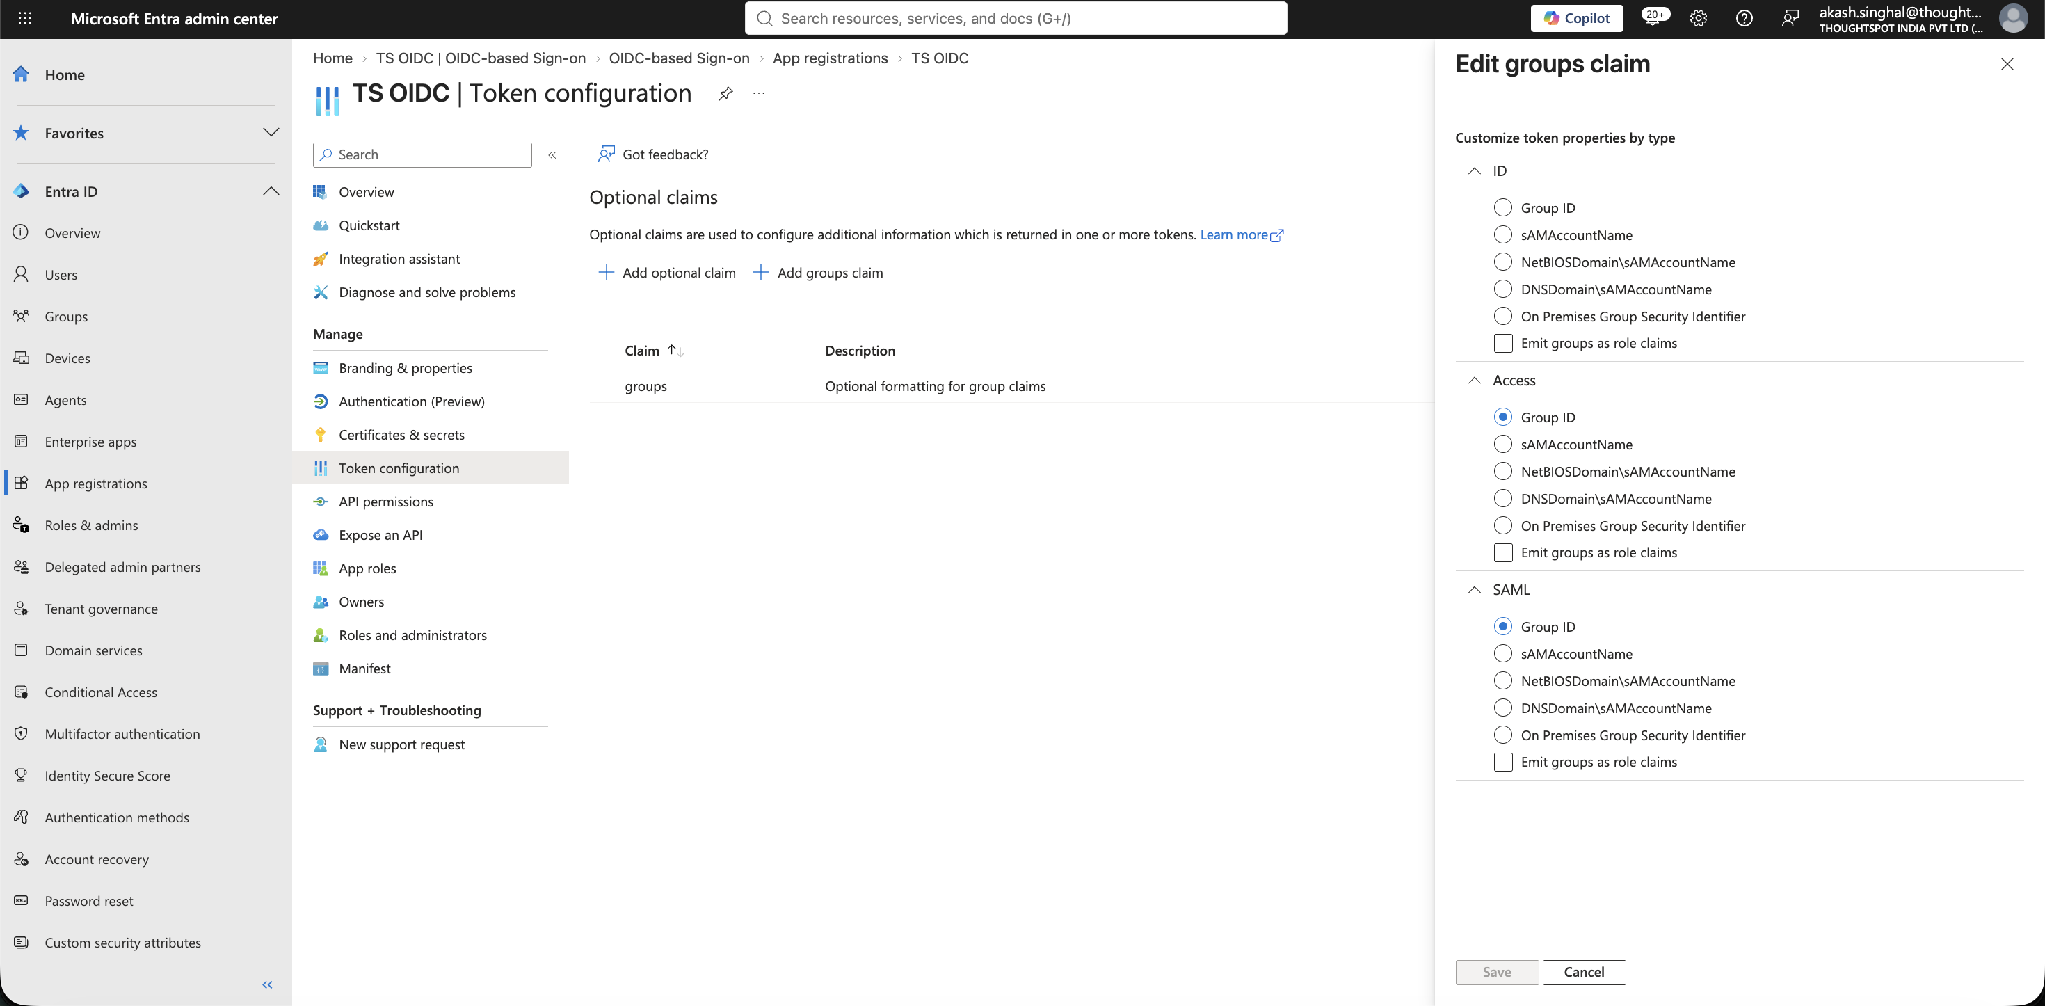
| ID token is what matters for OIDC. ThoughtSpot consumes the ID token, so configure the groups claim under the ID token type. The Access and SAML token settings on this panel do not apply to this OIDC flow. |
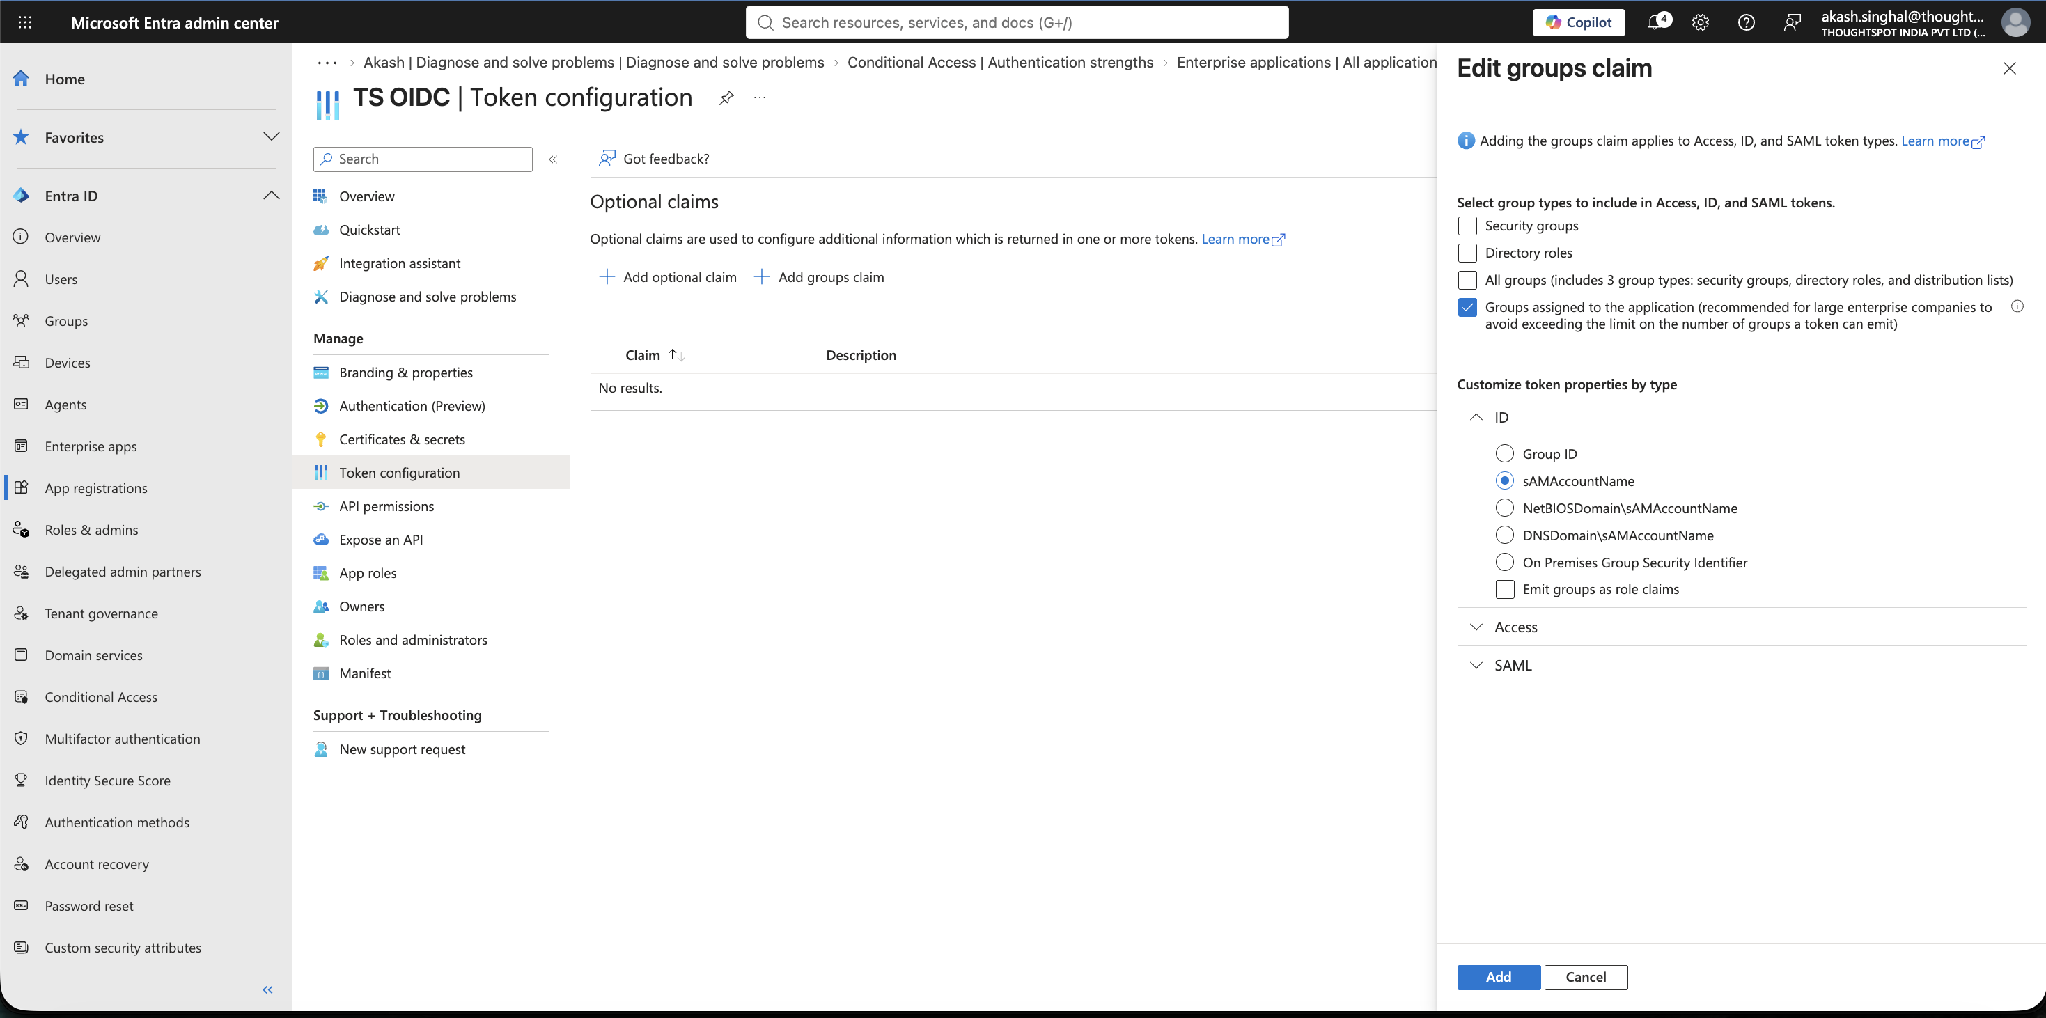
| Group name vs. Object ID. The name formats (sAMAccountName, NetBIOSDomain\sAMAccountName, DNSDomain\sAMAccountName, and On Premises Group Security Identifier) only return a group name for groups that are synced from on-premises Active Directory. For cloud-only Entra ID groups, none of these apply and Entra emits the group Object ID (GUID) regardless of the format selected. To get names for cloud groups, see Step 1.6. |
After you add it, the groups claim appears in the Token configuration list.
Step 1.6 (Optional) Get group names for cloud-only Entra groups
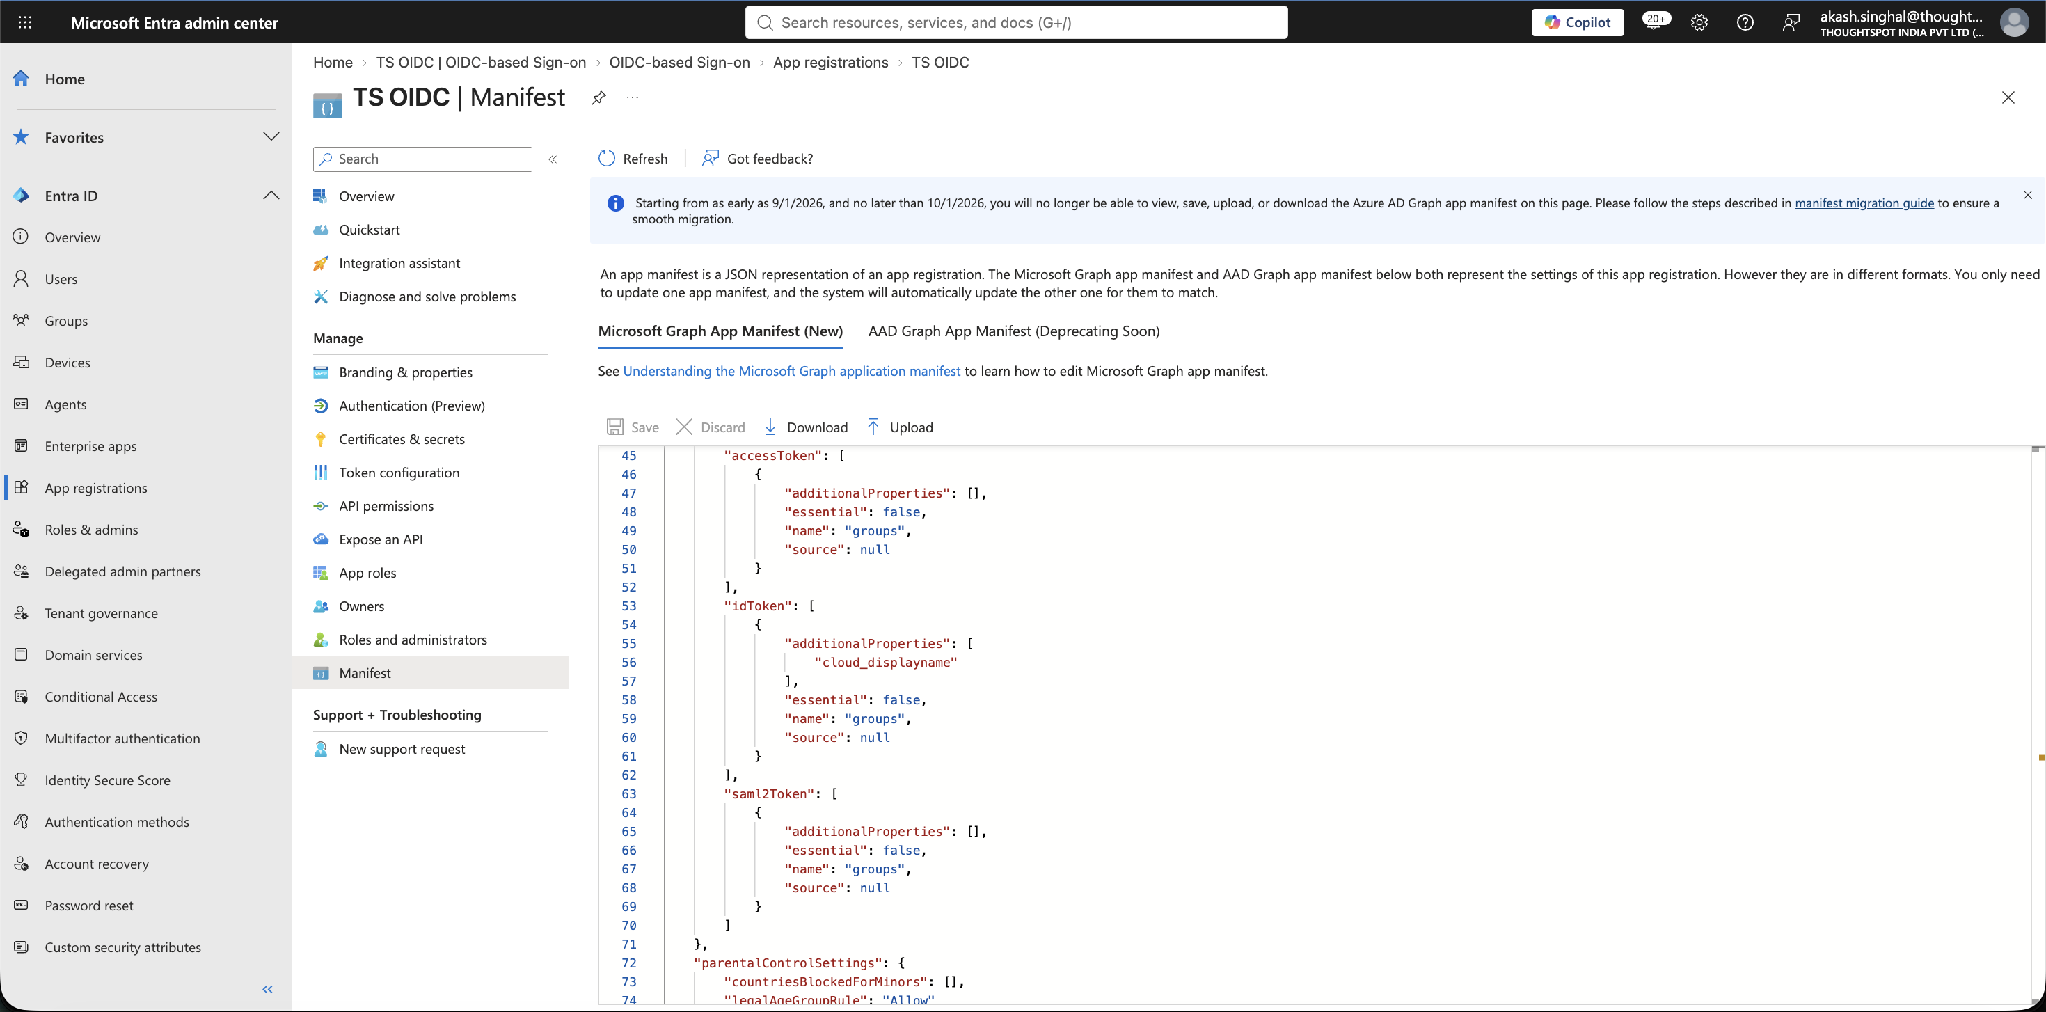
As noted above, cloud-only Entra ID groups emit the group Object ID (GUID) rather than a name, so ThoughtSpot receives group IDs instead of group names. To receive group names for cloud groups, edit the application manifest and add cloud_displayname to the groups claim in the ID token section:
-
From the app registration Overview, open Manifest.
-
In the Microsoft Graph App Manifest tab, find the
groupsclaim under theidTokensection. -
Add
cloud_displaynameto that claim’sadditionalProperties, as shown below, then select Save.
Edit the ID token entry. For OIDC only the idToken section matters — the accessToken and saml2Token entries for the groups claim are not used by this flow.
|
If group names already appear, skip this. If you already receive group names in ThoughtSpot without this edit, you can ignore it — that typically means your groups are synced from an on-premises Active Directory, where the name formats already return a name, so choosing sAMAccountName should do the trick.
|
Part 2 — Create the OIDC connection in ThoughtSpot
This part covers the values you enter for Microsoft Entra ID. For a description of every field in the ThoughtSpot OIDC configuration, see Enable OIDC authentication.
Step 2.1 Start Add Identity Provider
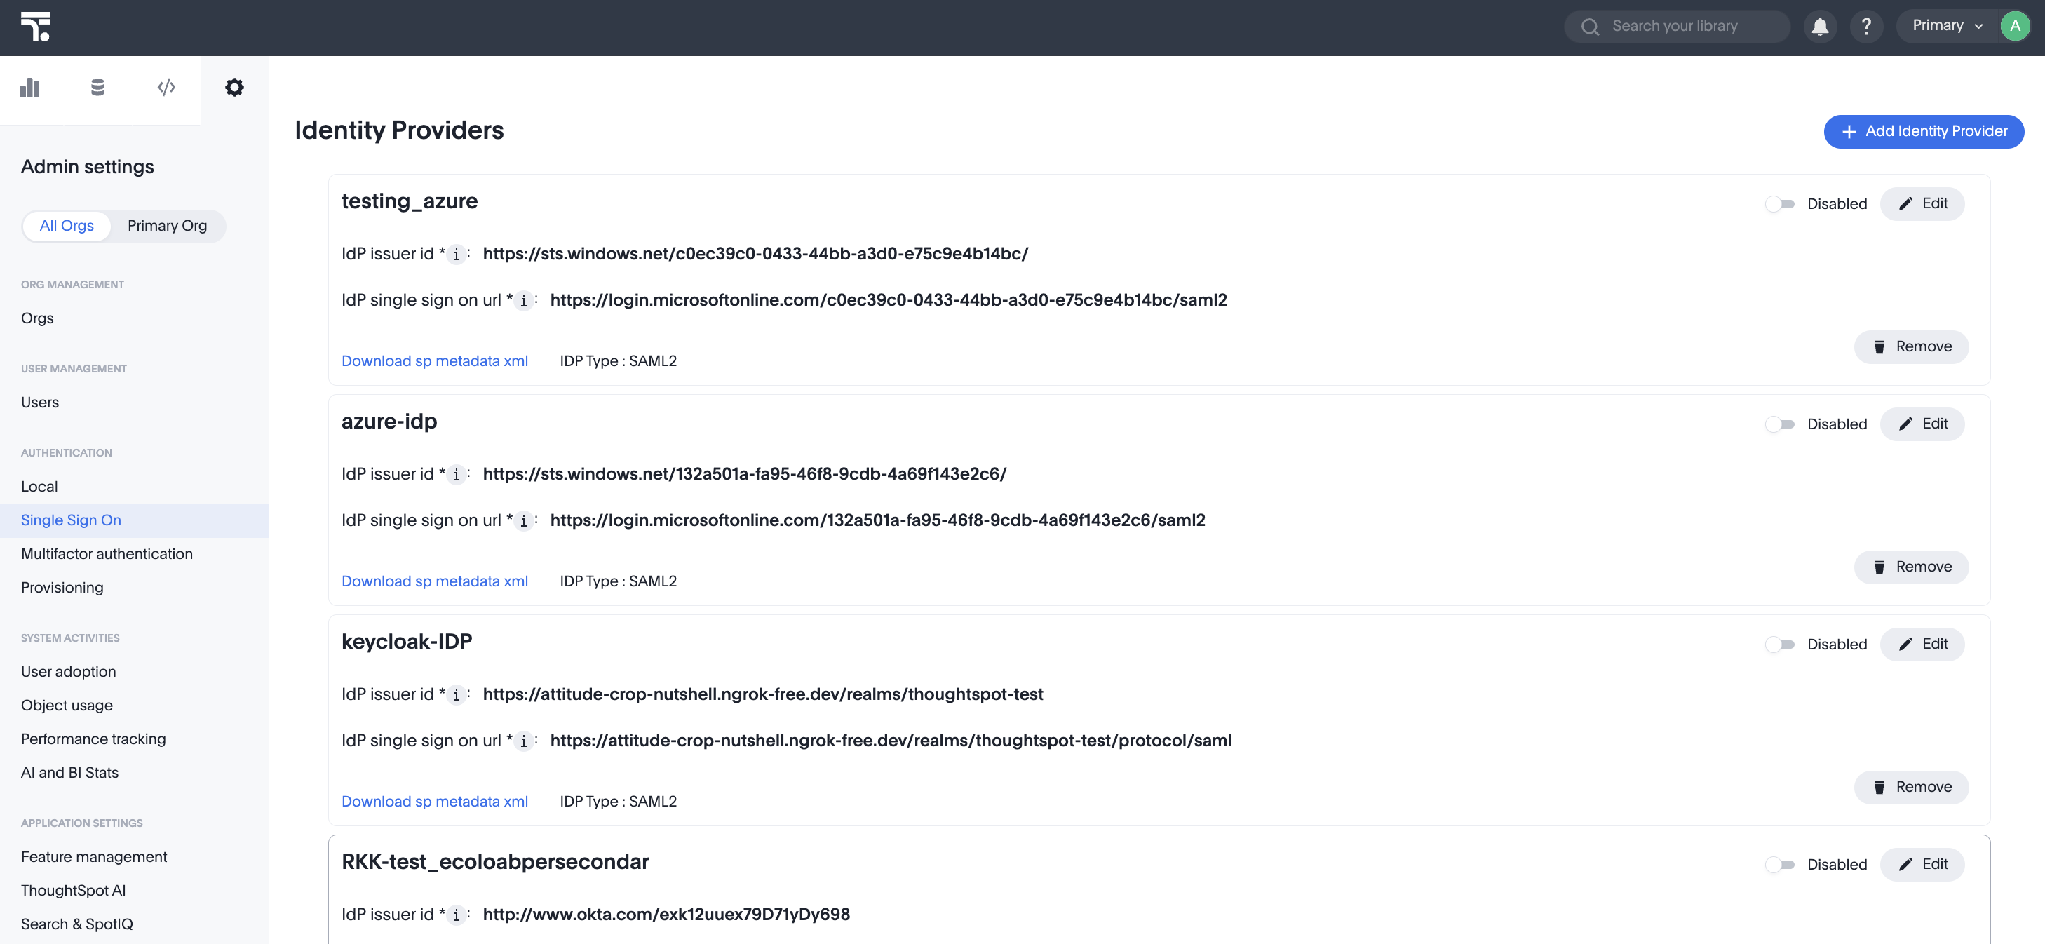
In ThoughtSpot, go to Admin > Single Sign On and select Add Identity Provider.
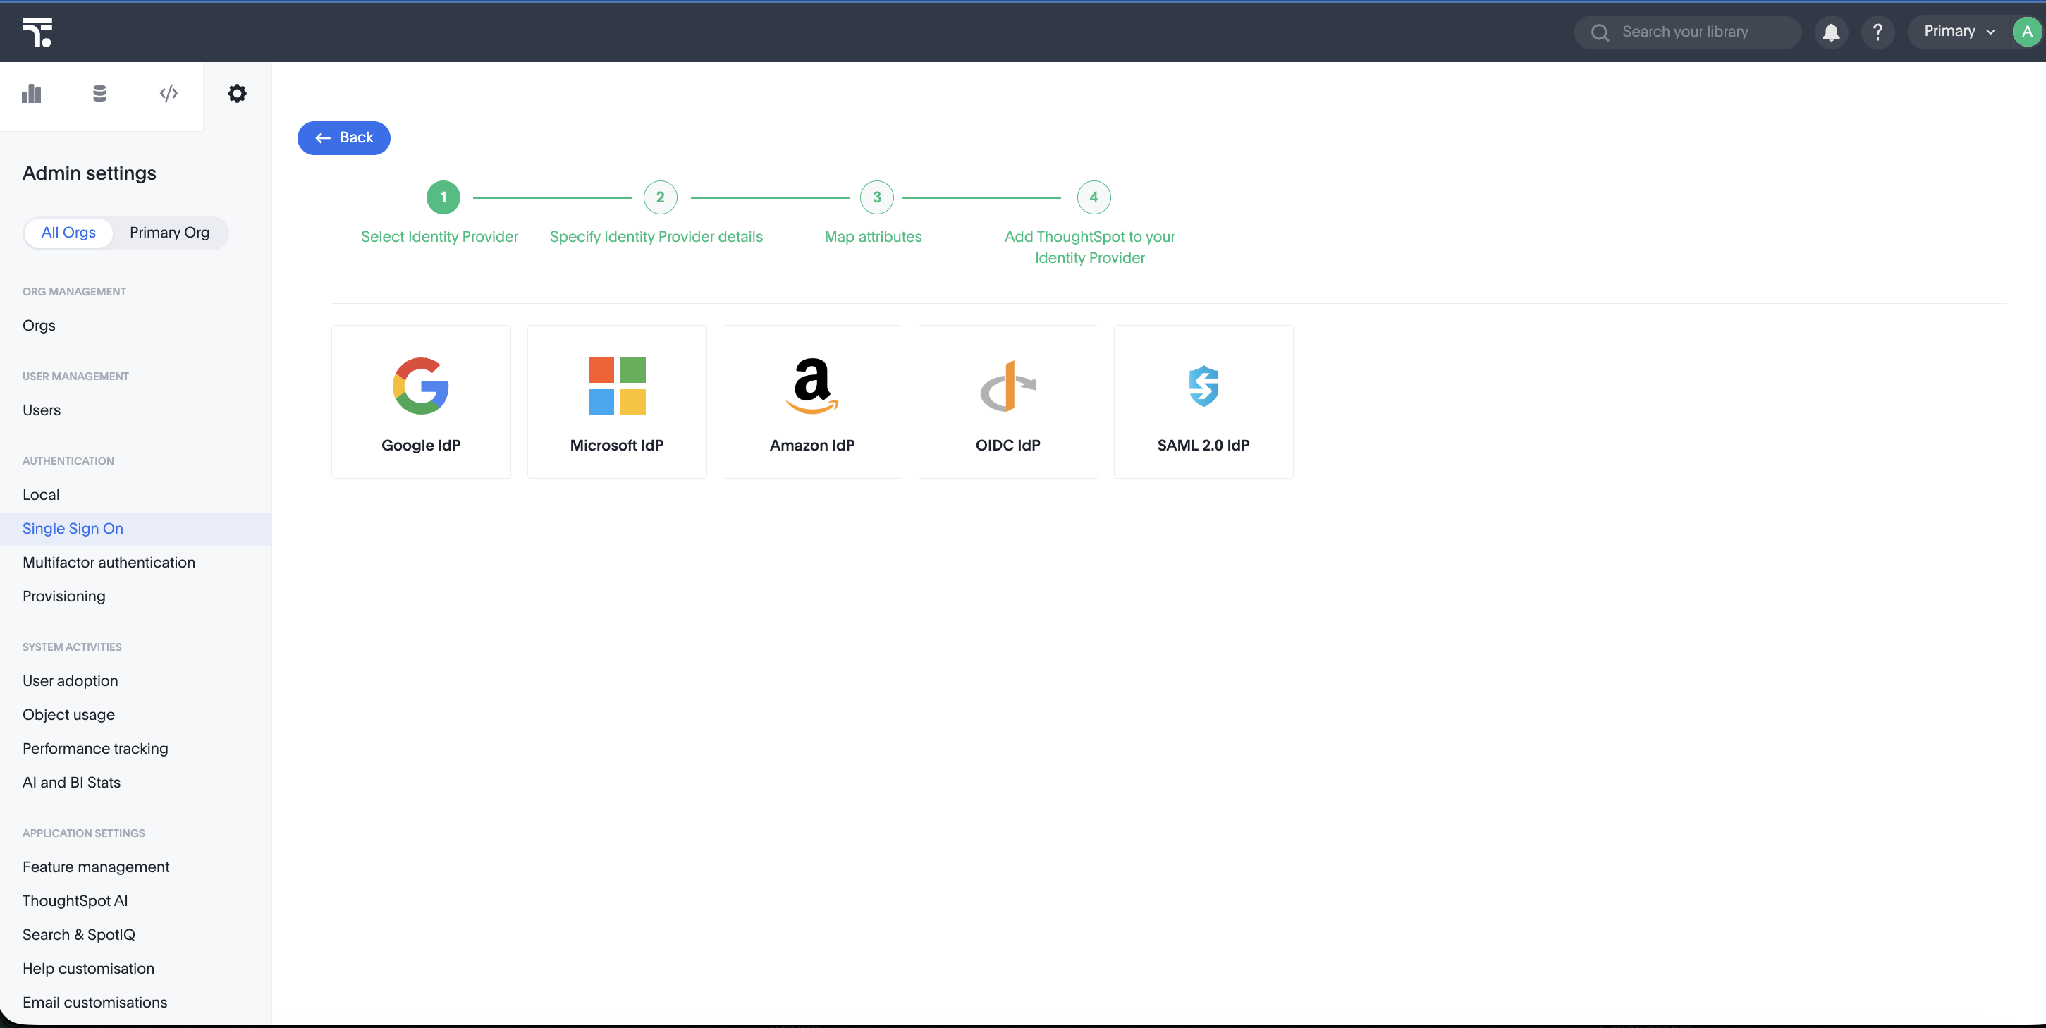
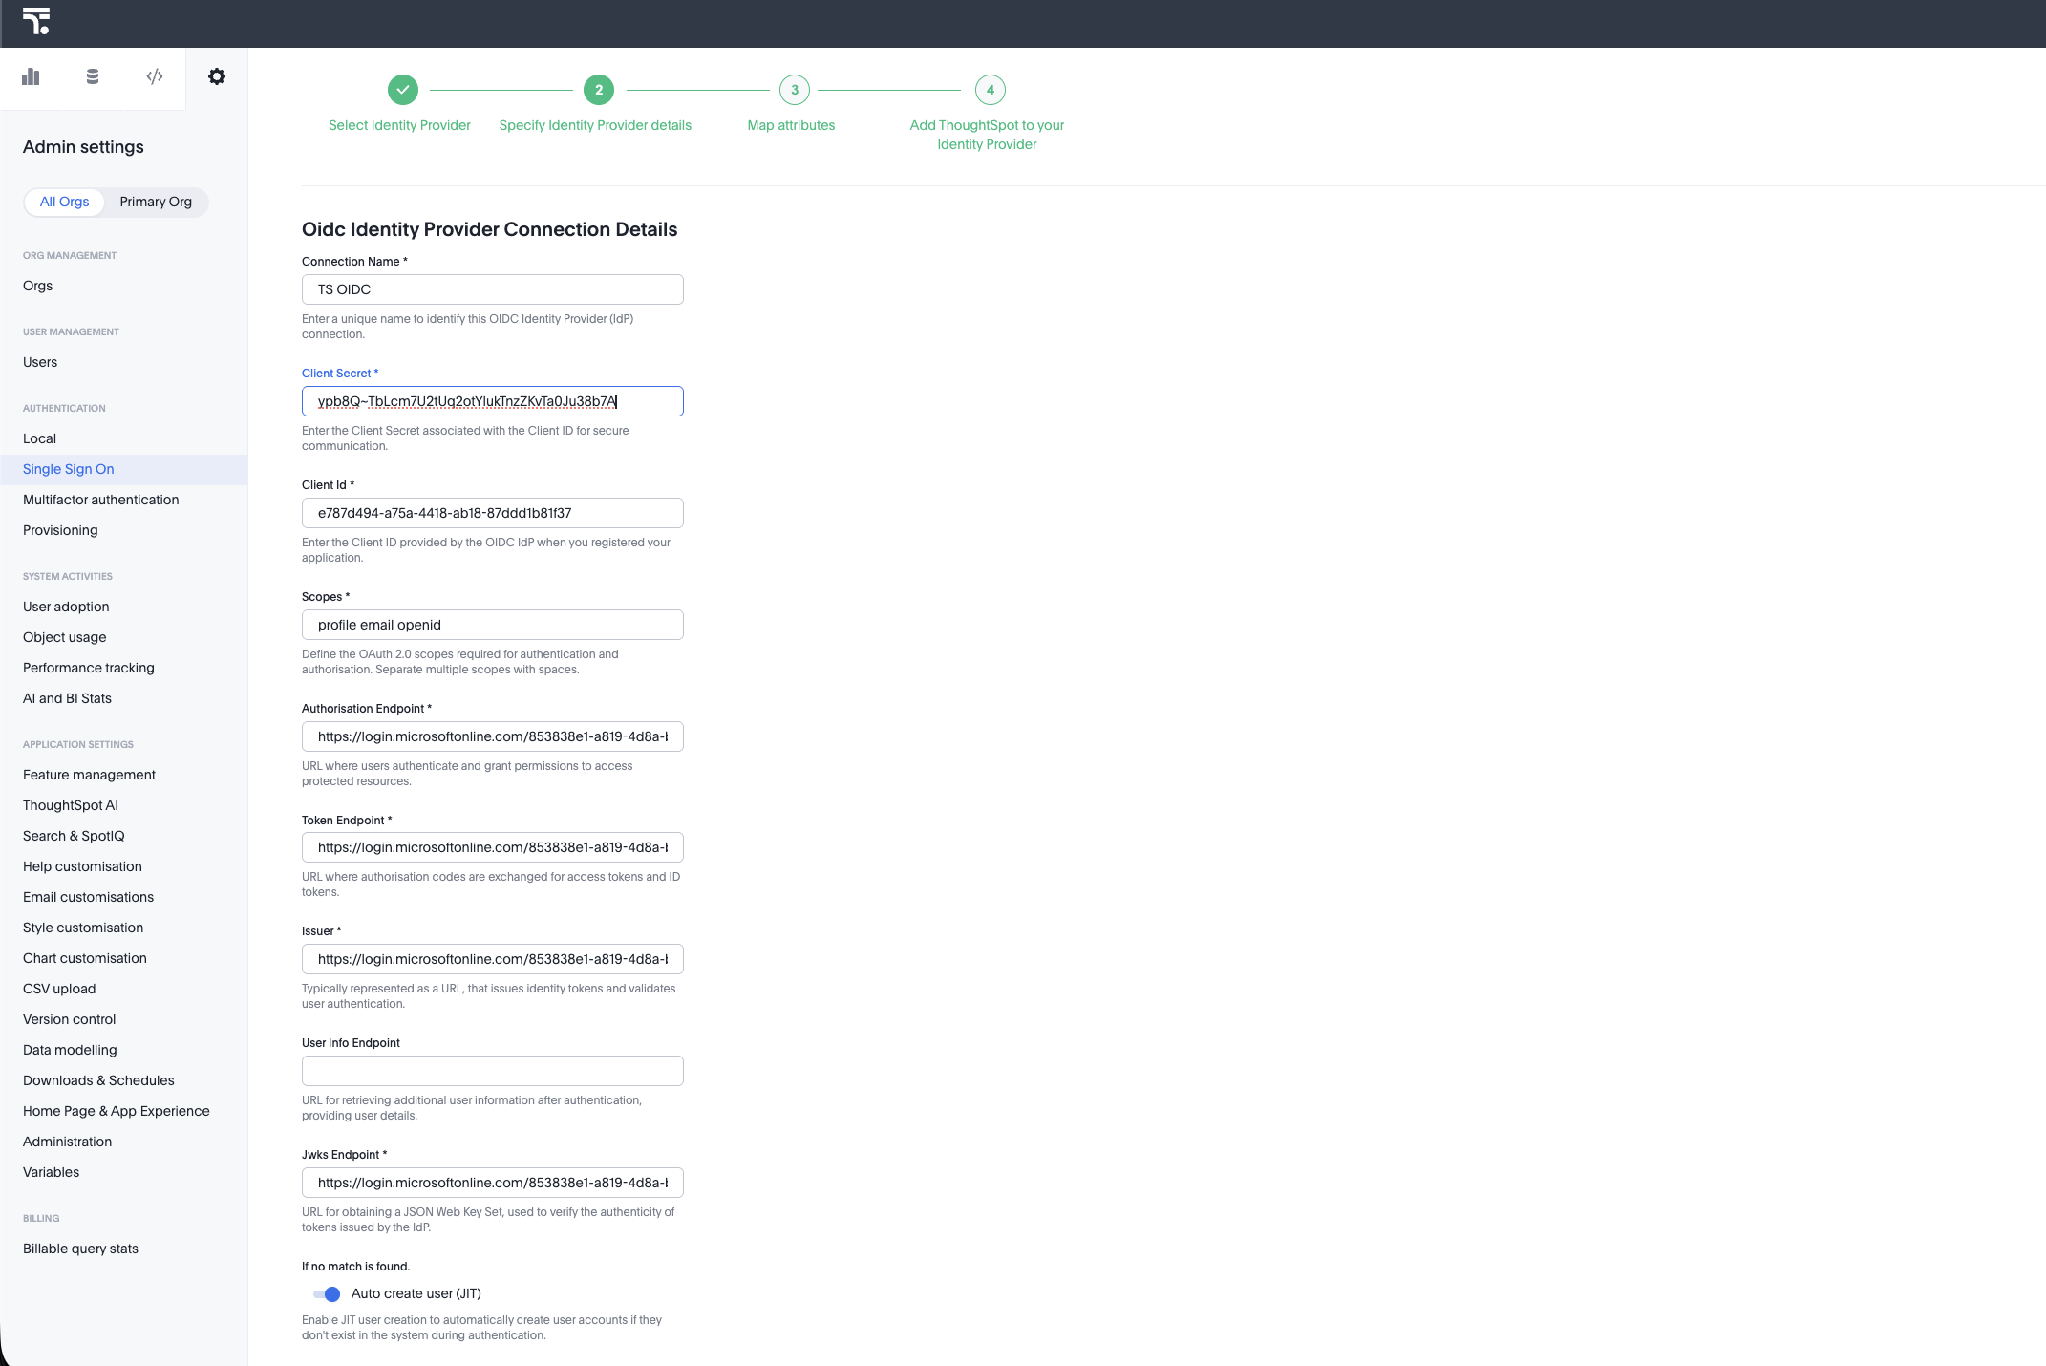
Step 2.3 Enter the connection details
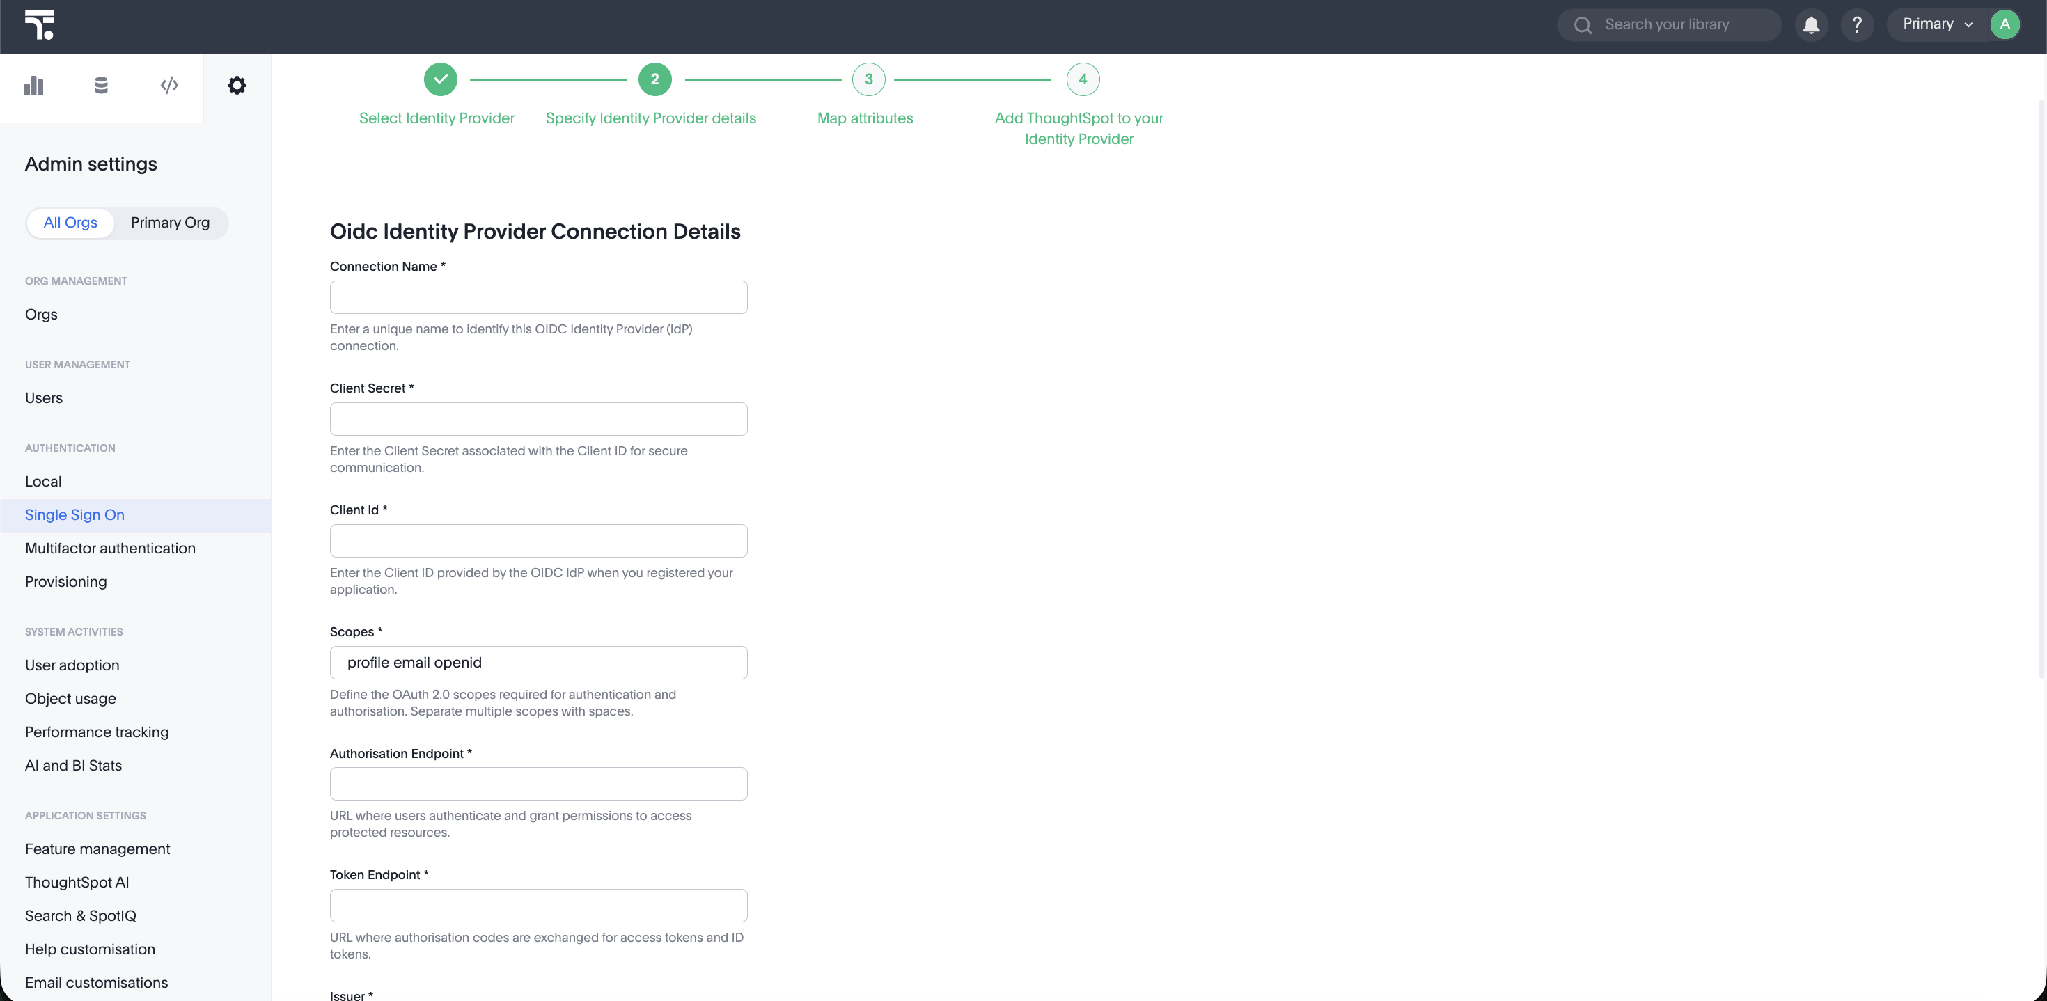
Complete the OIDC Identity Provider Connection Details form using the values you collected from Entra:
-
Connection Name — a unique name for this connection.
-
Client Secret — the secret Value from Step 1.3.
-
Client Id — the Application (client) ID from Step 1.2.
-
Scopes —
profile email openid. -
Authorisation Endpoint, Token Endpoint, Issuer, Jwks Endpoint — from Step 1.4.
-
User Info Endpoint — optional.
-
Auto create user (JIT) — enable to create ThoughtSpot accounts automatically on first successful sign-in.
Step 2.4 Map attributes
Map the claims from the IdP token to ThoughtSpot user attributes. A typical mapping is Username → email, Email → email, and Display name → name (the name claim represents the user’s display-name property in OIDC). If you configured a groups claim in Step 1.5, map roles → groups (groups is the default OIDC claim name, so no custom claim is required). Optionally map Orgs and Default Org. Select Save and continue.
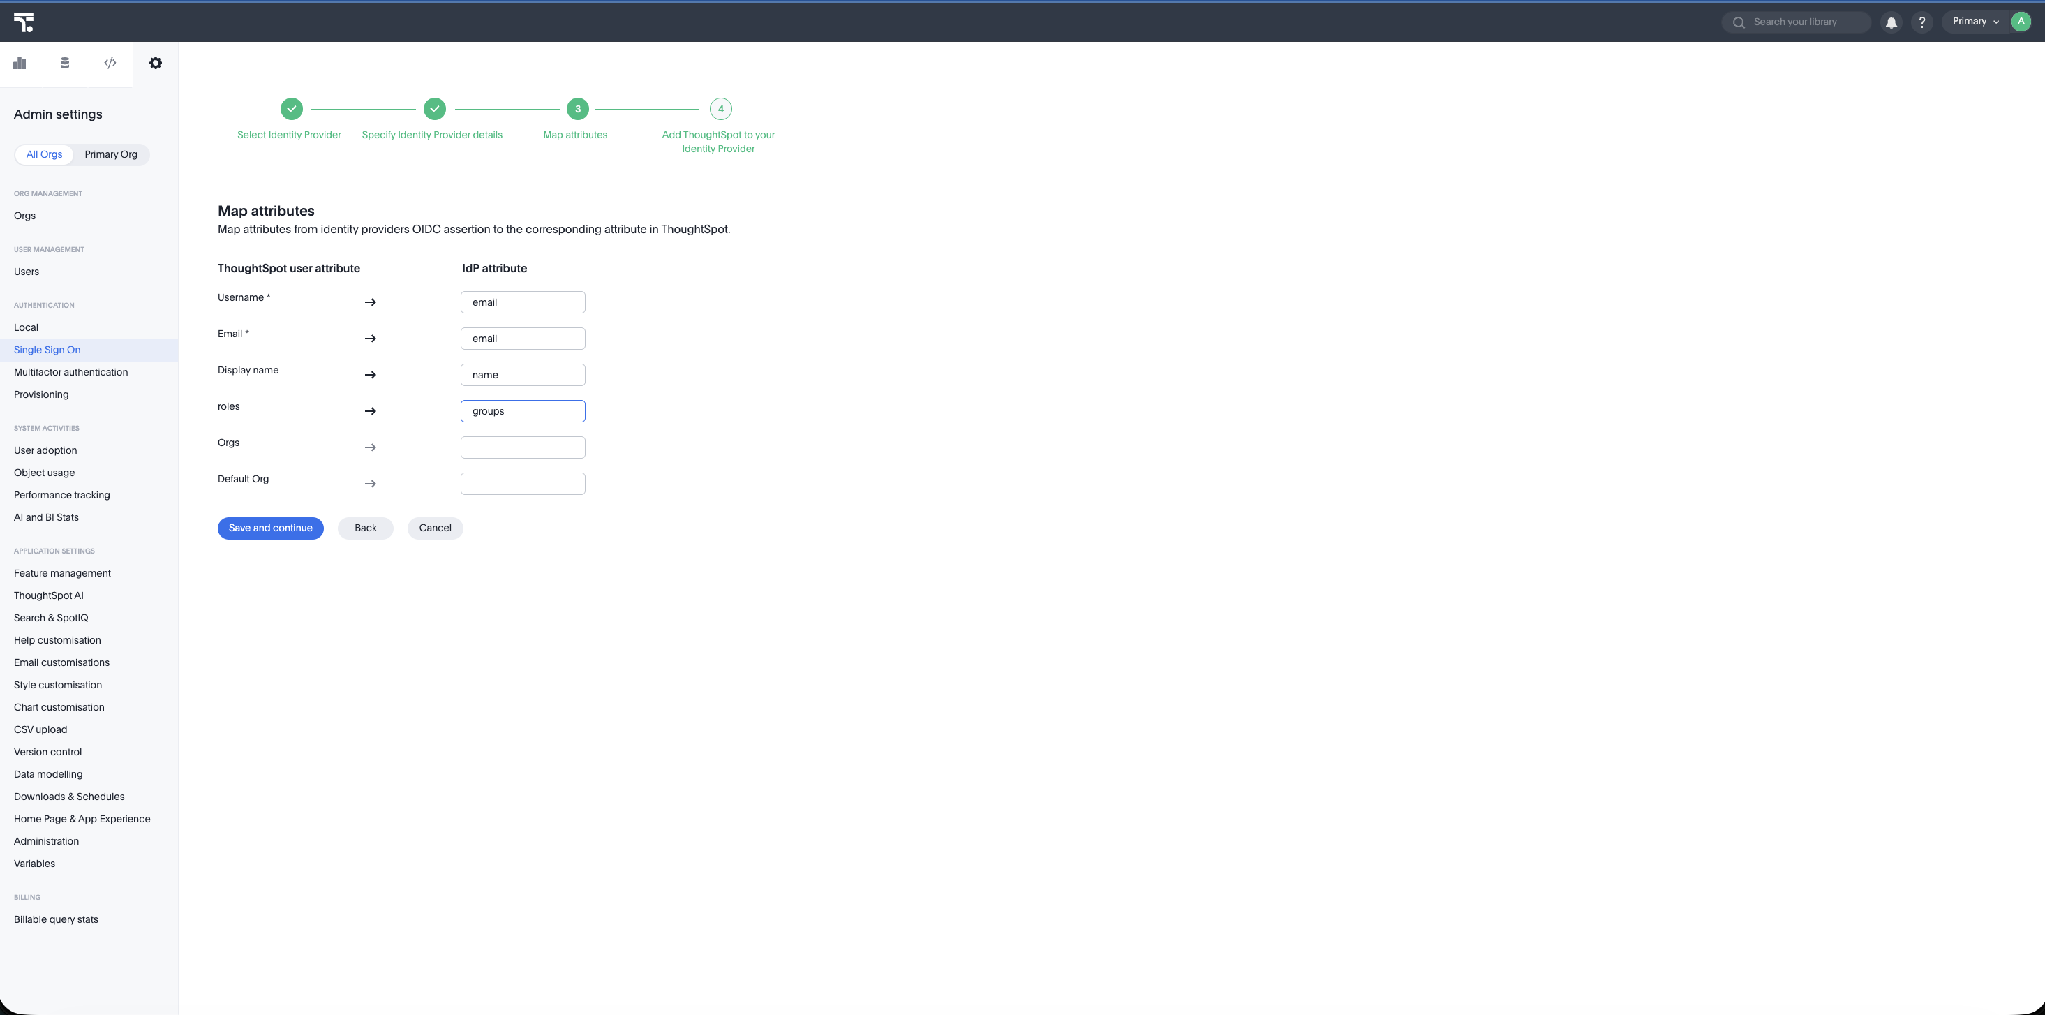
Username source. You can map Username to preferred_username instead of email if you want the ThoughtSpot username to be the user’s UID rather than their email address.
|
Group mapping requires activation by ThoughtSpot Support. The roles → groups mapping does not take effect until Support enables group mapping from the backend. See Group mapping requirements and scope.
|
Step 2.5 Copy the ThoughtSpot callback URL
On the final step, ThoughtSpot displays a Callback URL to register in your identity provider. Copy it — you will add it to the Entra app in Part 3. The callback URL has the form:
| Choose Later at this point rather than Enable — enable the connection only after you have added the redirect URI and assigned users in Entra (Part 3), then return to enable it in Part 4. |
Part 3 — Complete the application configuration in Microsoft Entra ID
Step 3.1 Add the redirect (callback) URI
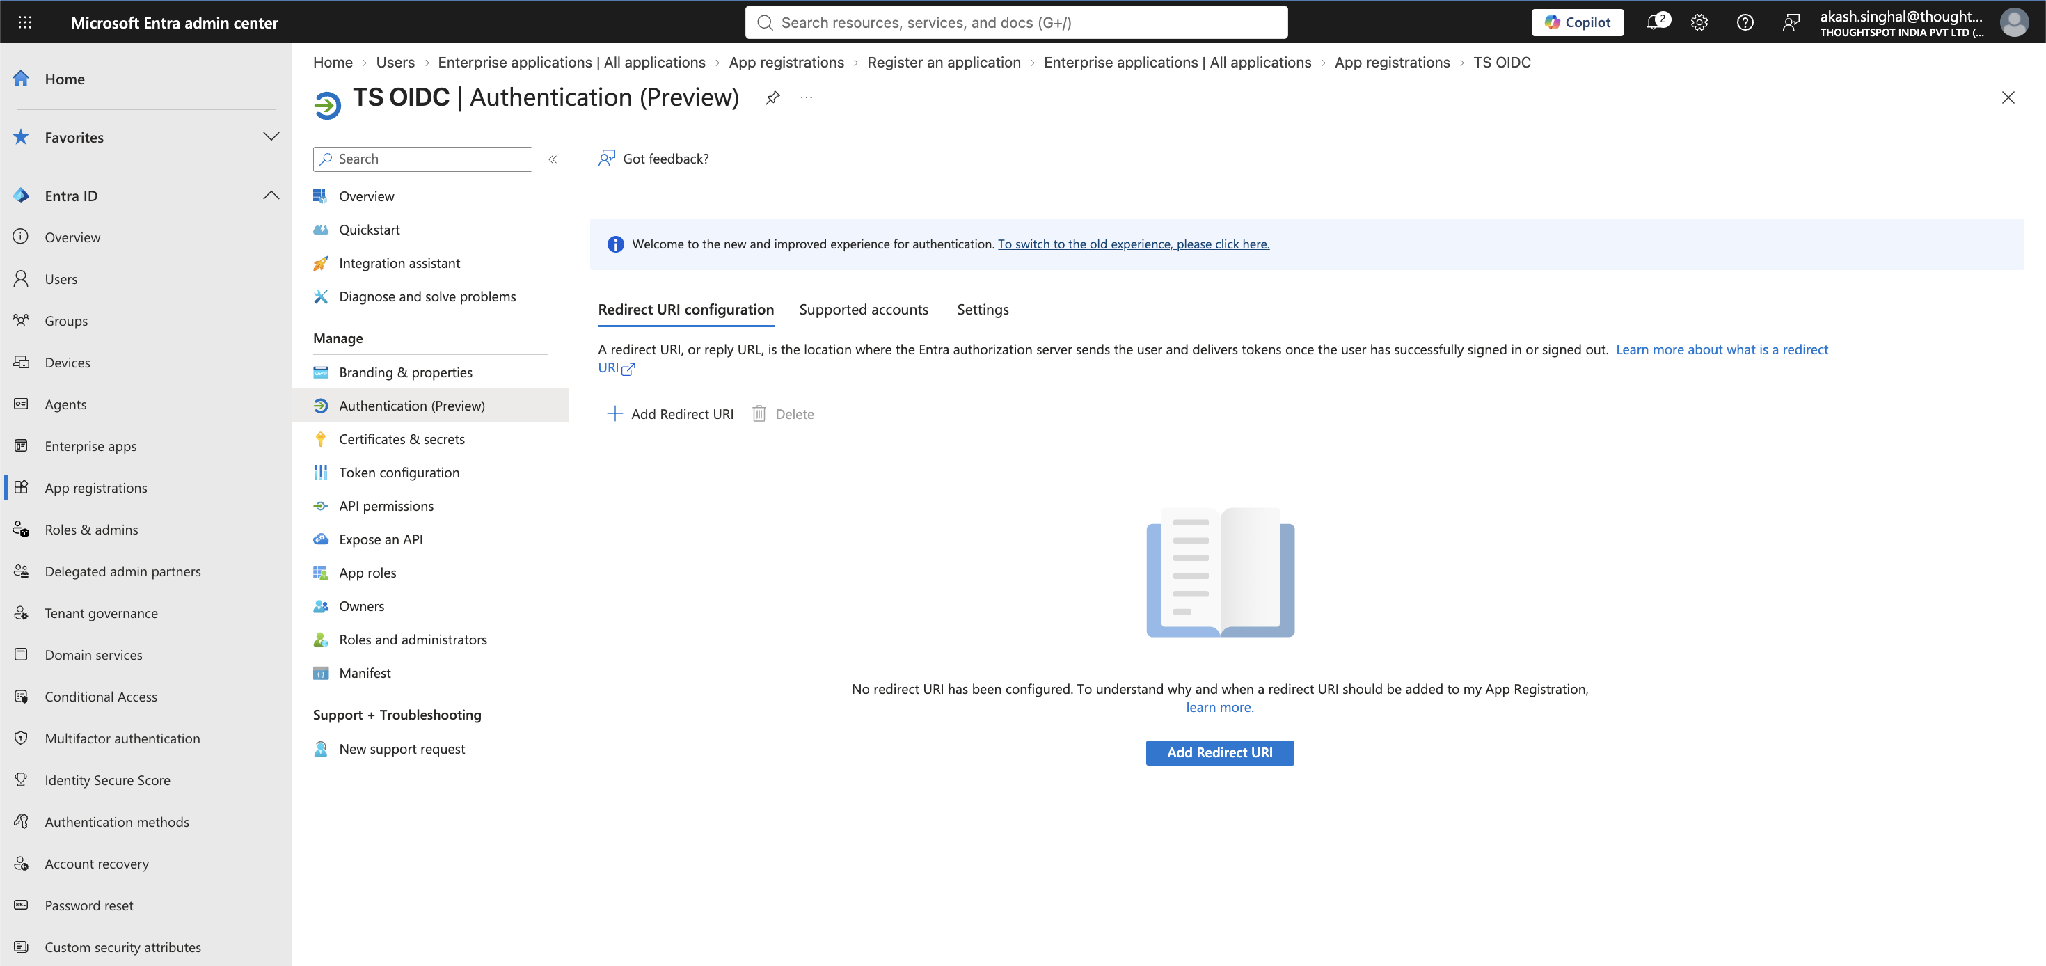
Back in the Entra app registration, go to Authentication and select Add a platform or Add Redirect URI. Choose Web and paste the ThoughtSpot Callback URL from Step 2.5, then select Save.
| Both sides must match: the redirect URI in Entra must be identical to the callback URL shown by ThoughtSpot, or sign-in will fail. |
Step 3.2 Assign users and groups
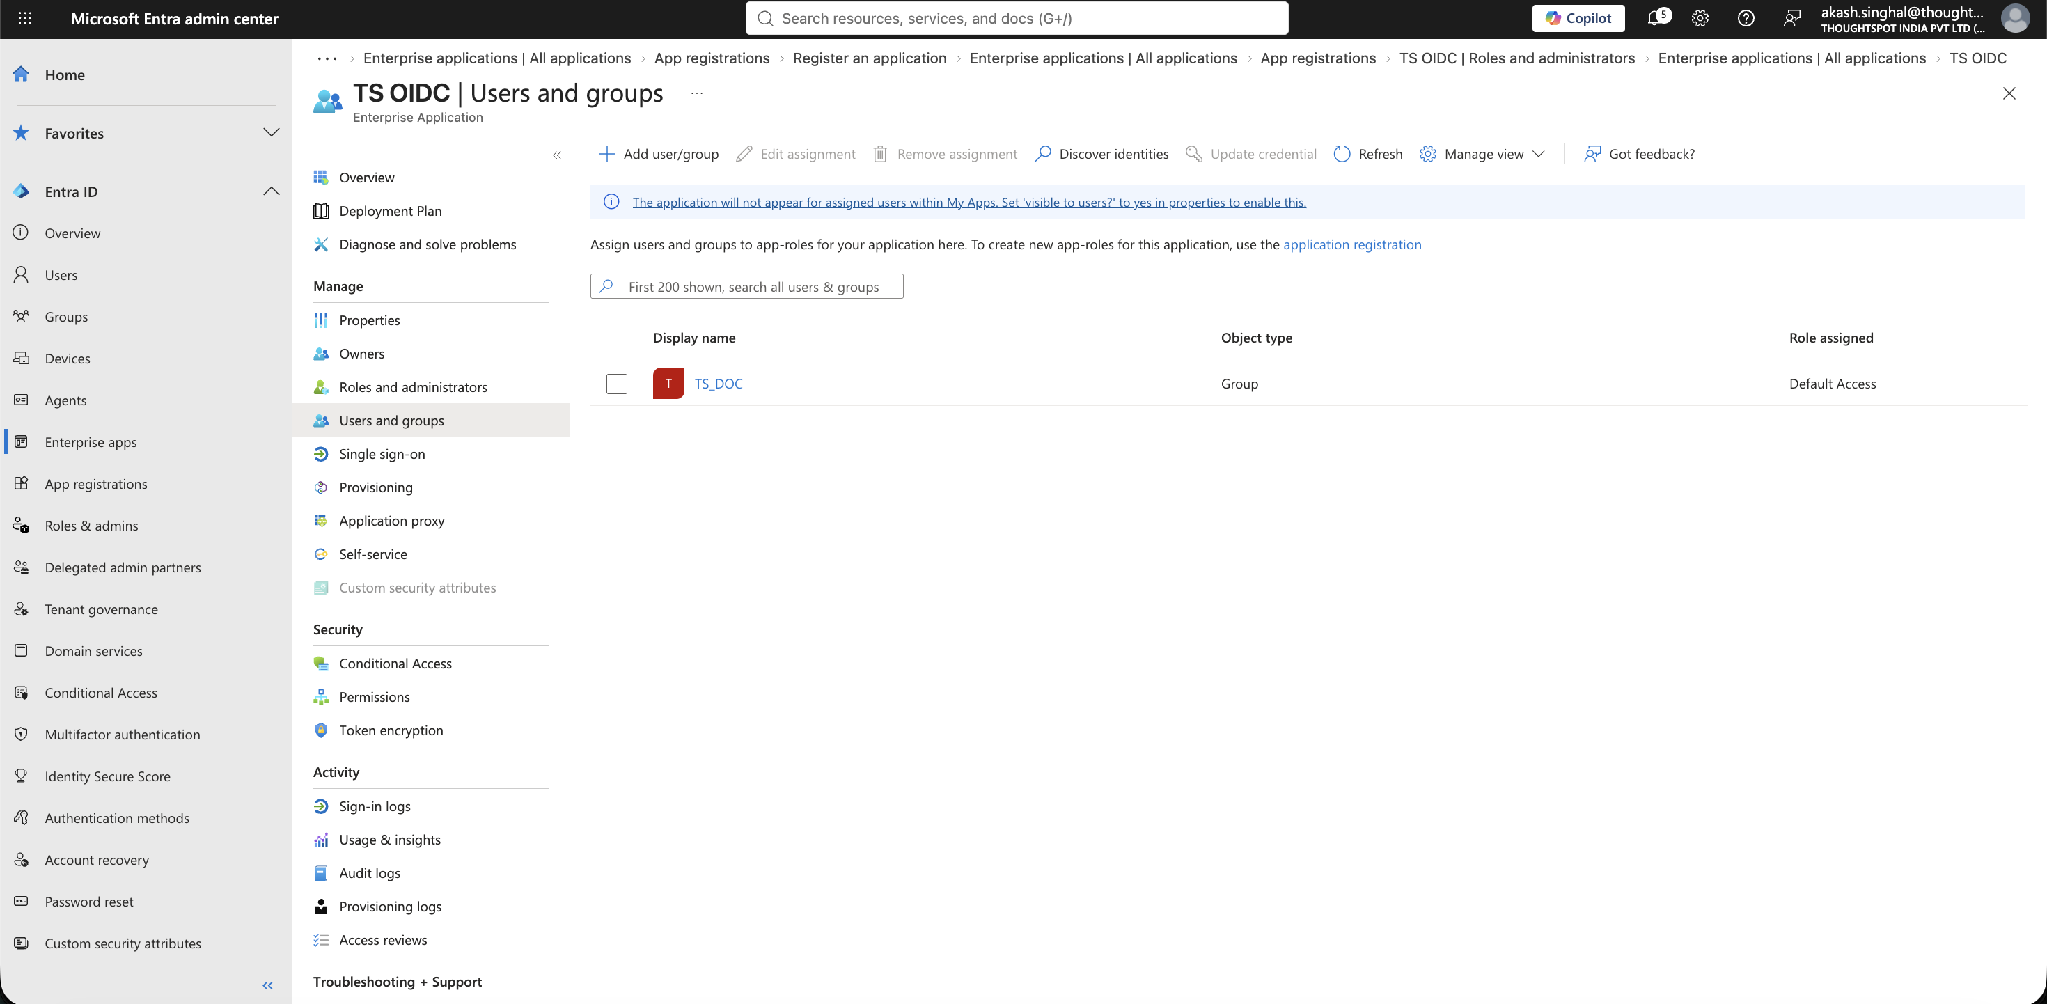
In Entra ID > Enterprise applications, open the application, go to Users and groups, and select Add user/group. Select the users or groups that should be allowed to sign in to ThoughtSpot and assign them.
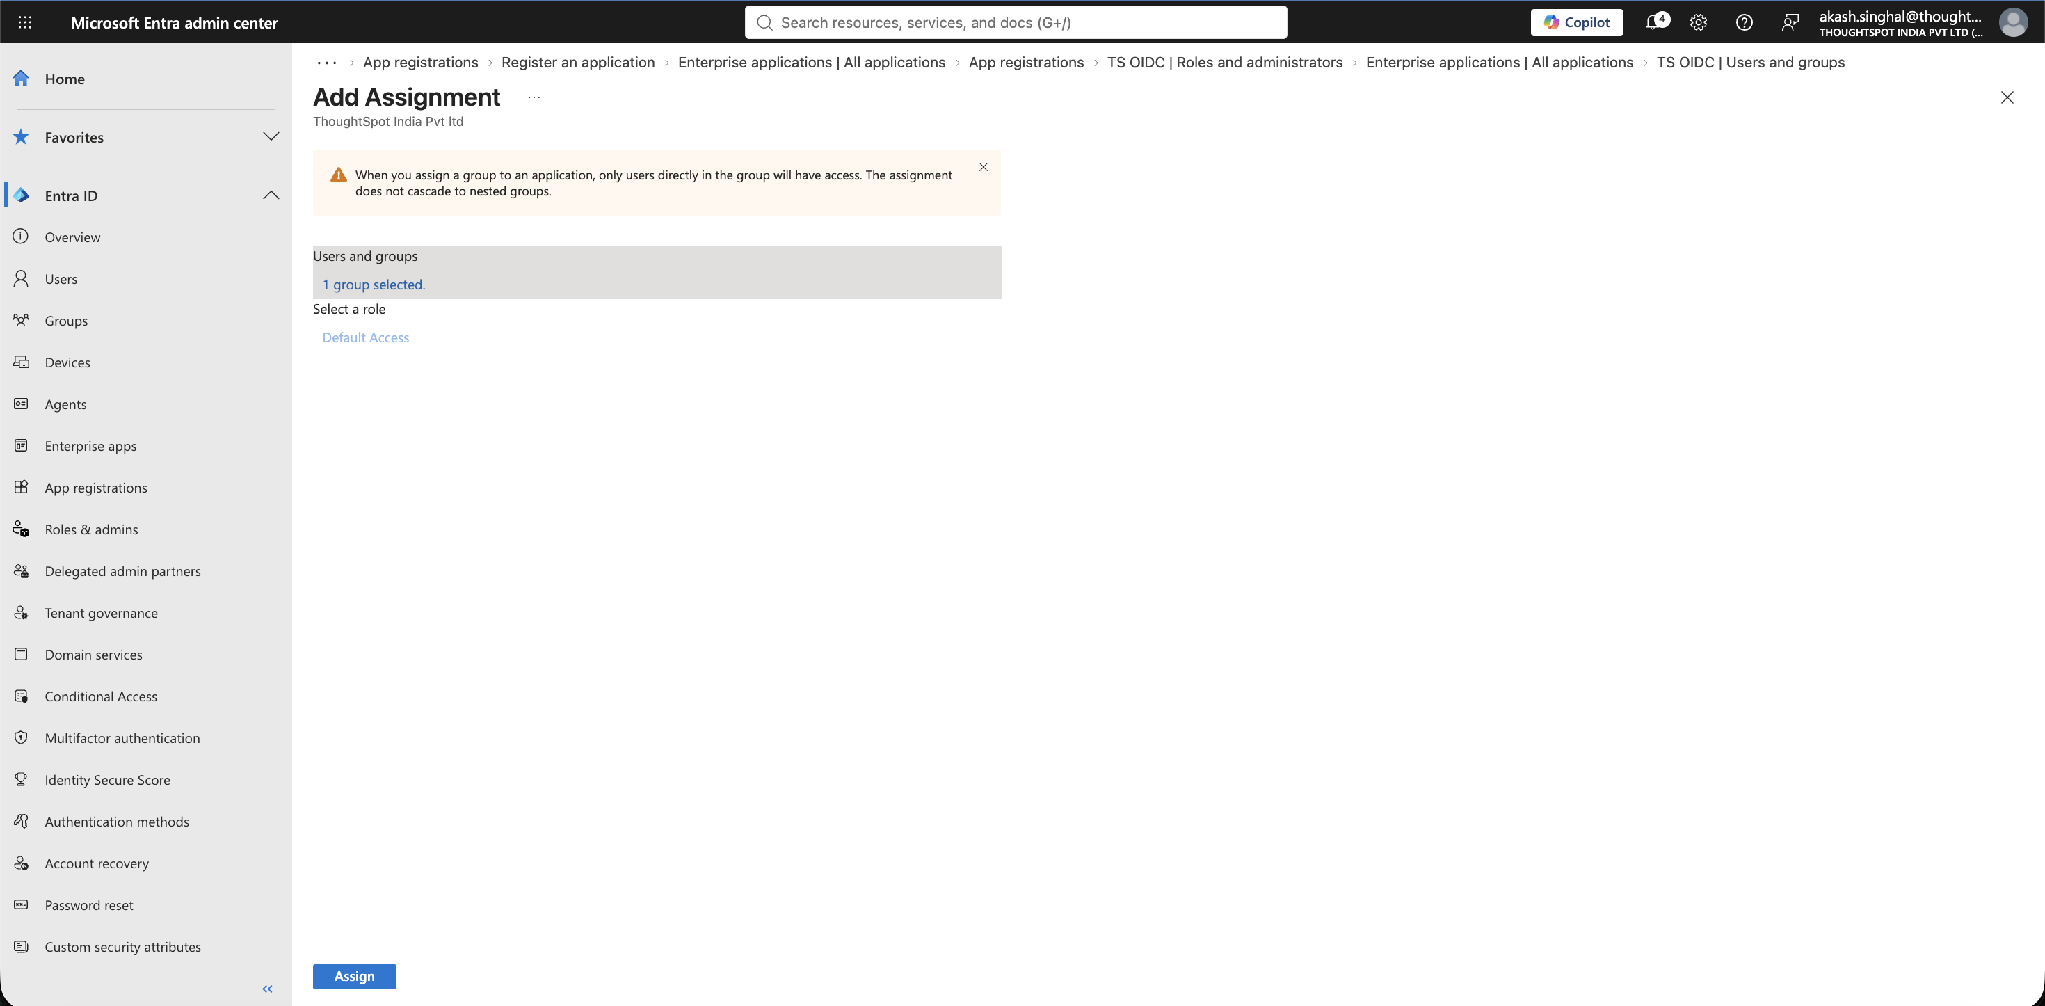
The assigned group (or users) now appears in the Users and groups list for the application.
Part 4 — Enable and test
Step 4.1 Enable the connection in ThoughtSpot
Return to ThoughtSpot, go to Admin > Single Sign On, and Enable the OIDC connection you created.
Step 4.2 Test the sign-in
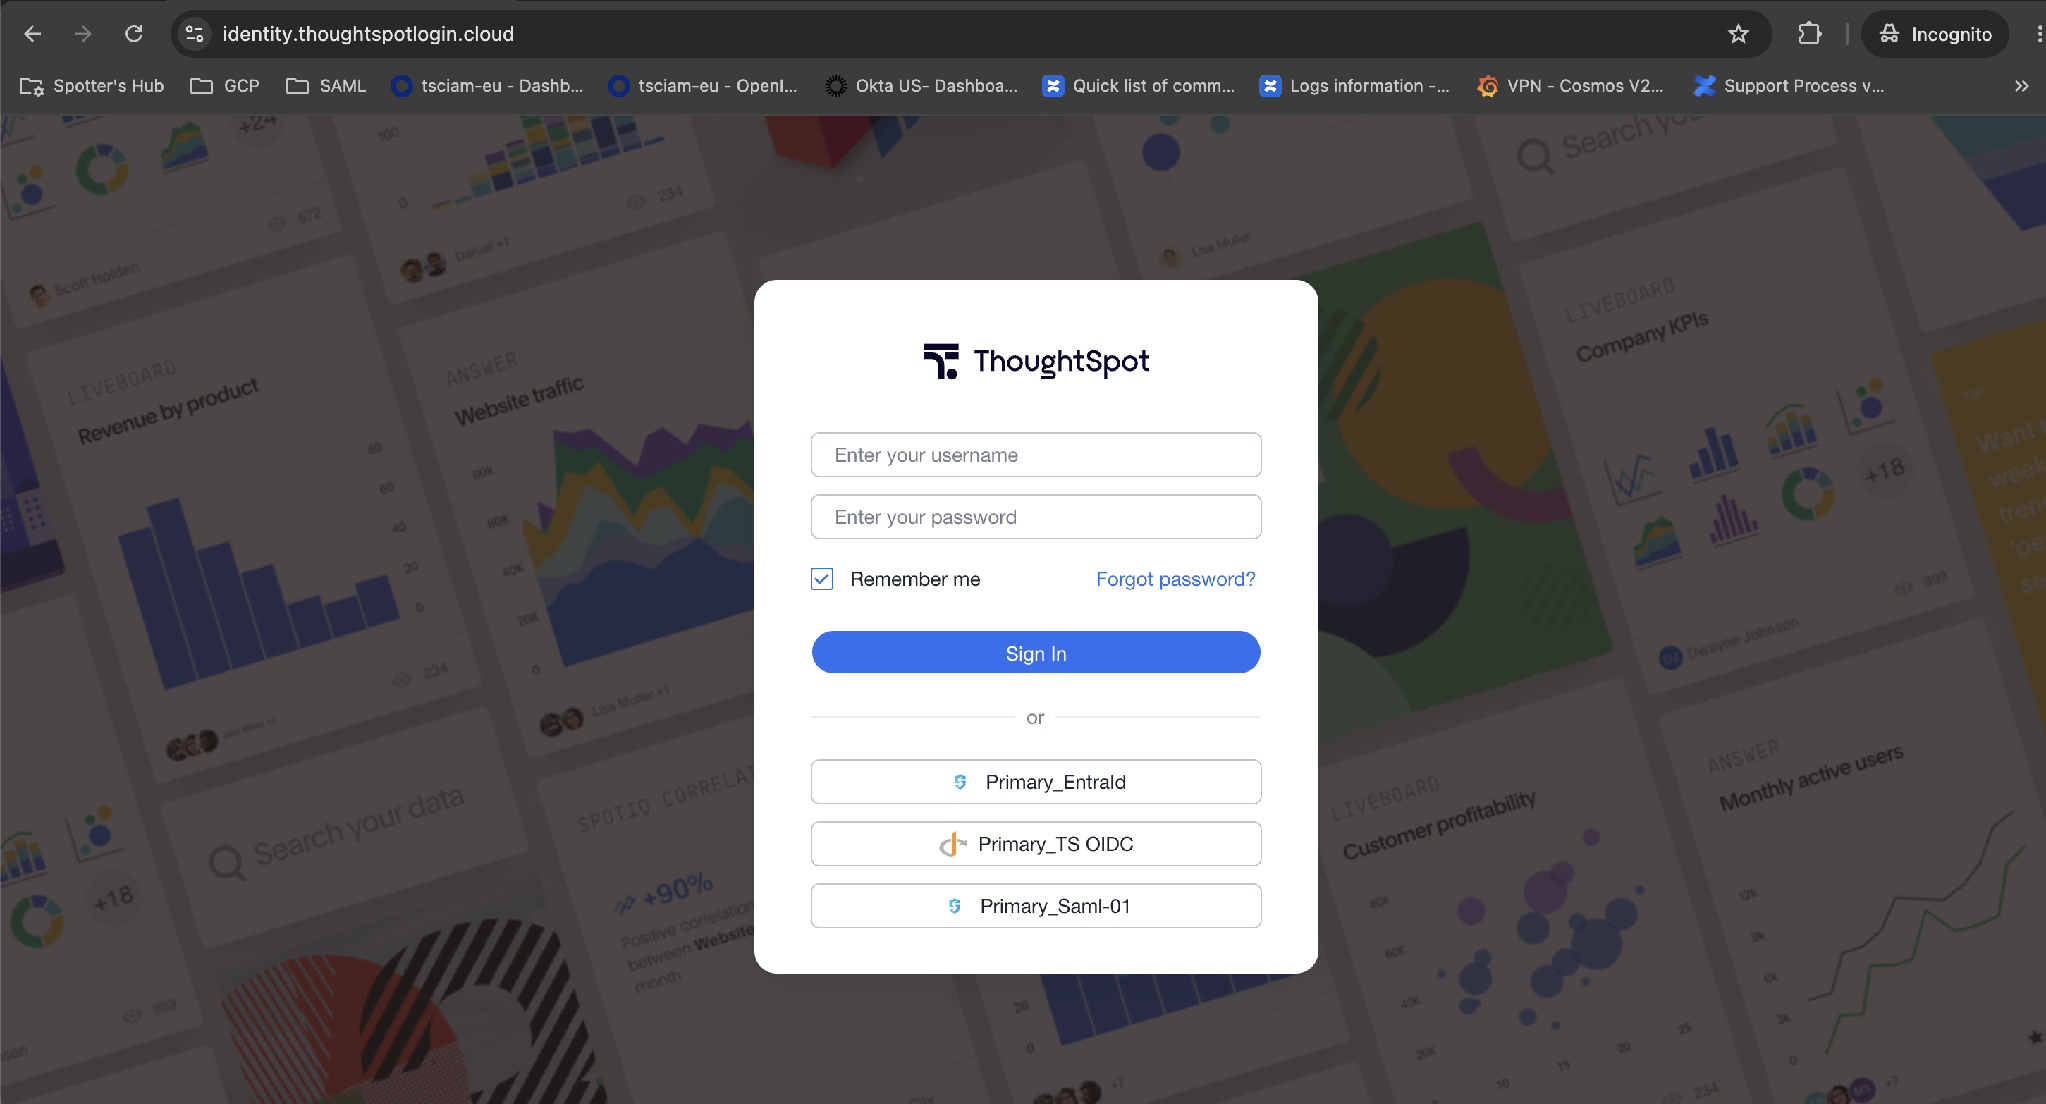
Open the ThoughtSpot login page. Below the username/password fields, under or, select the OIDC sign-in button for your connection (for example, Primary_TS OIDC).
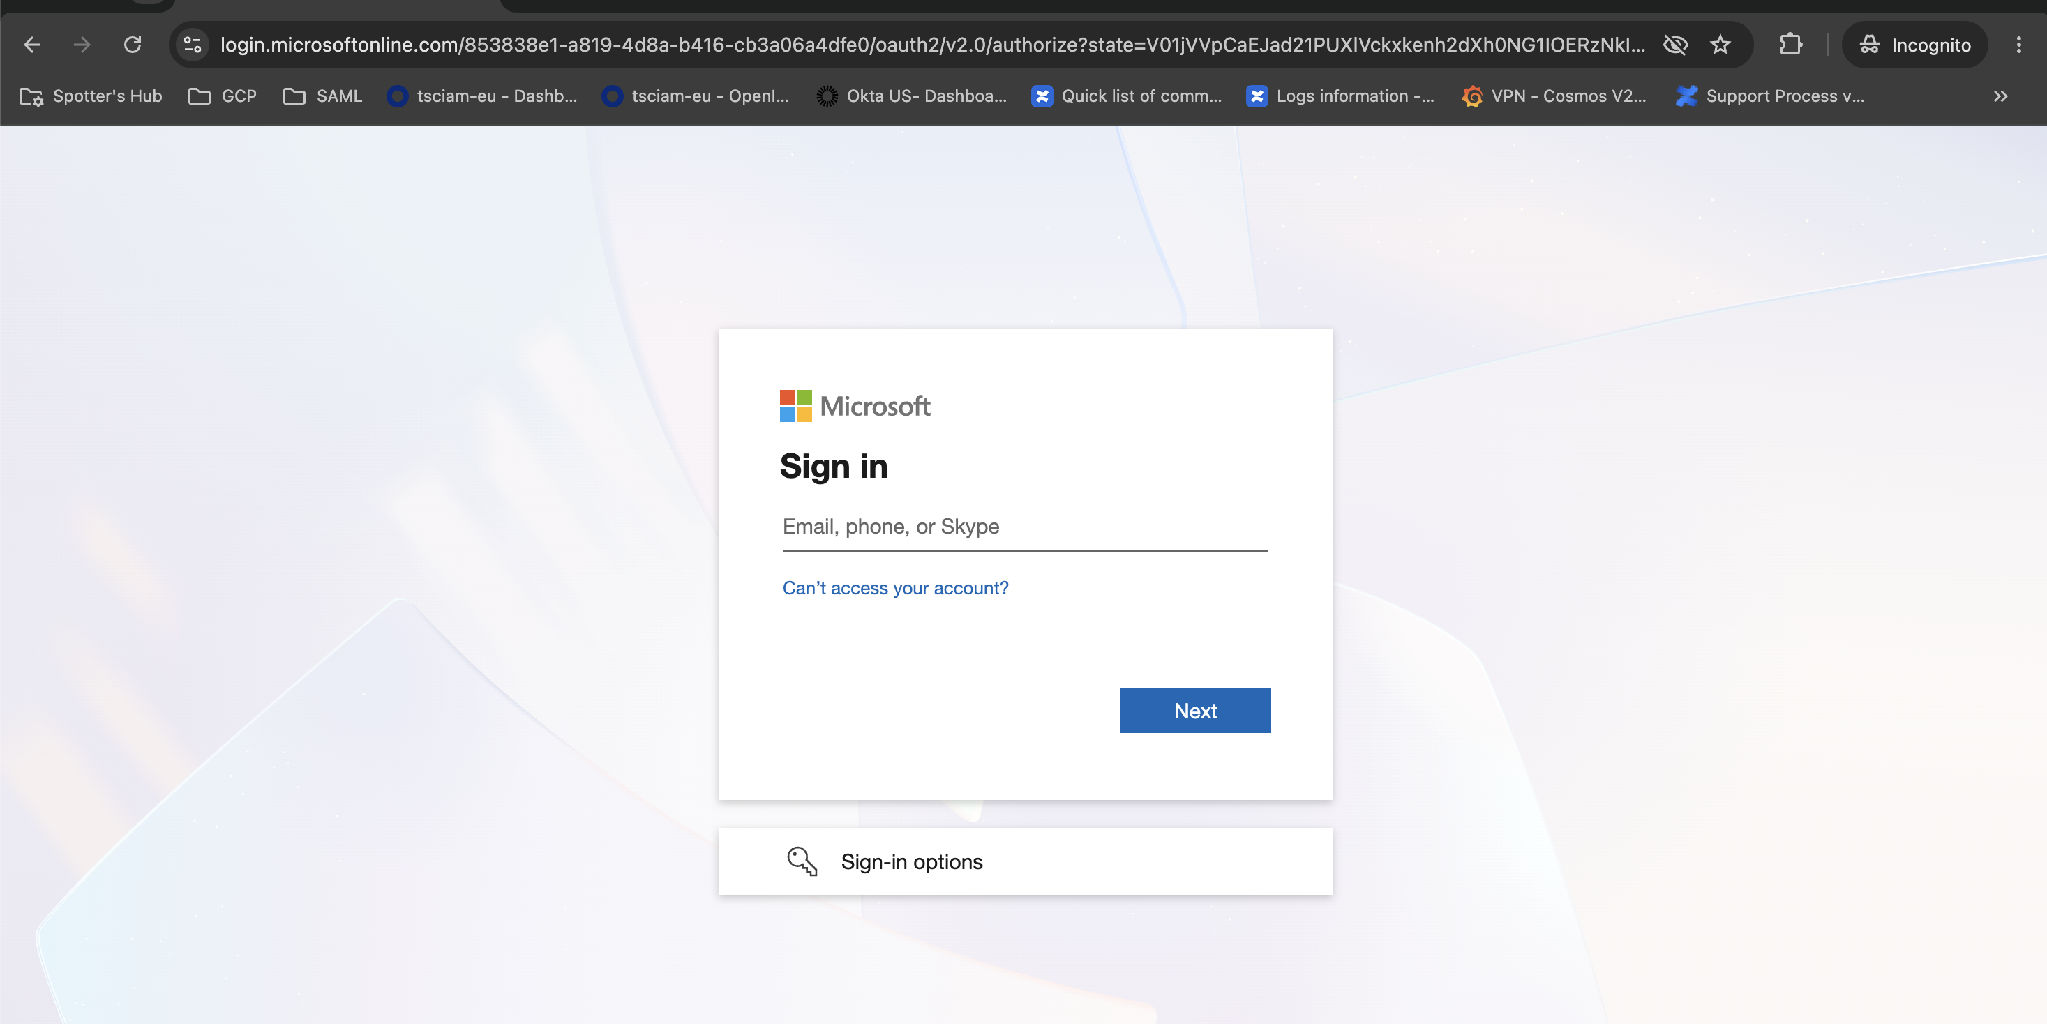
You are redirected to Microsoft to authenticate. Enter your Entra credentials.
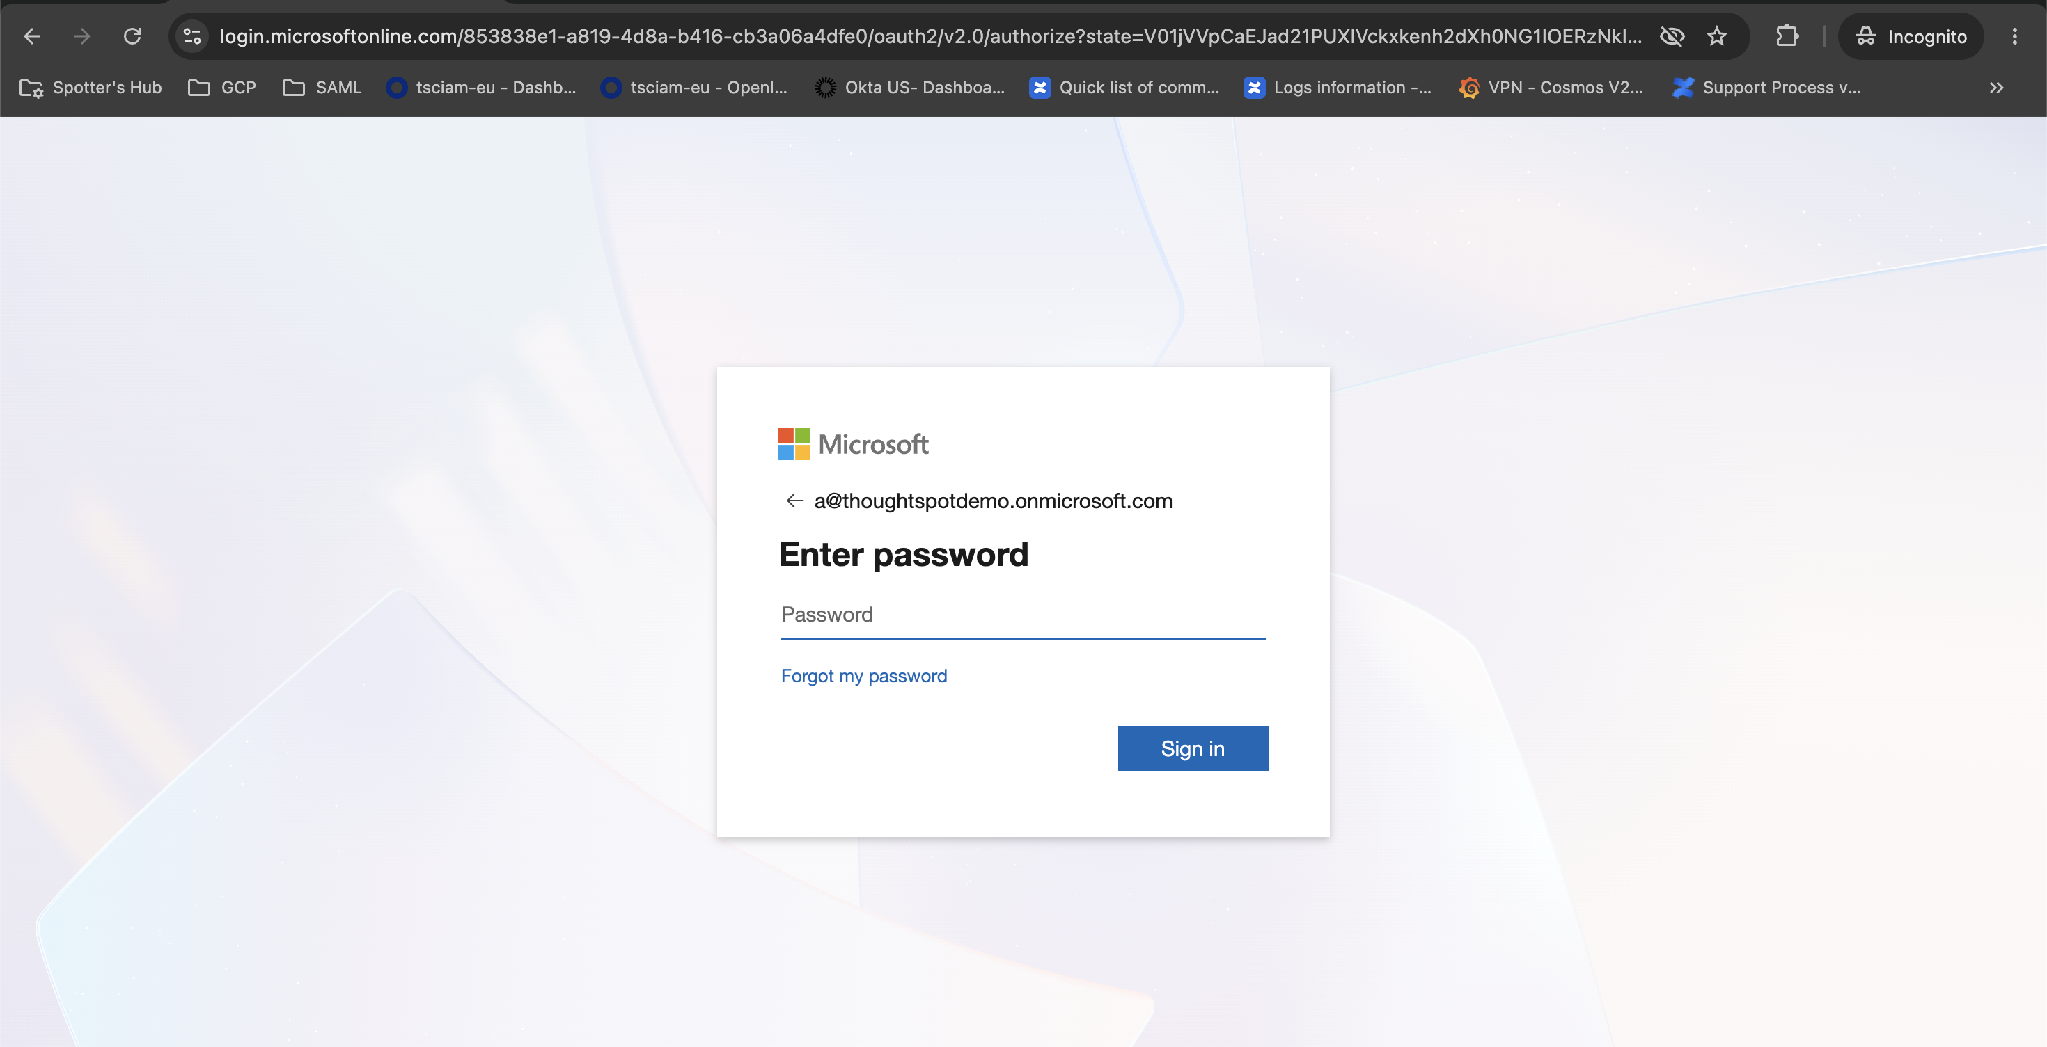
On successful authentication you are returned to ThoughtSpot and signed in. If Auto create user (JIT) is enabled and the account did not previously exist, it is created automatically.
Step 4.3 Group synchronization
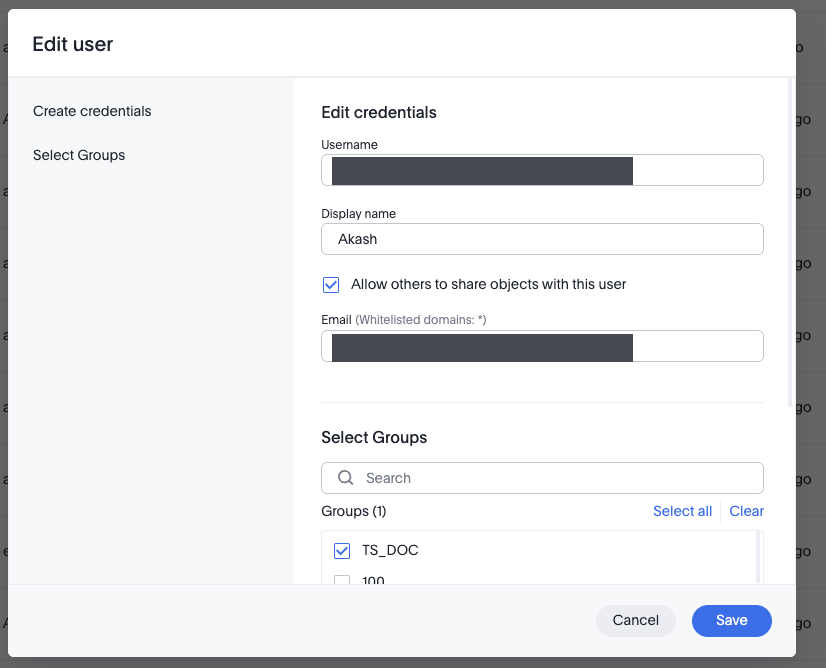
When a user signs in, the groups carried in their ID token are synchronized to ThoughtSpot automatically and applied to the user. If a group in the token does not yet exist in ThoughtSpot, it is created automatically. The resulting group membership is visible on the user’s ThoughtSpot profile.
| Prerequisite: this synchronization only takes effect once group mapping has been activated from the backend by ThoughtSpot Support. See Group mapping requirements and scope. |
Group mapping requirements and scope
| Group mapping must be activated from the ThoughtSpot backend. After you complete the configuration in this article, contact ThoughtSpot Support to finish the setup. Until Support enables group mapping, it does not take effect, even if the configuration in Entra and ThoughtSpot is correct. |
The IdP is the source of truth. ThoughtSpot only creates and honors what the identity provider sends in the SAML response or ID token. Anything that must exist in ThoughtSpot at sign-in, such as a user, an email, or a group membership, must be supplied by the IdP (Microsoft Entra ID). When the setup is correct, it is the IdP’s responsibility to include these values. After a value is sent, ThoughtSpot honors and applies it. If a value is missing, ThoughtSpot has nothing to act on.
What is not provisioned from the IdP. Single sign-on can create users and groups in ThoughtSpot at sign-in, but the privileges assigned to those groups and the creation of Orgs are not derived from the IdP. Set up group privileges and create Orgs beforehand, either manually in ThoughtSpot or through automation with the ThoughtSpot REST APIs.
Scope. The group-mapping setup in this article applies to the following scenarios, in which each user belongs to a single Org:
-
Primary Org group mapping: the user belongs to the Primary Org only.
-
Per-Org subdomain login: the user belongs to a single Org and signs in through the Org-specific URL. ThoughtSpot identifies the Org from that URL as the authorized Org, and the user enters that Org with the relevant group memberships.
| Users who must belong to more than one Org require a different approach, with additional guidelines that are not covered in this article. |
Field reference
Use this table as a quick map from each ThoughtSpot connection field to its source in Microsoft Entra ID.
| ThoughtSpot field | Value / source in Microsoft Entra ID |
|---|---|
Connection Name |
Any unique name for this IdP connection (e.g. "TS OIDC"). |
Client Id |
Application (client) ID — app registration Overview. |
Client Secret |
Secret Value — Certificates & secrets (shown only once at creation). |
Scopes |
|
Authorisation Endpoint |
|
Token Endpoint |
|
Issuer |
|
User Info Endpoint |
|
Jwks Endpoint |
|
Callback URL (into Entra) |
Shown on the final ThoughtSpot step; added as a Redirect URI (Web) in the Entra app. |
Key points
-
Client secret is shown once. Copy the secret Value at creation and store it securely; note the expiry and plan to rotate it before it lapses.
-
Default vs. group claims. OIDC includes default claims (email, name) automatically. To pass group membership, add a groups claim explicitly in Token configuration. "groups" is the default OIDC claim name — map ThoughtSpot roles to groups; no custom claim is needed.
-
ID token is what matters for OIDC. ThoughtSpot reads the ID token, so configure the groups claim on the ID token type; the Access and SAML token settings do not apply to this flow.
-
Group name vs. Object ID. The sAMAccountName / NetBIOS / DNSDomain / on-prem SID formats return a group name only for groups synced from on-premises Active Directory. Cloud-only Entra ID groups always emit the group Object ID (GUID) — add
cloud_displaynameto thegroupsclaim in the manifest’sidTokensection to receive names instead. -
Groups sync on login. Group membership is synchronized to ThoughtSpot at sign-in, and any group that does not already exist is created automatically.
-
Group mapping needs a backend activation. Group mapping must be enabled from the backend by ThoughtSpot Support; the roles → groups mapping alone will not take effect until this is done.
-
The redirect/callback URL must match exactly on both sides — the value in ThoughtSpot and the redirect URI in Entra.
-
Single-tenant issuer format:
https://login.microsoftonline.com/<tenant-id>/v2.0.