Configuring SAML 2.0 SSO for ThoughtSpot with Microsoft Entra ID
This is for you to configure SAML 2.0 single sign-on (SSO) between Microsoft Entra ID (formerly Azure Active Directory) and ThoughtSpot. Once configured, users in your Entra tenant can sign in to ThoughtSpot with their corporate credentials.
Replace every value shown in angle brackets — for example <your-cluster> — with the value from your own environment. Configure attributes and claims according to your organization’s business requirements. The screenshots are illustrative; the URLs, identifiers, and certificates in your tenant will differ.
| ThoughtSpot user names cannot contain whitespace. Ensure that the Entra attribute you map to the ThoughtSpot Username (for example, user principal name or email) does not contain spaces; user names containing spaces will fail to provision or sign in. |
Prerequisites
-
Administrator access to the Microsoft Entra admin center with permission to create and manage enterprise applications (Cloud Application Administrator or higher).
-
Administrator access to ThoughtSpot with permission to configure authentication (User management).
-
Your ThoughtSpot cluster URL, for example
https://<your-cluster>.thoughtspot.cloud.
Overview of the configuration flow
You configure both consoles and move between them, because each side needs values generated by the other. Complete the parts in this order:
-
Part A – Entra: Register a ThoughtSpot enterprise application.
-
Part B – Entra: Enable SAML SSO, review claims, and collect the IdP metadata (certificate, issuer, and sign-on URL).
-
Part C – ThoughtSpot: Configure the Entra identity provider and copy ThoughtSpot’s service-provider URLs (ACS and Audience).
-
Part D – Entra: Paste ThoughtSpot’s URLs to finish the SAML configuration, then assign users and groups.
-
Part E – Test: Verify the end-to-end SSO login.
Part A – Register the ThoughtSpot application in Microsoft Entra ID
Step 1 – Start a new application
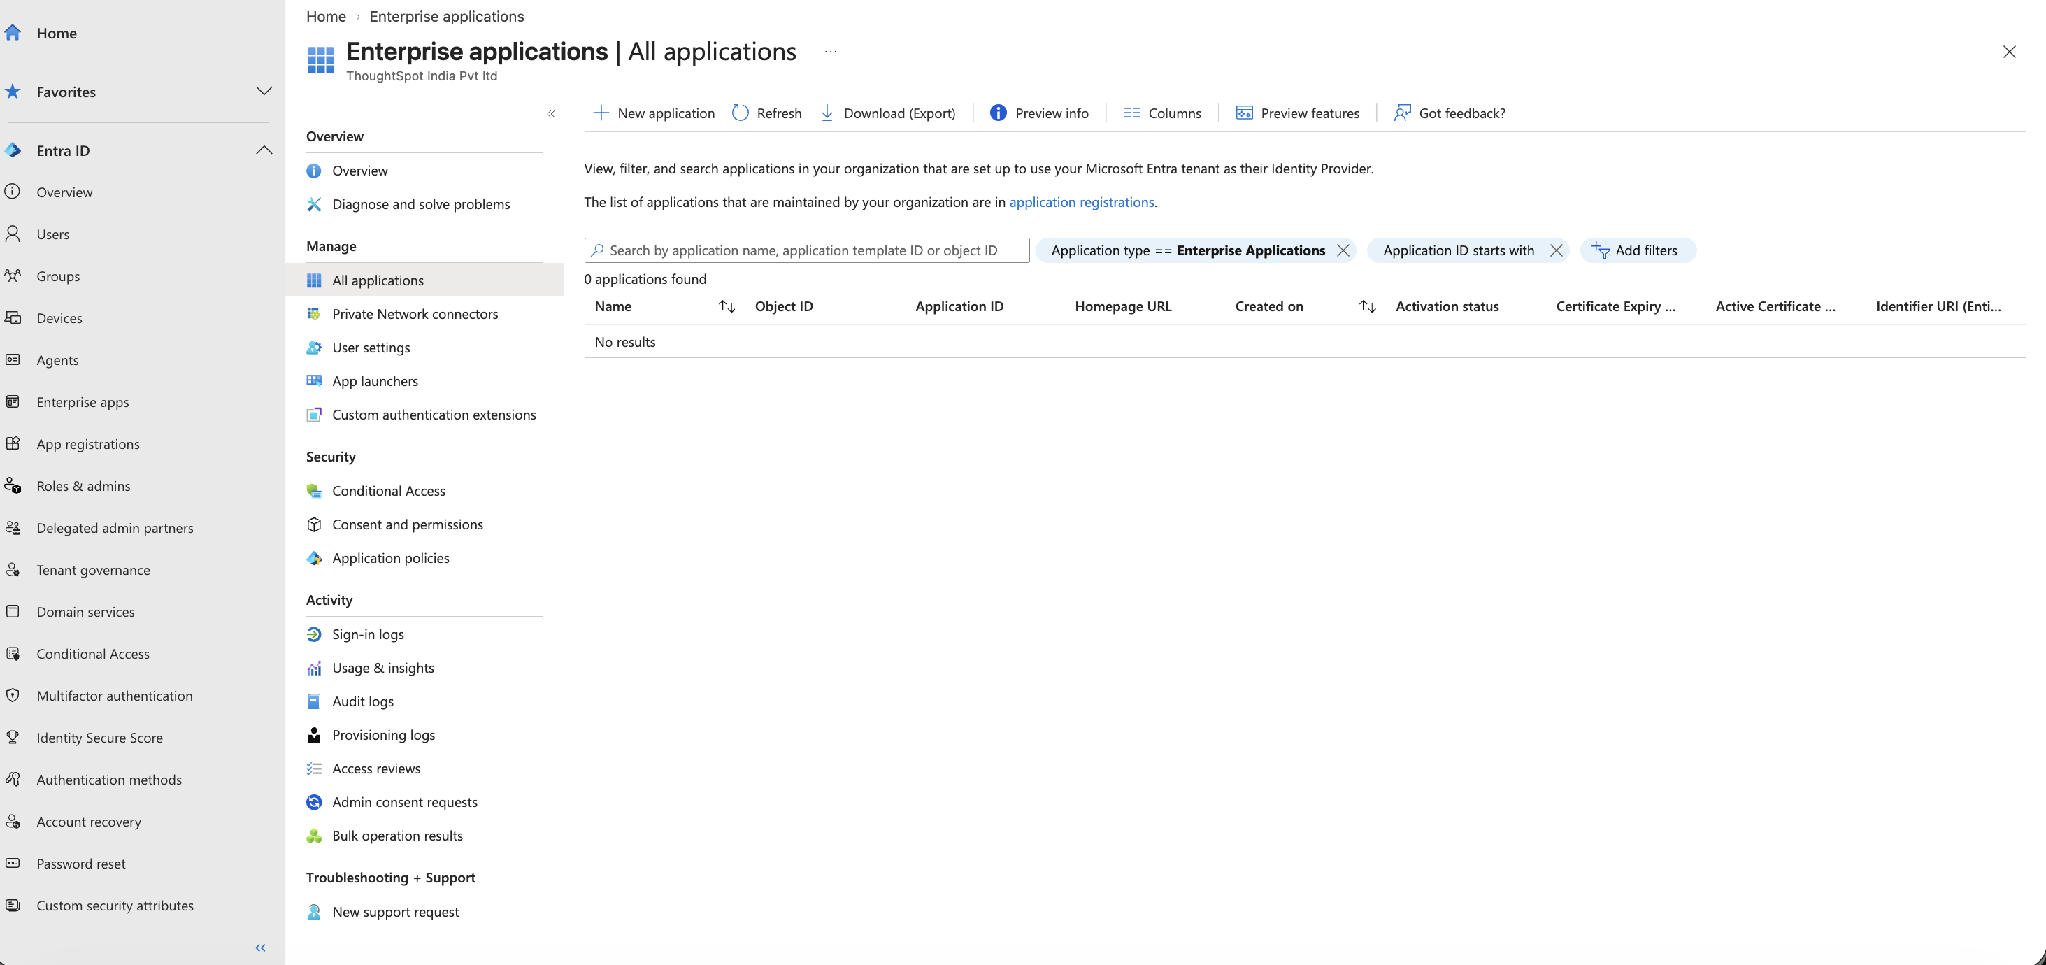
In the Microsoft Entra admin center, go to Entra ID > Enterprise apps > All applications, then select New application.
Step 2 – Choose to create your own application
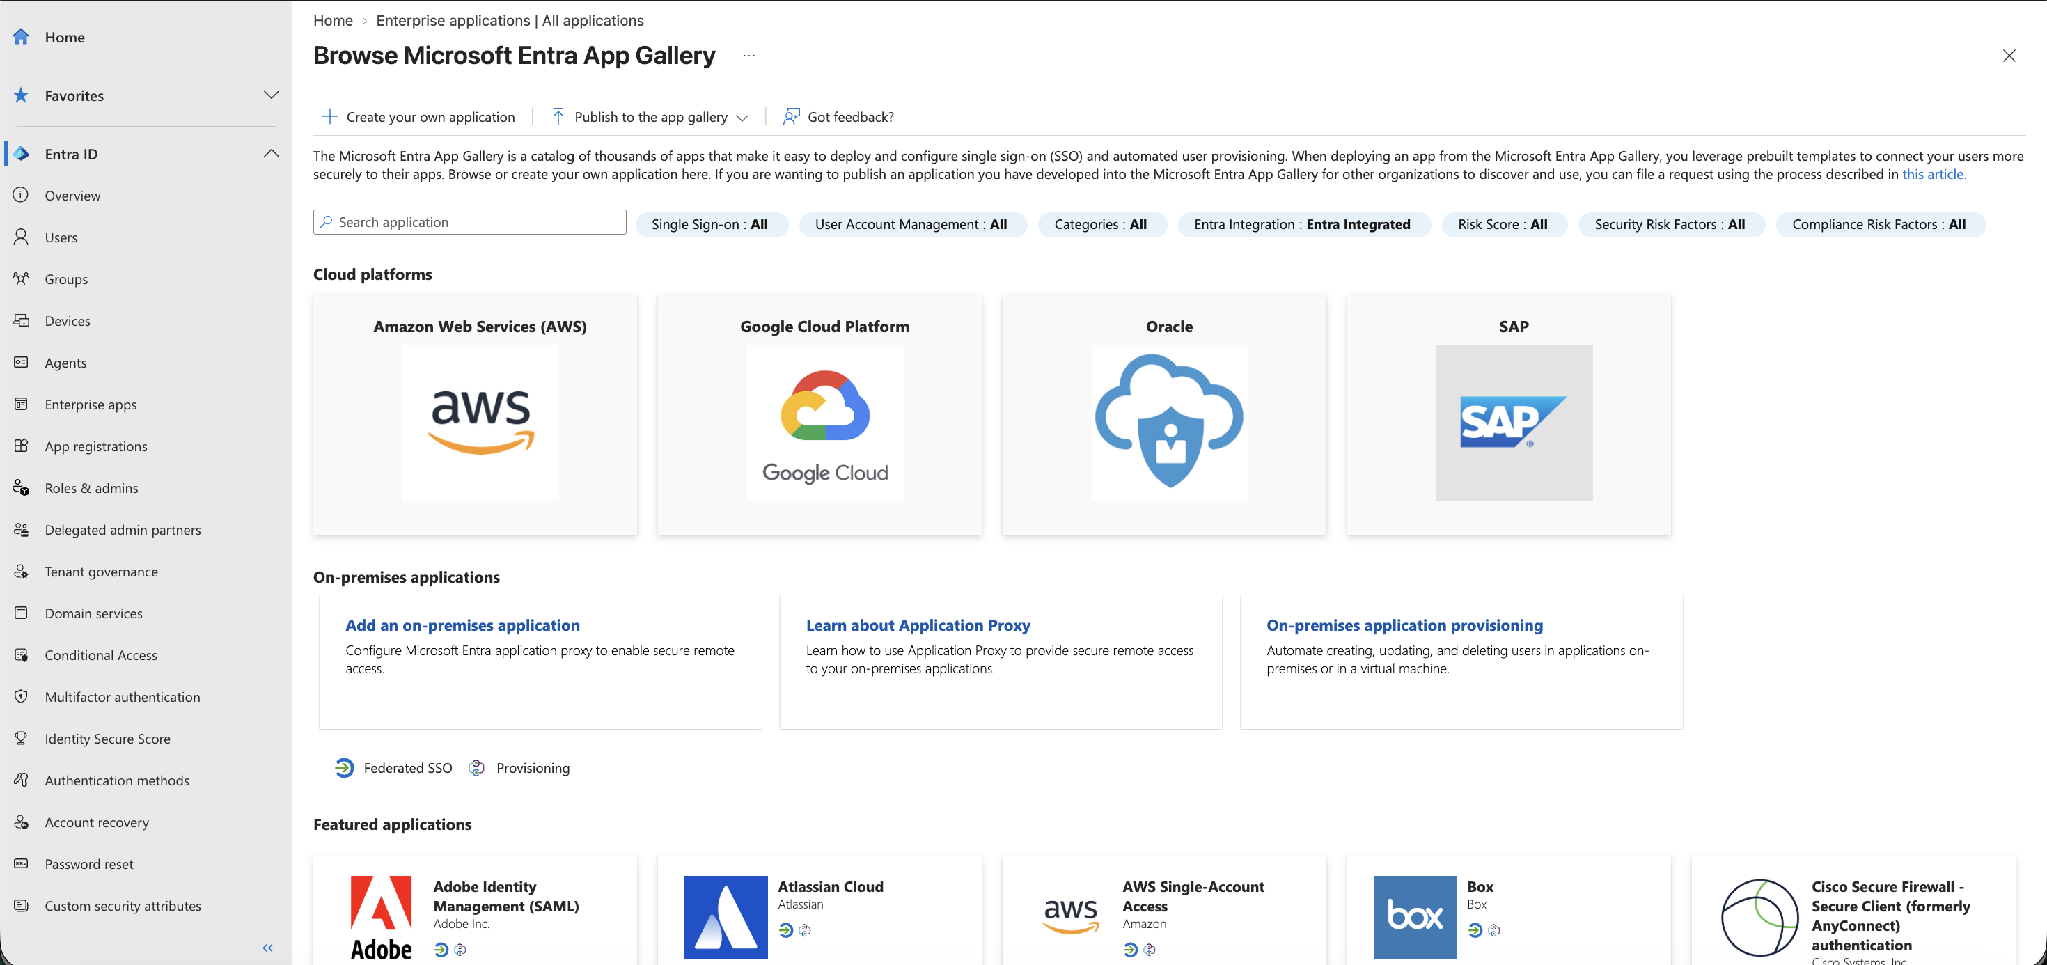
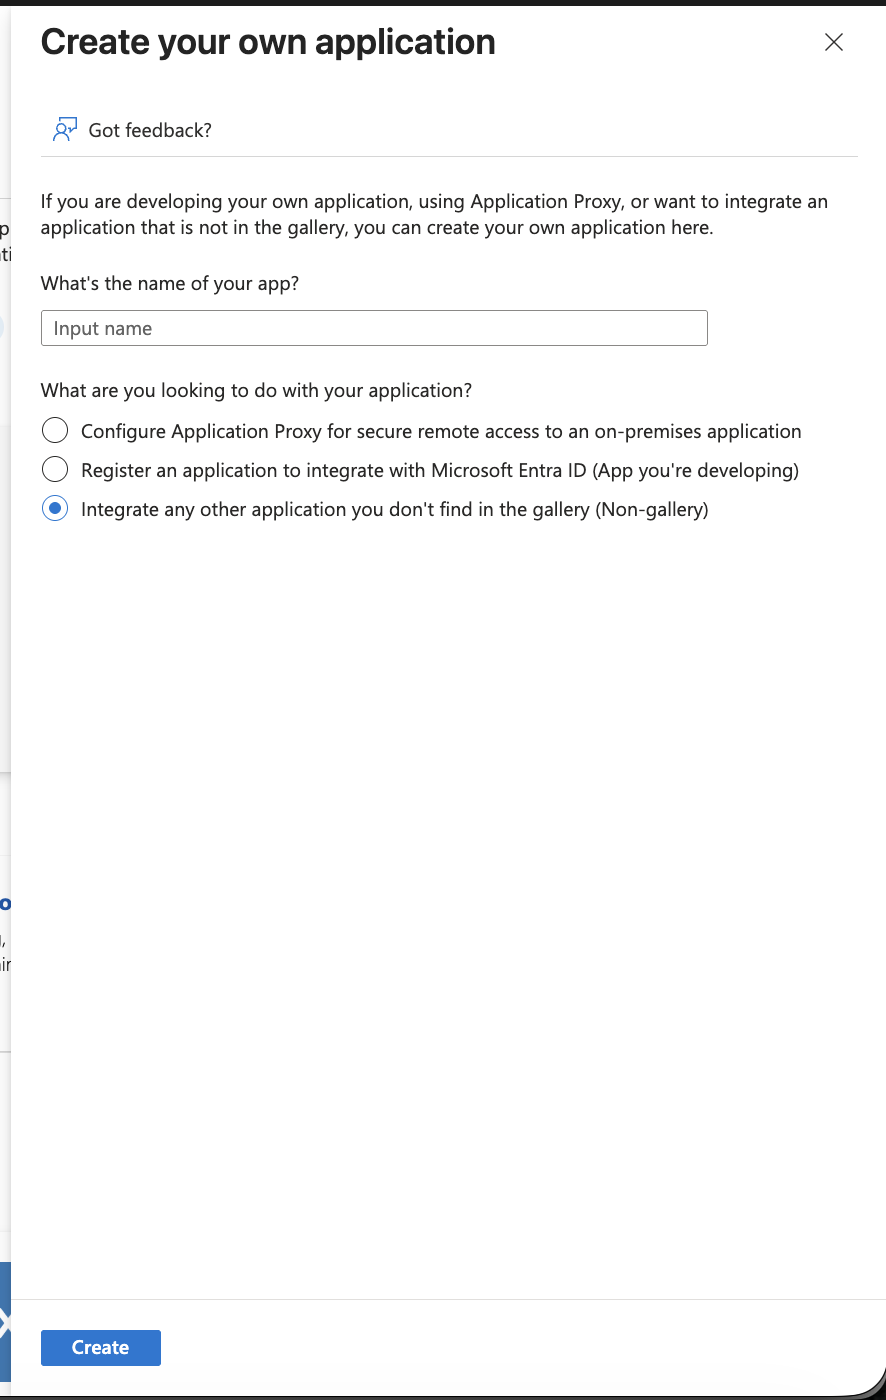
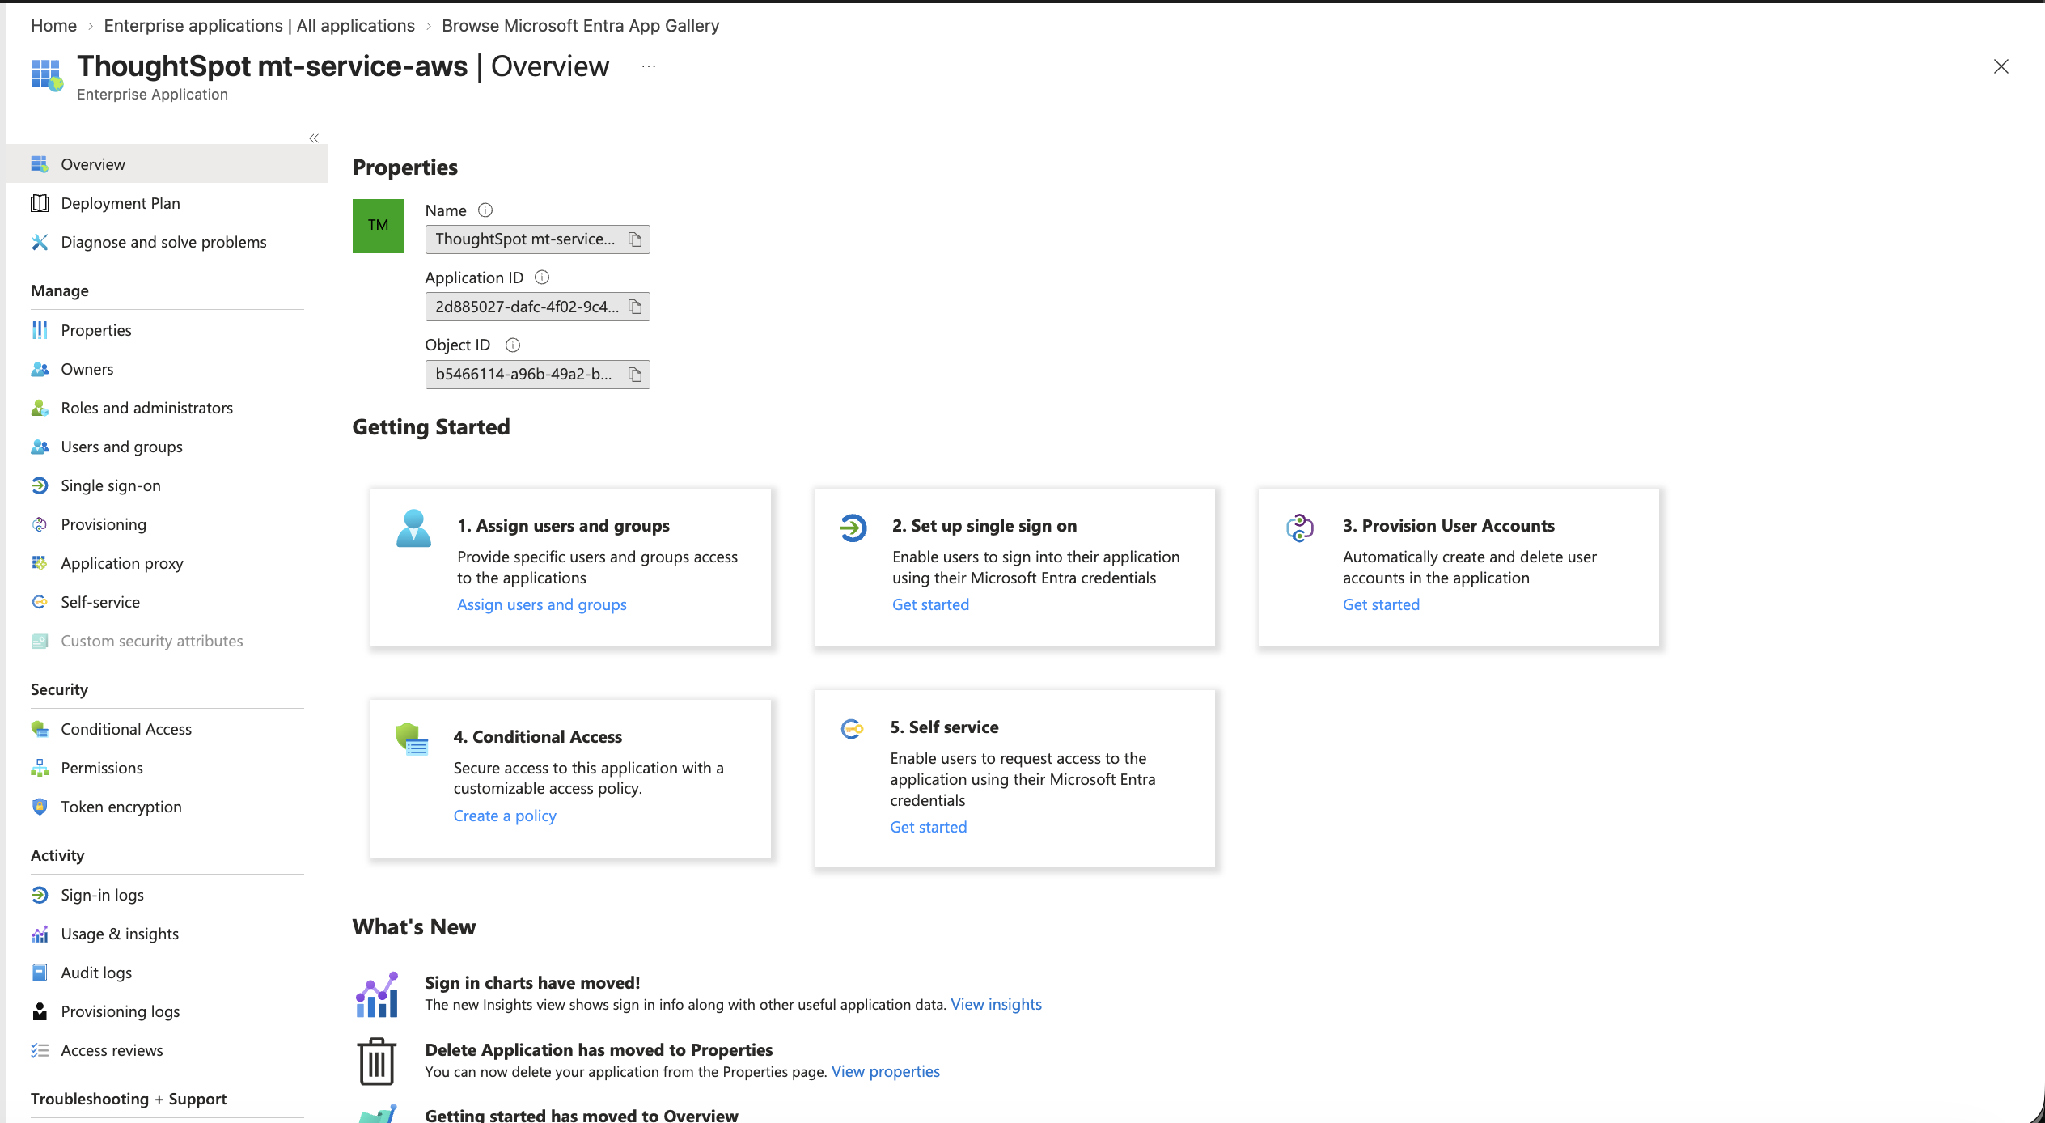
On the Browse Microsoft Entra App Gallery page, select Create your own application.
Part B – Enable SAML single sign-on in Entra
Step 5 – Select the SAML sign-on method
In the application, select Single sign-on, then choose SAML.
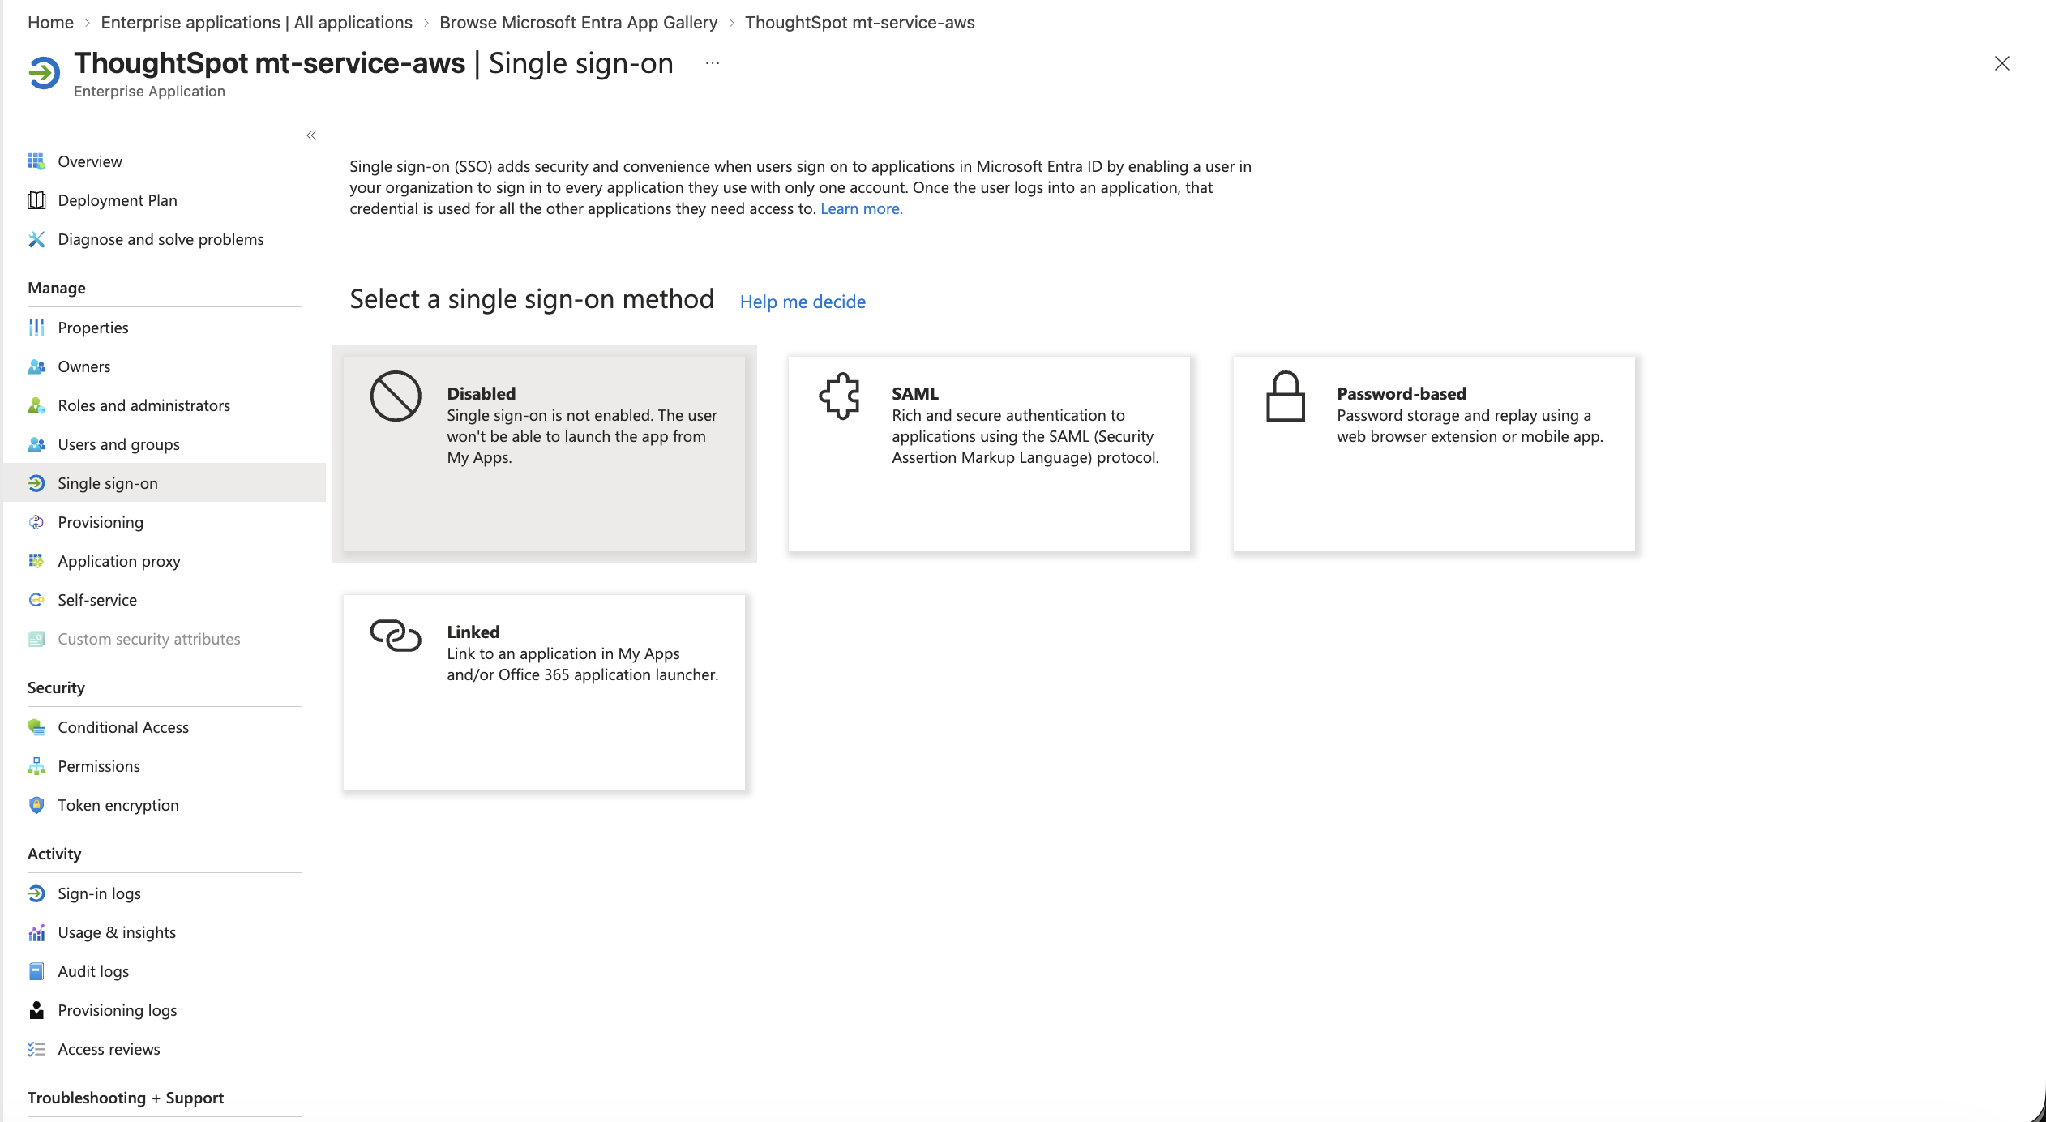
Step 6 – Open the SAML setup page
The Set up Single Sign-On with SAML page opens. You complete the numbered sections on this page.
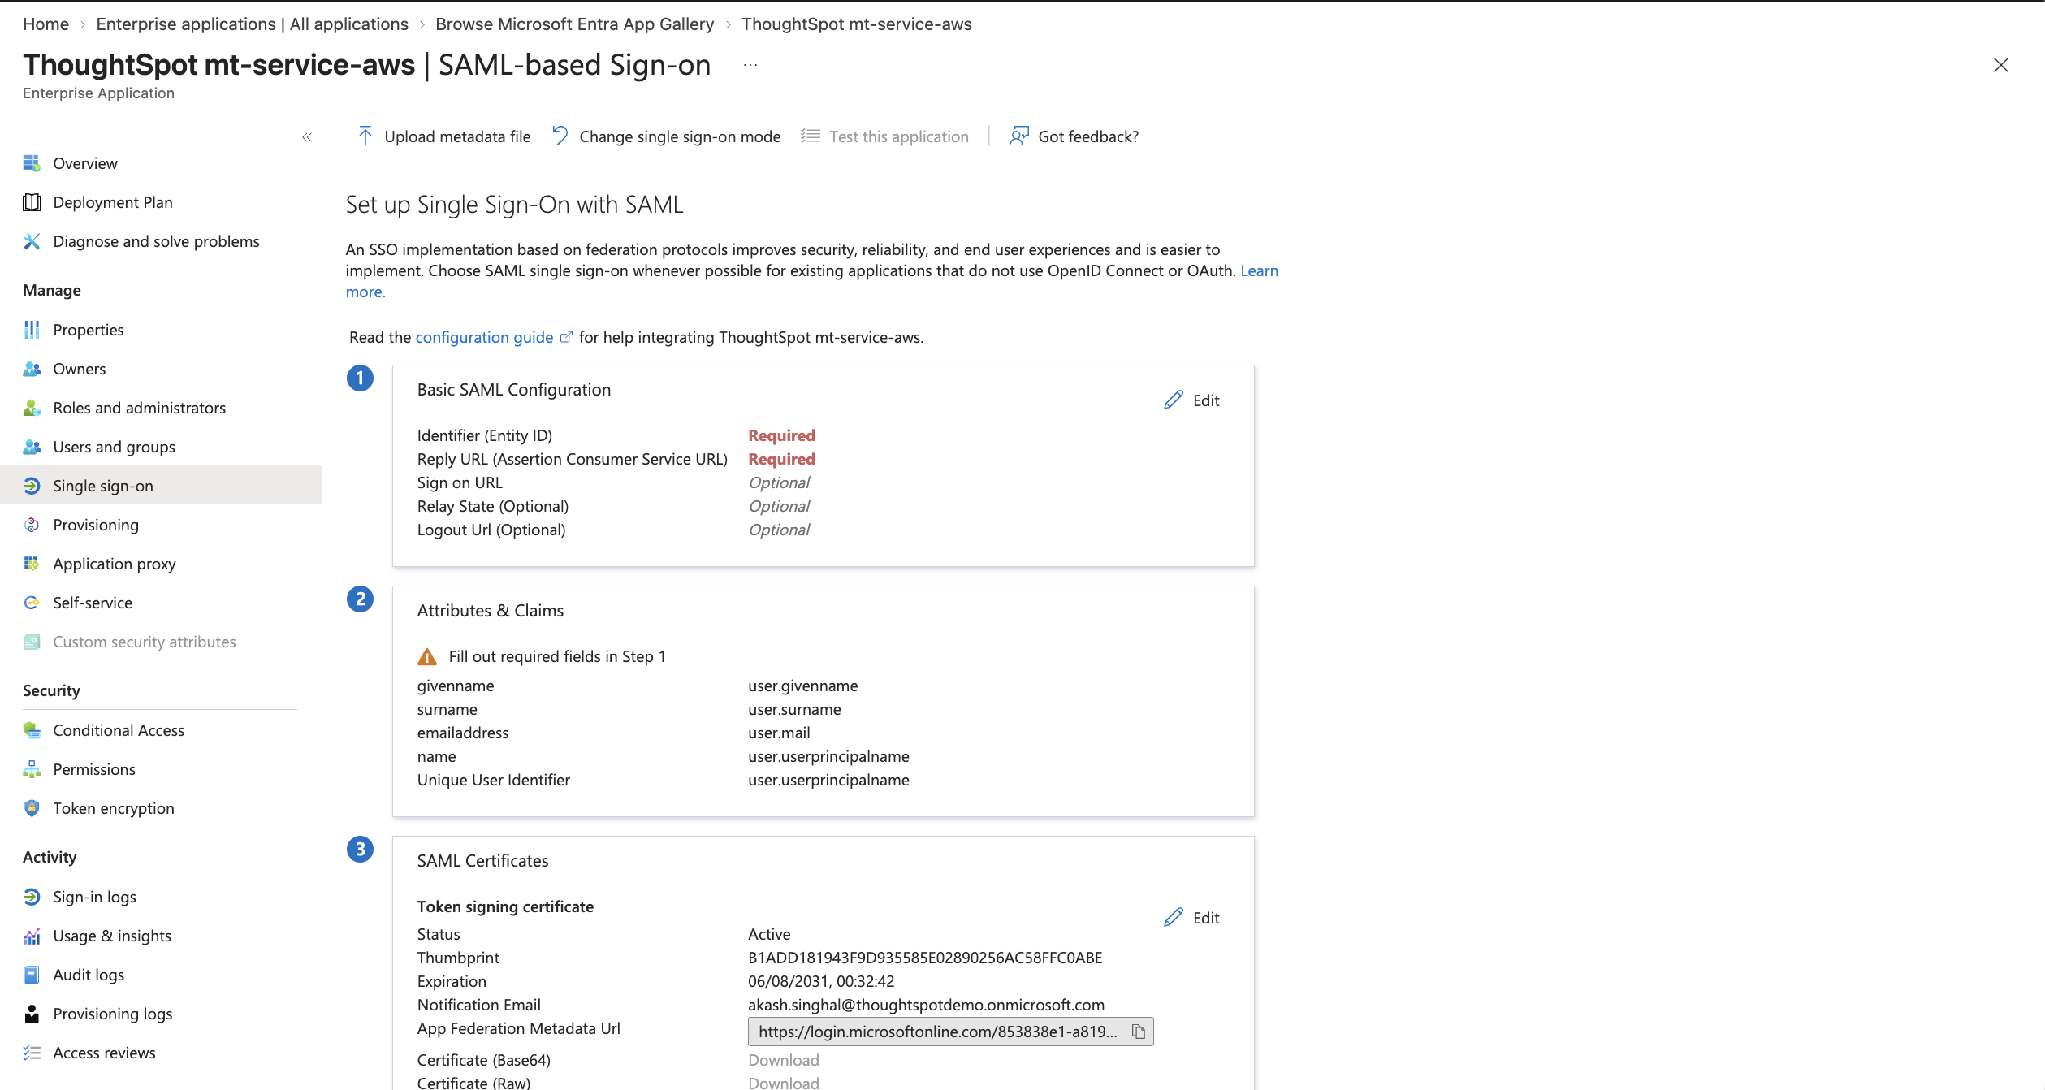
Step 7 – Open Basic SAML Configuration
In section 1, Basic SAML Configuration, select Edit. You will fill in the Identifier (Entity ID) and Reply URL (Assertion Consumer Service URL) in Part D, using values that ThoughtSpot generates. For now, you can enter temporary placeholders so the page can be saved, and set Relay State to your ThoughtSpot cluster URL, https://<your-cluster>.thoughtspot.cloud.
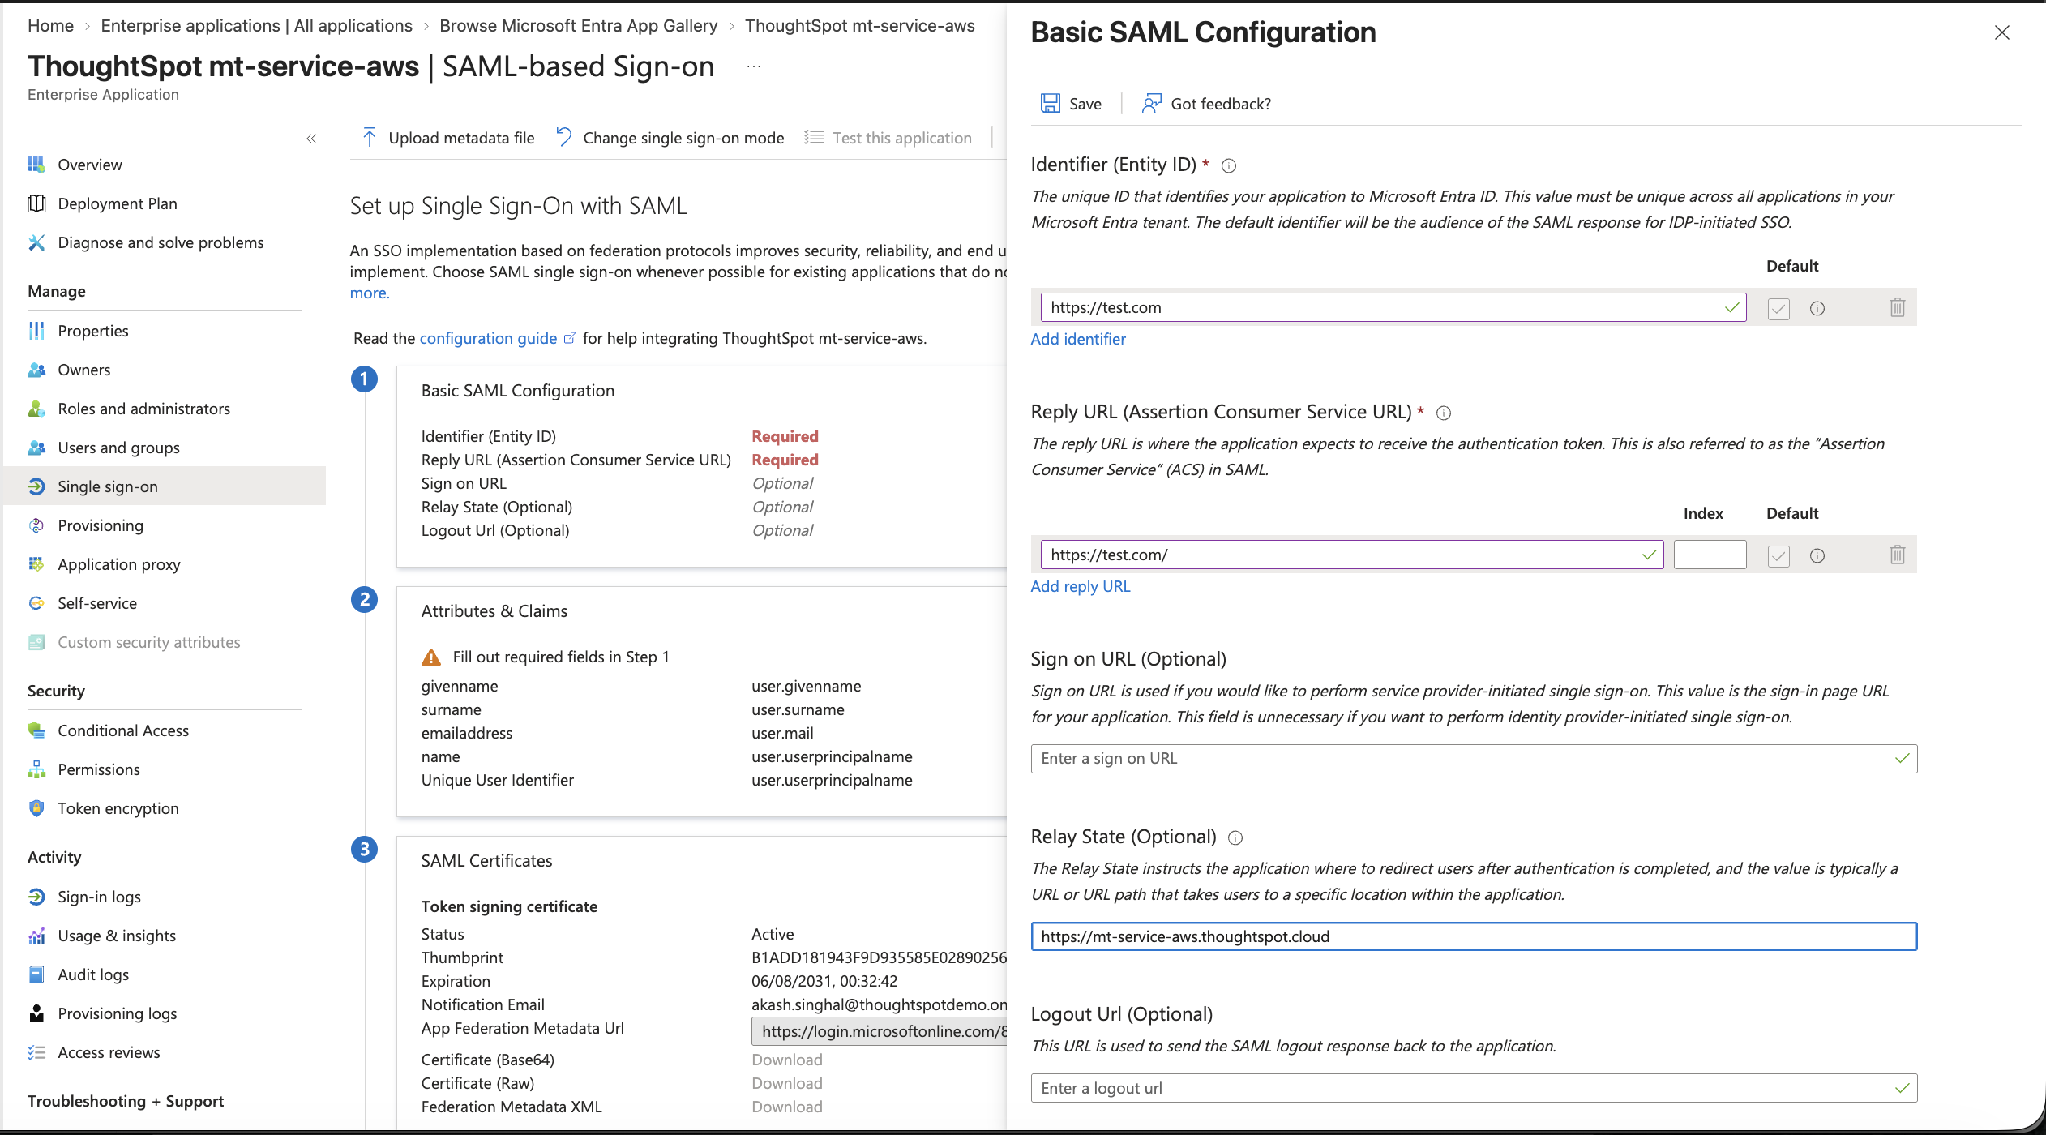
| The Identifier and Reply URL must ultimately contain the values that ThoughtSpot provides (see Part D). Any value entered now is a temporary placeholder so that the configuration can be saved. |
SAML per Org: If you are configuring SAML separately for each Org and users will sign in through a per-Org subdomain, set Relay State to the Org subdomain instead of the base cluster URL: https://<dns-friendly-orgname>.<your-cluster-url>;. The <dns-friendly-orgname> must be an exact match of the Org name configured in ThoughtSpot (Admin > Orgs), and that Org name must be DNS-compliant (for example, lowercase letters, numbers, and hyphens — no spaces, underscores, or other special characters). If you implement SAML per Org, create the DNS-compliant Org names in ThoughtSpot before configuring subdomain-based login. For how ThoughtSpot handles group and Org claims for a per-Org IdP, see Org isolation for per-org SAML authentication.
|
Step 8 – Review and set attributes & claims
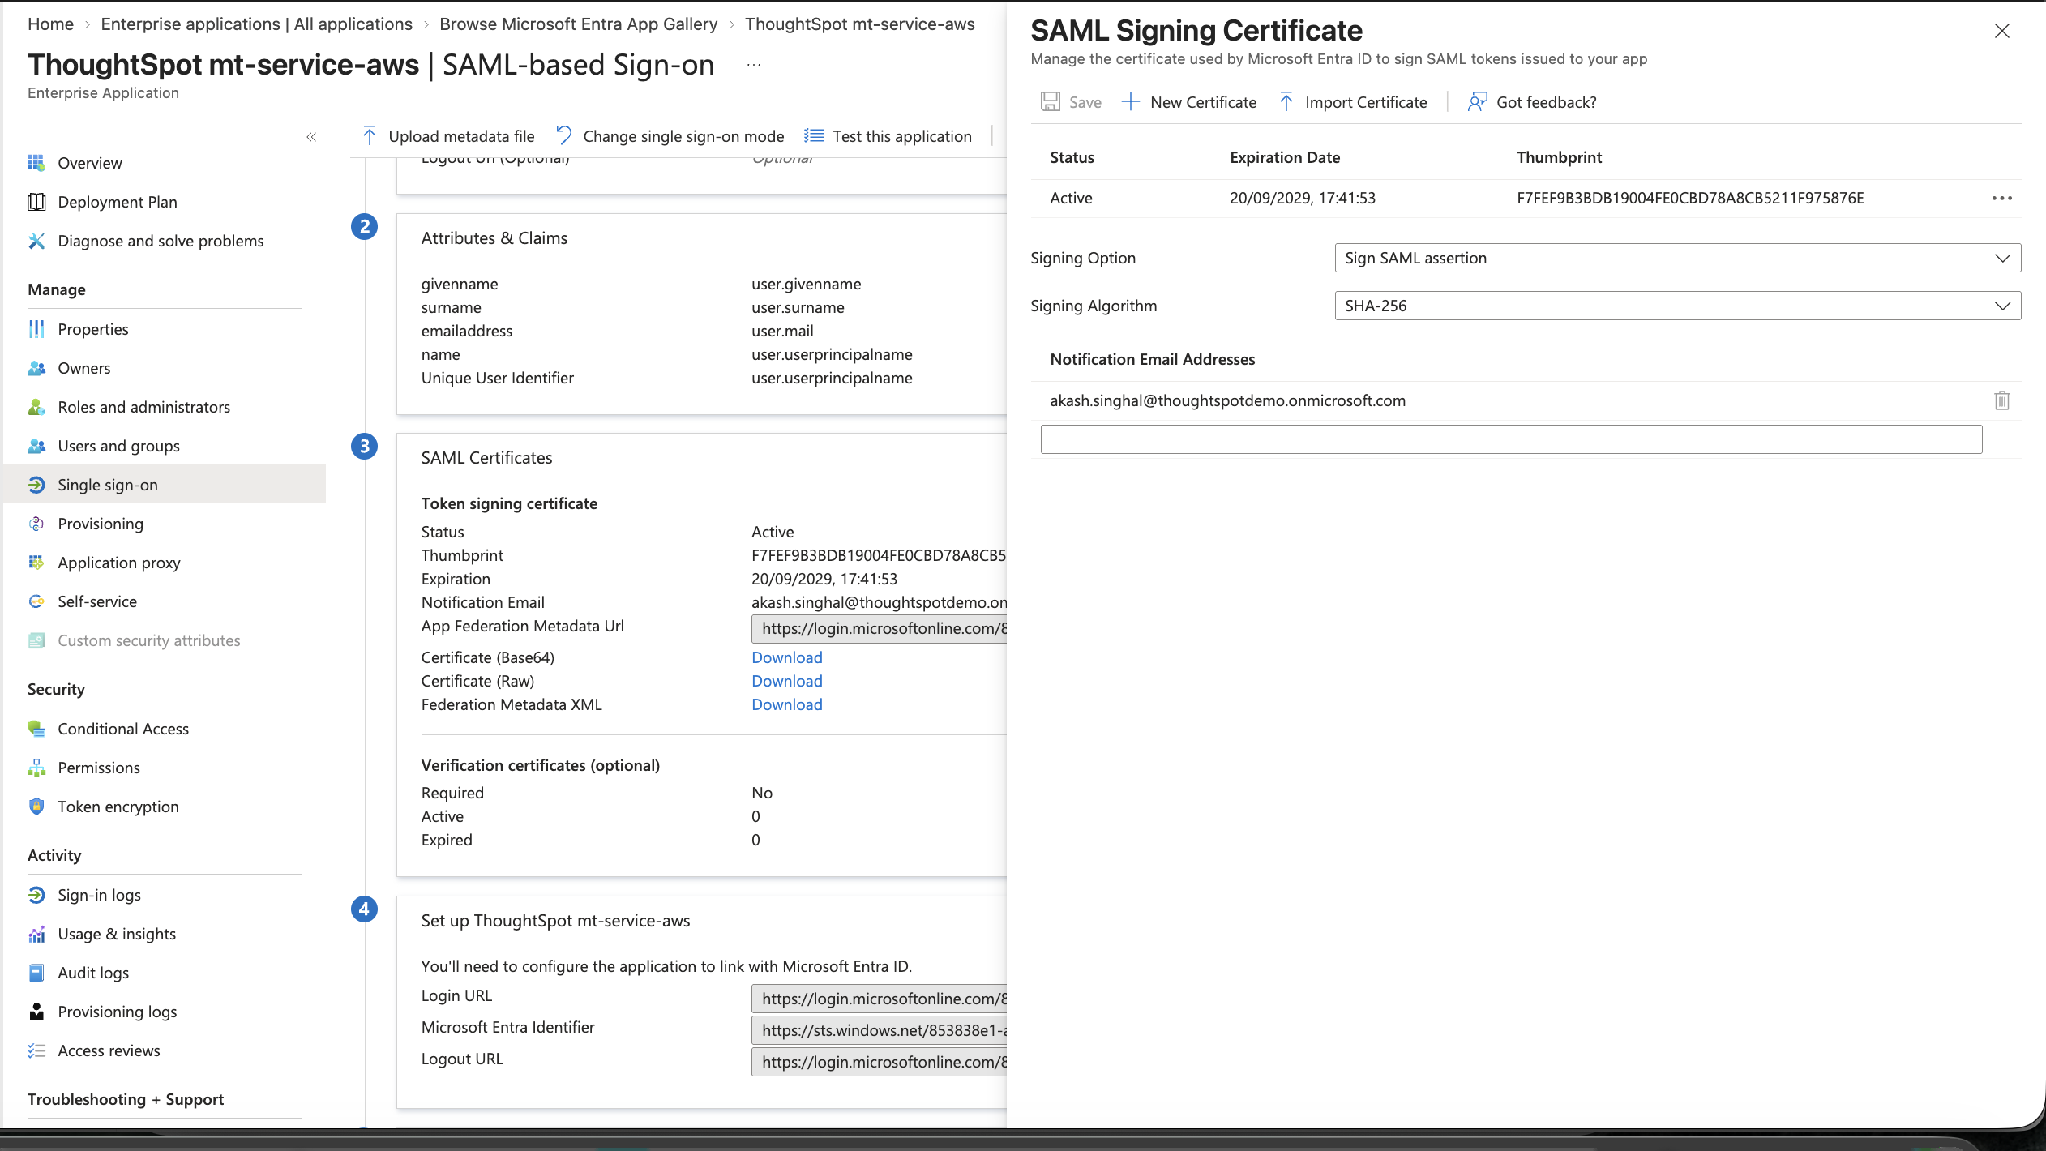
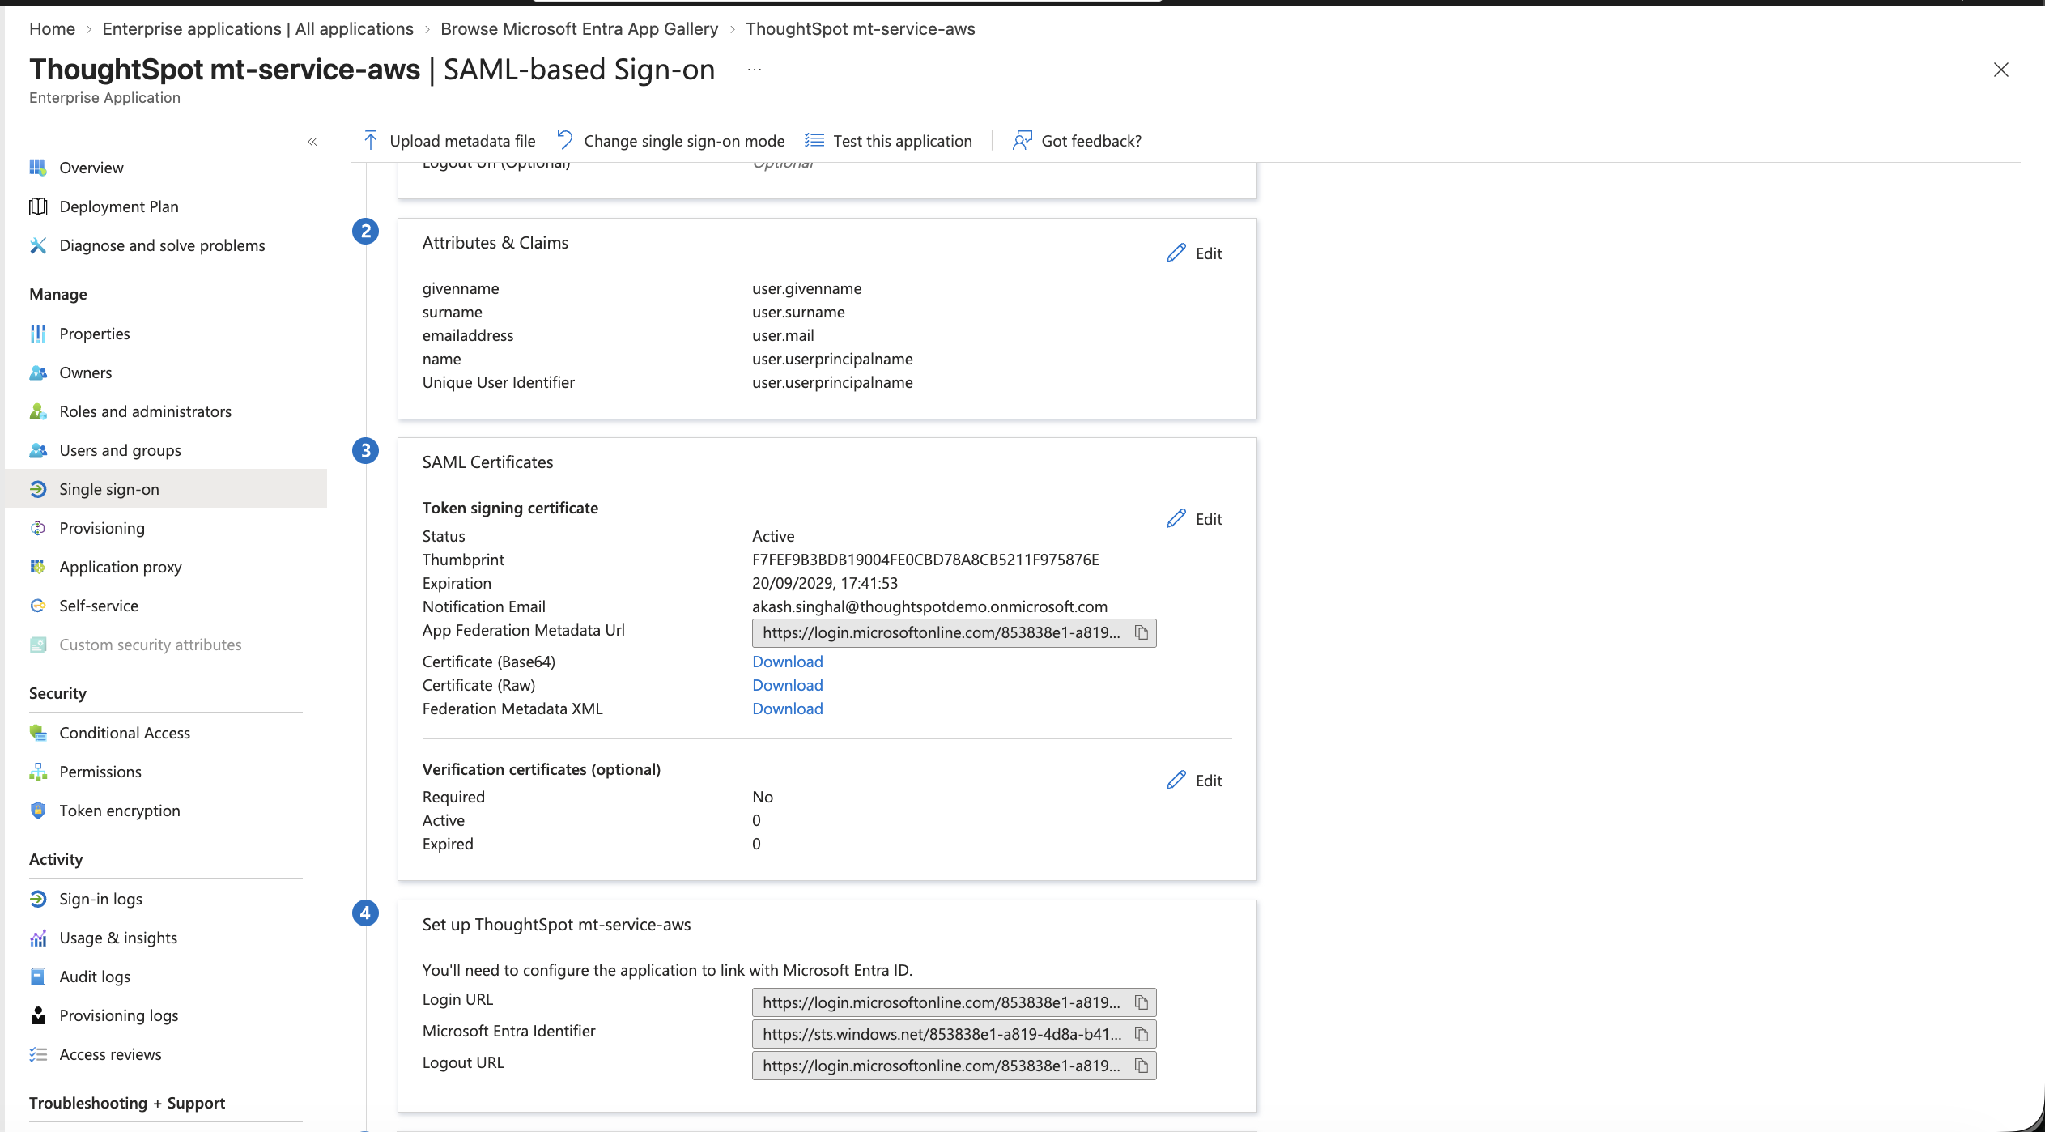
In section 2, Attributes & Claims, review the claims that Entra sends in the SAML assertion. Add, remove, or edit claims so that they match the attributes your organization uses to identify and provision users in ThoughtSpot. Record the claim names — you enter the matching names in ThoughtSpot in Part C.
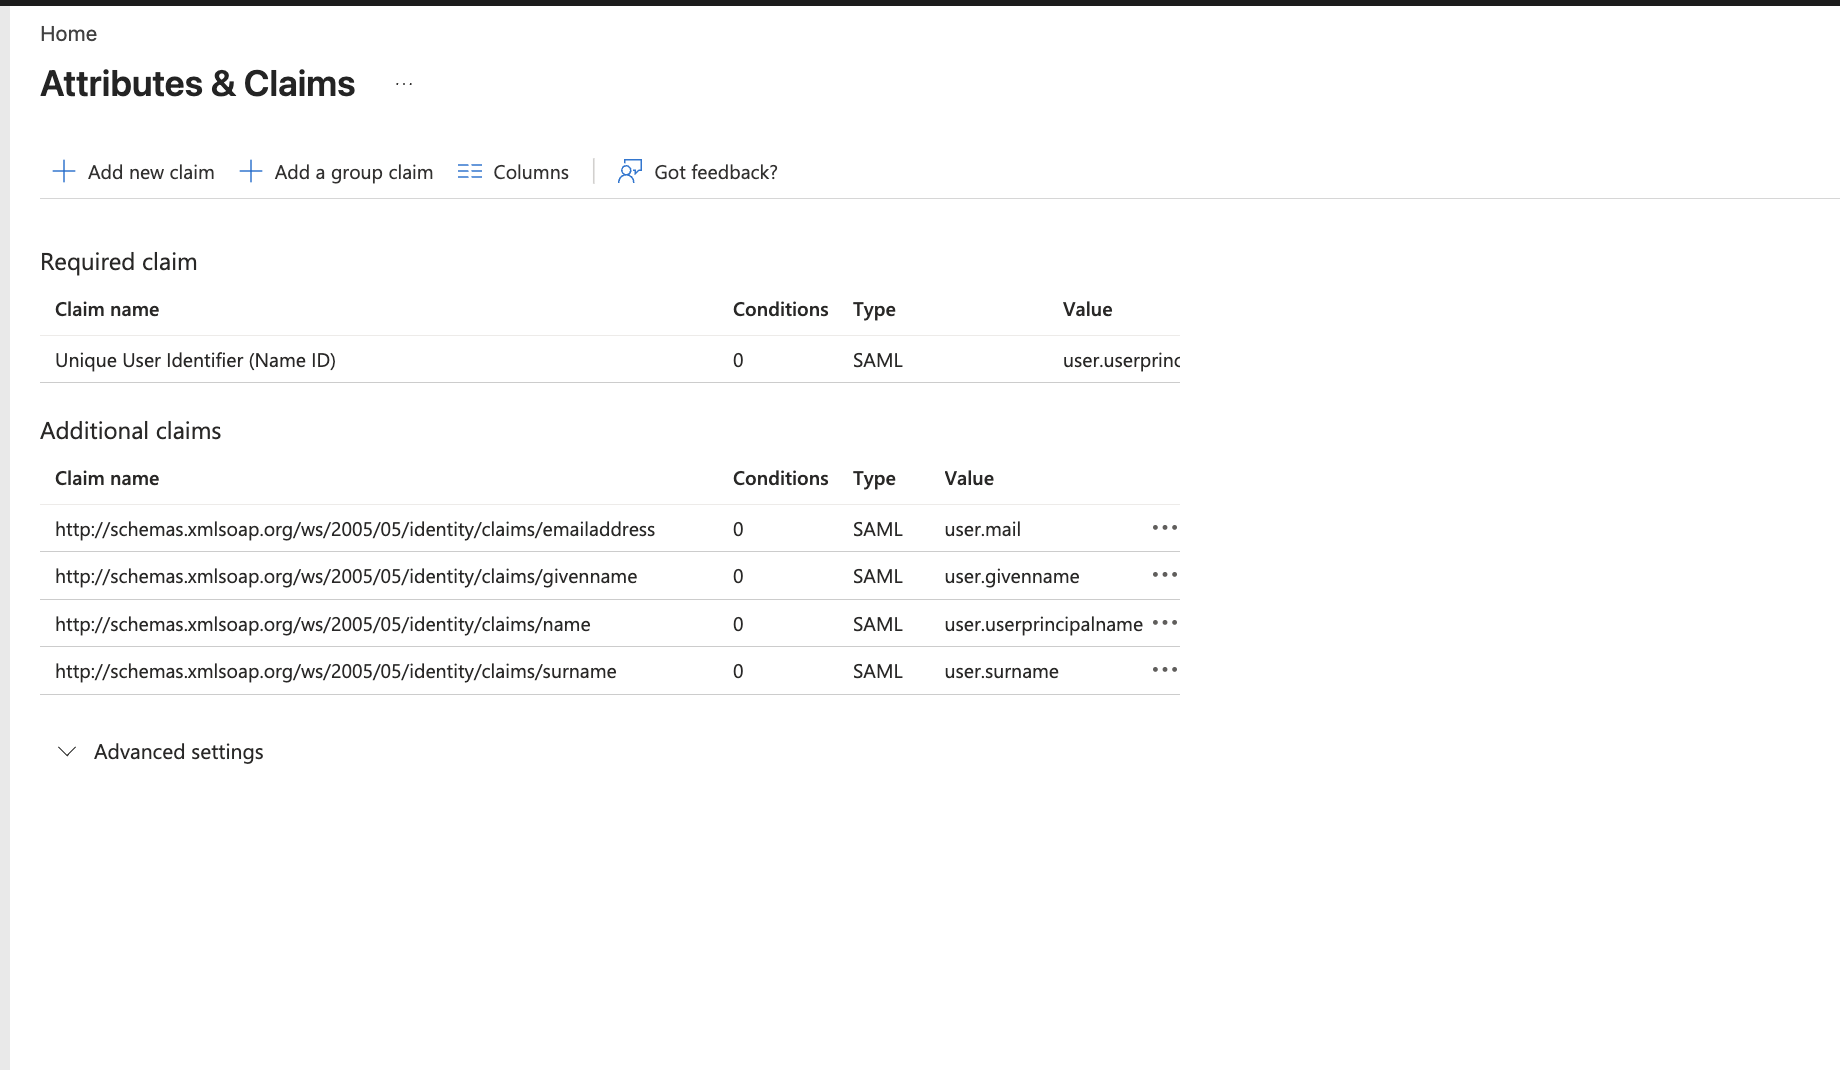
| The claim you map to the ThoughtSpot Username must not contain whitespace. |
To pass Entra group membership to ThoughtSpot so that group memberships are granted automatically at sign-in, you can also add a group claim here — see the optional Part F.
Part C – Configure the identity provider in ThoughtSpot
This part covers the values you enter for Microsoft Entra ID. For a description of every field in the ThoughtSpot SAML configuration, see Enable SAML authentication.
Step 11 – Open the identity provider configuration
The navigation to reach the identity provider setup depends on which administration experience your ThoughtSpot cluster uses. Follow the path that matches your cluster — the remaining steps (selecting SAML 2.0, entering the IdP details, and mapping attributes) require the same values in both.
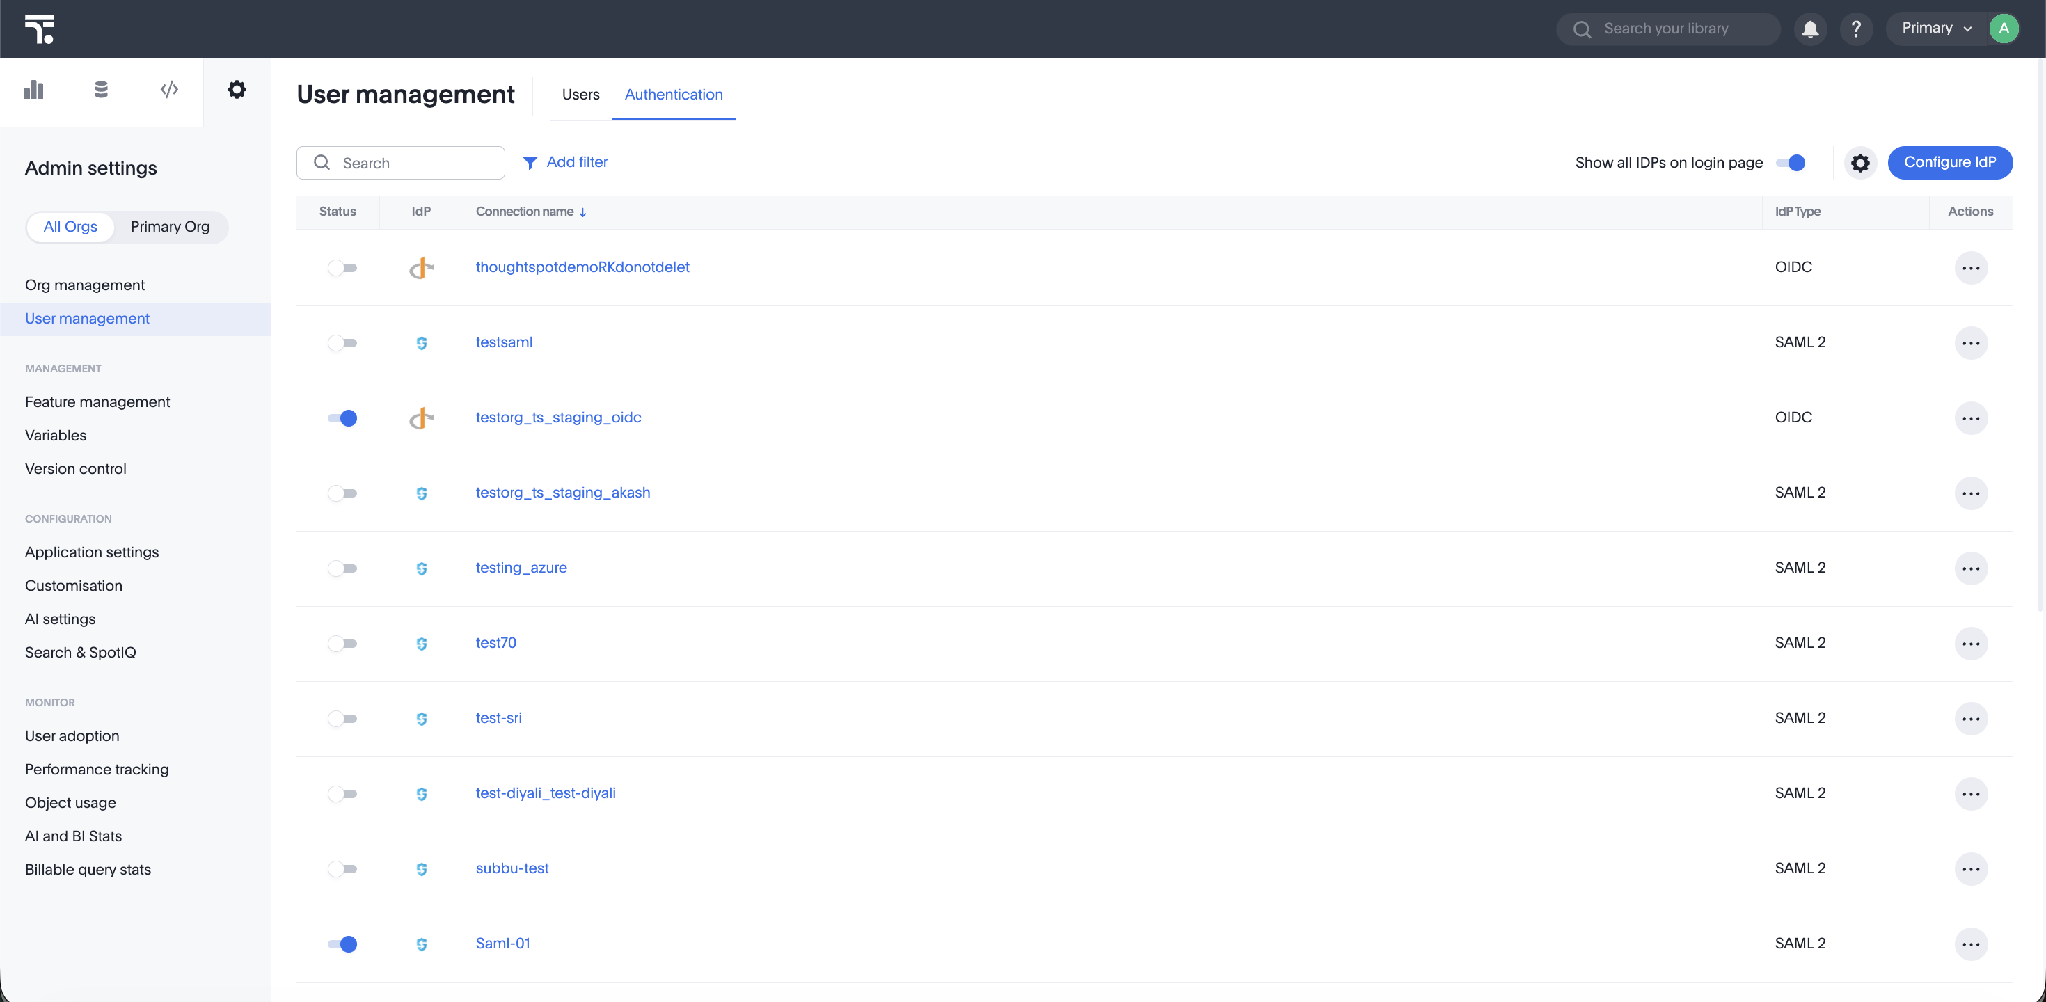
If the New Admin Experience is enabled: In ThoughtSpot, go to Admin > User management > Authentication, then select Configure IdP.
If your cluster uses the classic administration experience: Open Admin settings (the gear icon), and under Authentication select Single Sign On.
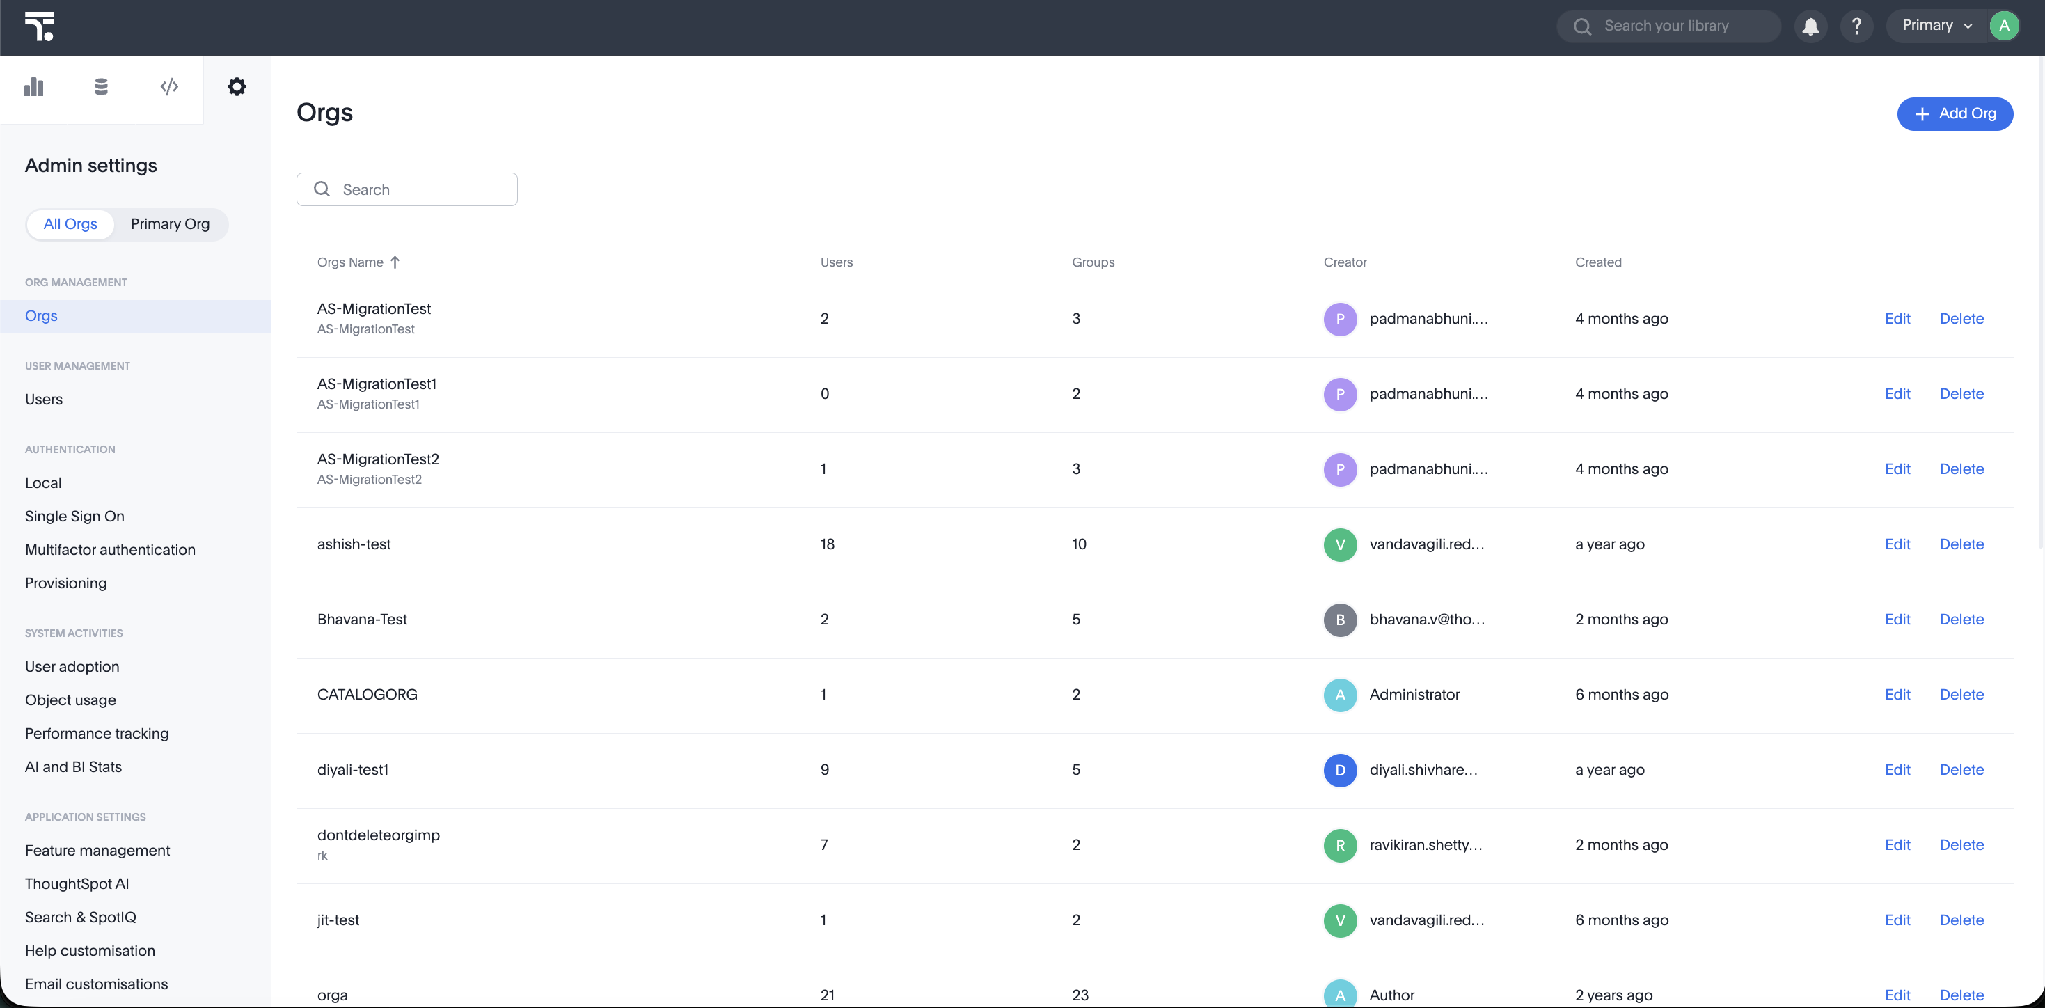
On the Identity Providers page, select Add Identity Provider.
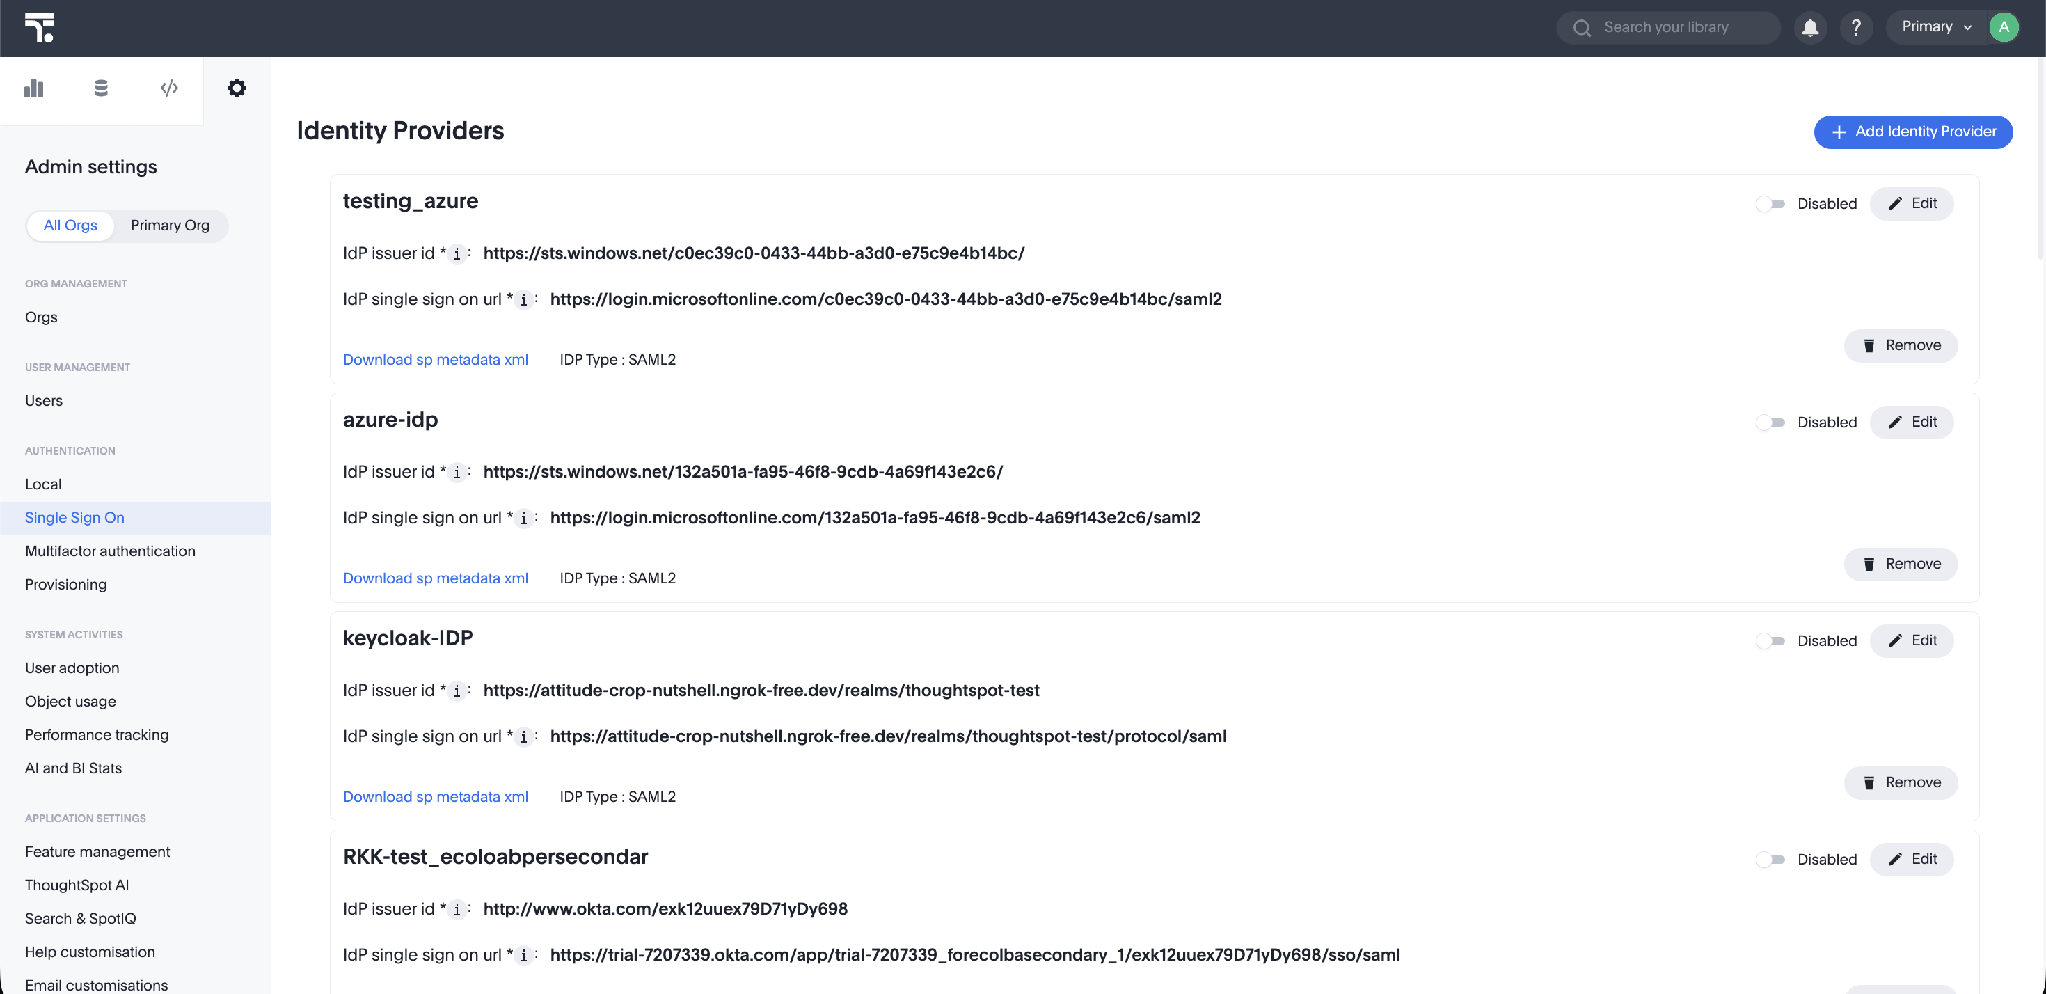
| The wizard screens shown in the following steps are from the New Admin Experience. In the classic experience the layout may differ slightly, but you provide the same values — the IdP certificate, issuer ID, single sign-on URL, and attribute mappings. |
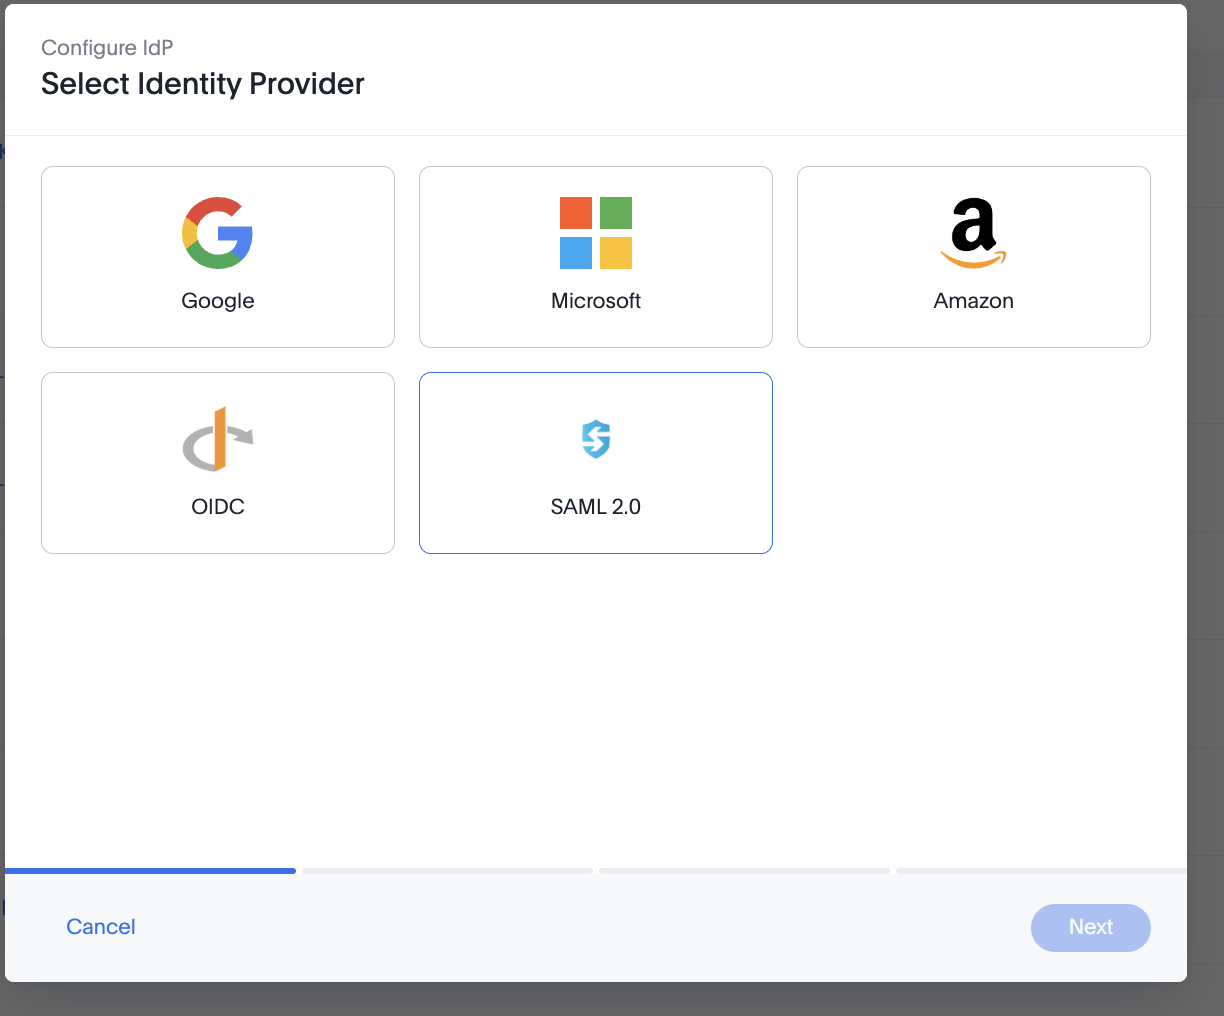
Step 13 – Enter the IdP details
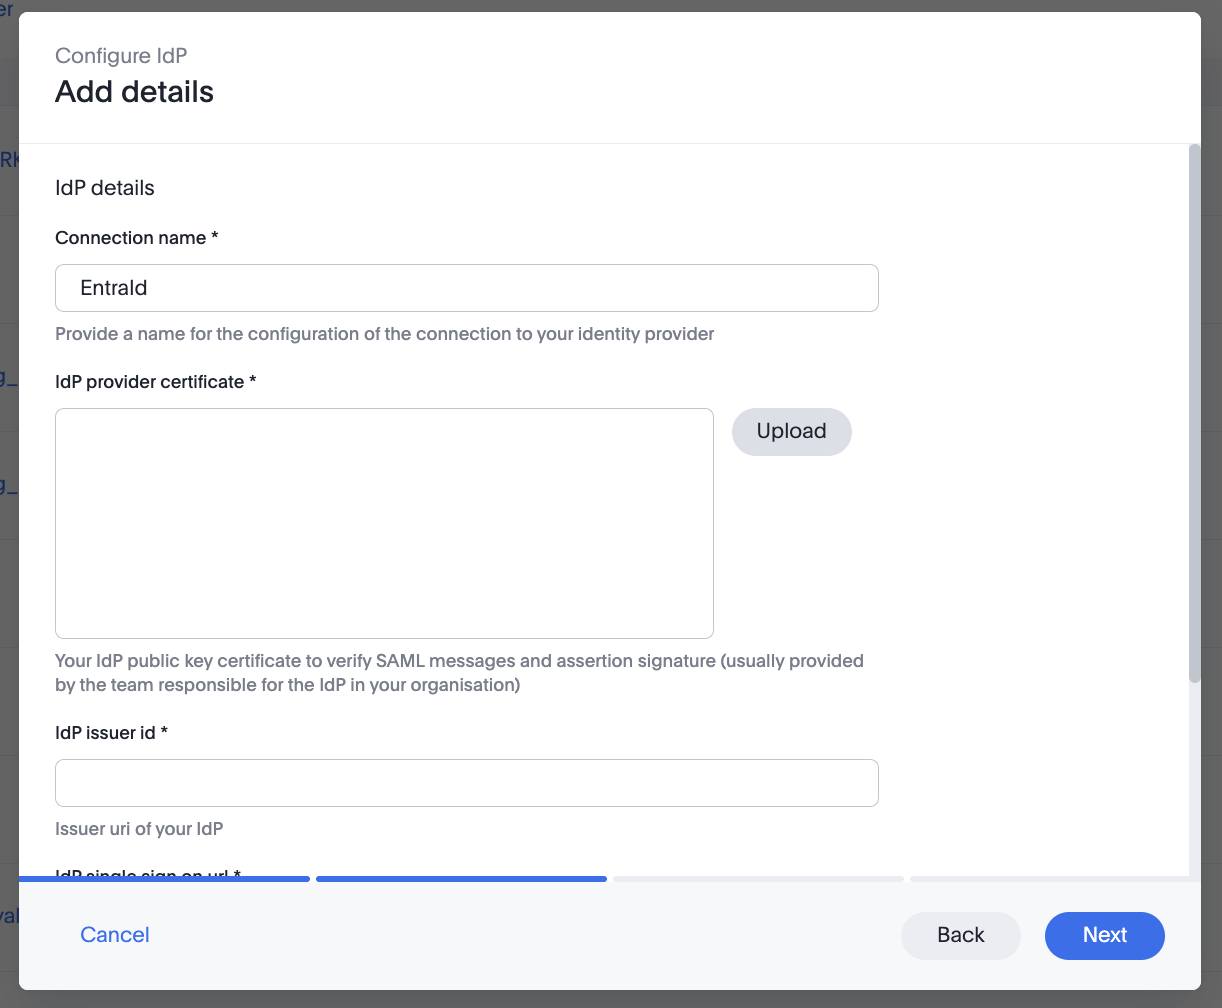
On the Add details step, enter:
-
Connection name – a name for this connection (for example, your IdP’s name).
-
IdP provider certificate – upload the Base64 token-signing certificate you downloaded from Entra (Step 10).
-
IdP issuer id – the Microsoft Entra Identifier from Entra (Step 10).
-
IdP single sign-on url – the Login URL from Entra (Step 10).
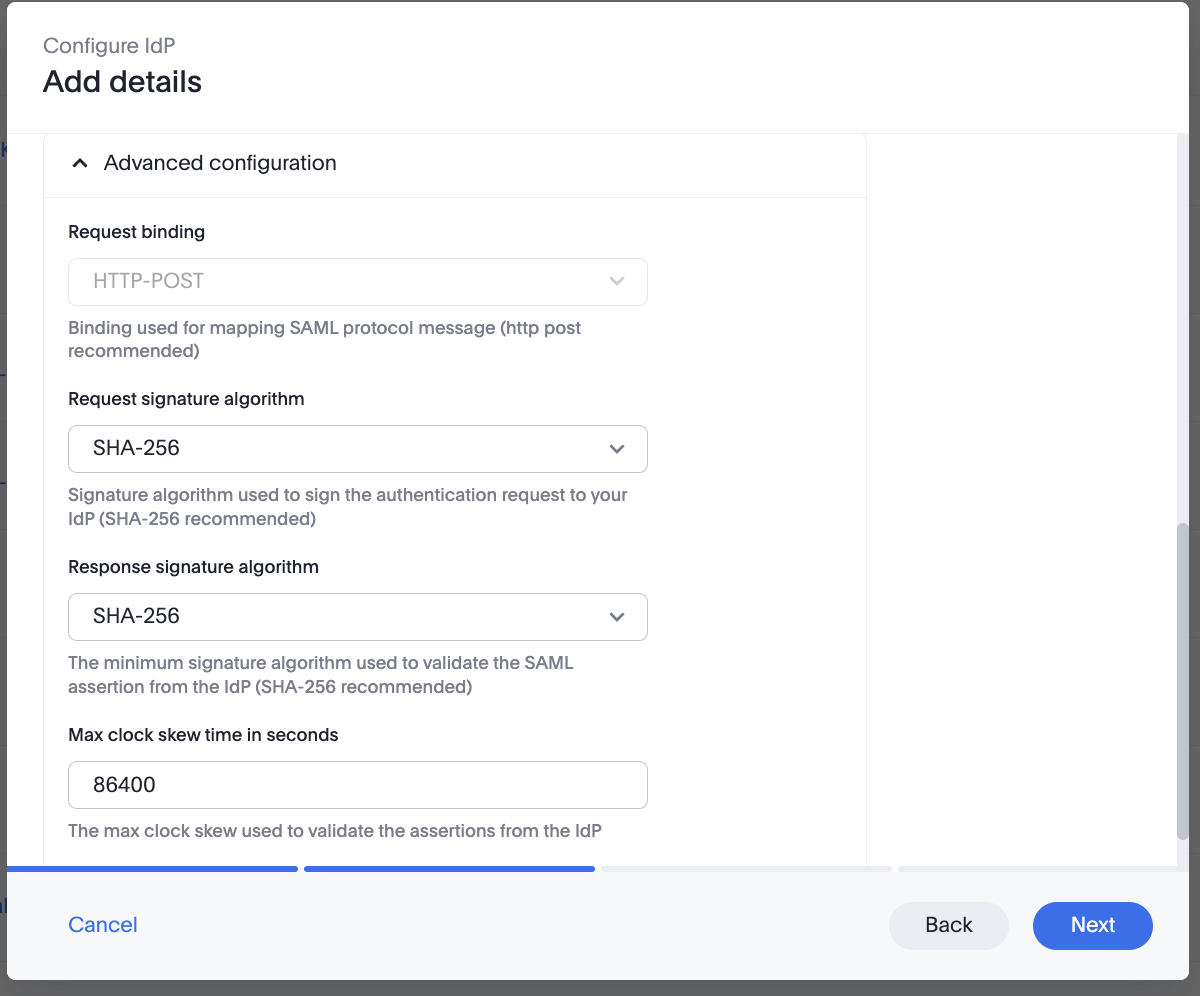
Step 14 – Set the advanced options
Expand Advanced configuration and set the Request binding and signature algorithms to match Entra (HTTP-POST and SHA-256 are recommended). Adjust the Max clock skew to suit your policy. For the default value of each option, see Enable SAML authentication. Select Next.
Step 15 – Map attributes
On the Map attributes step, map each ThoughtSpot user attribute to the SAML attribute name your IdP sends (from Step 8). Only Username is required; Email, Display name, Roles, Orgs, and Default Org are optional and can be mapped to suit your business needs. Select Next.
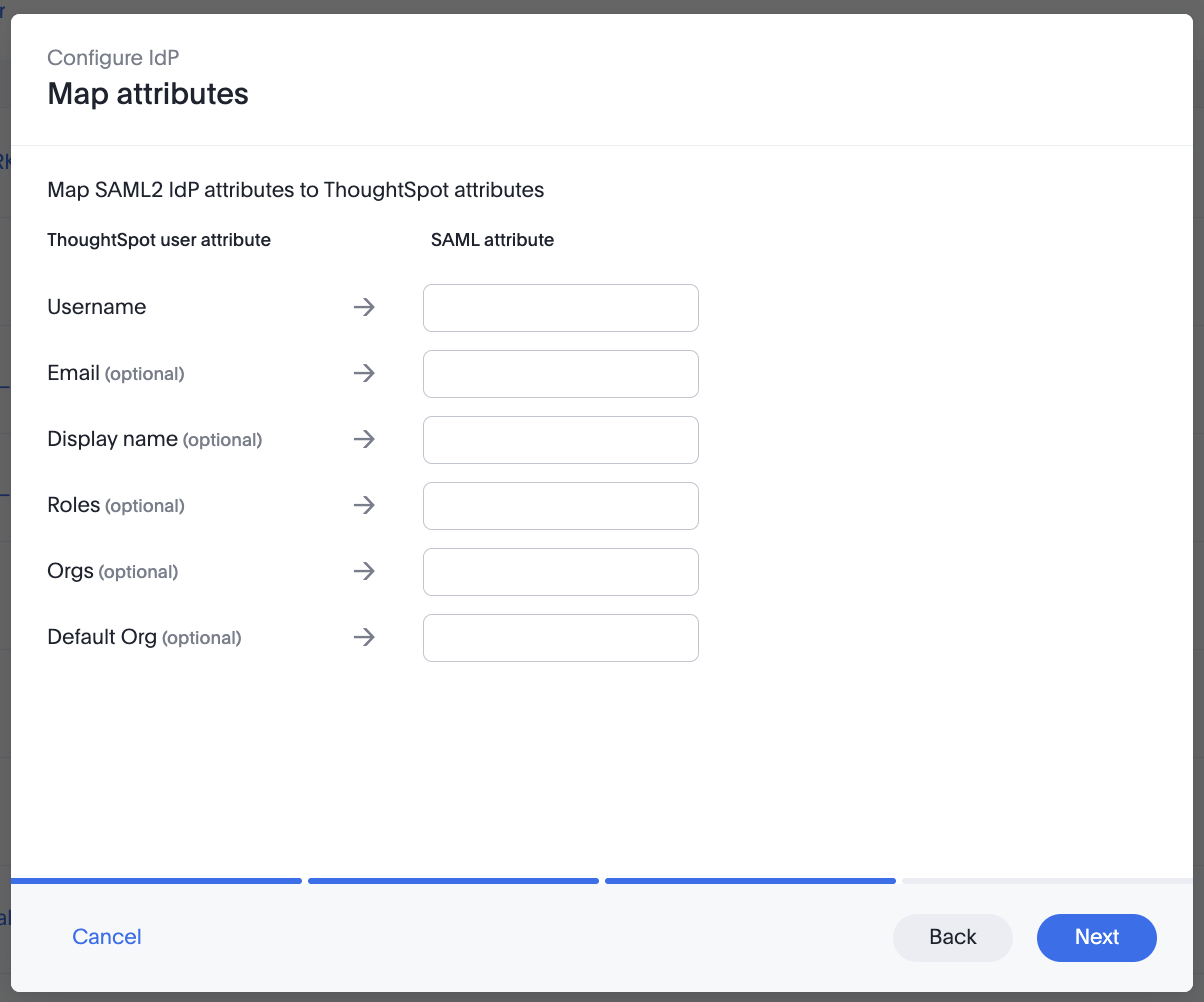
| The SAML attribute you map to Username must not contain whitespace, or affected users will not be able to sign in. |
To map Entra group membership to ThoughtSpot group memberships, map the Roles attribute to the Entra group claim — see the optional Part F.
Step 16 – Copy the ThoughtSpot service-provider URLs
On the Detail URLs step, copy the two values ThoughtSpot generates for this connection:
-
Assertion consumer service (ACS) URL – paste this into the Entra Reply URL in Part D.
-
Audience URL – paste this into the Entra Identifier (Entity ID) in Part D.
Optionally select Download metadata, then select Close. Keep these URLs handy for the next part.
| These URLs are specific to your ThoughtSpot cluster and connection. You can return to this screen later from the configured IdP menu if you need them again. |
Part D – Complete the configuration and assign users in Entra
Step 17 – Enter the ThoughtSpot URLs in Basic SAML Configuration
Return to the application in Entra, open Single sign-on > Basic SAML Configuration, and select Edit. Replace the placeholders with the values from ThoughtSpot (Step 16):
-
Identifier (Entity ID) – the ThoughtSpot Audience URL.
-
Reply URL (Assertion Consumer Service URL) – the ThoughtSpot Assertion consumer service (ACS) URL.
-
Relay State – for a single/primary-Org login, your ThoughtSpot cluster URL,
https://<your-cluster>.thoughtspot.cloud. For SAML per Org with subdomain login, the Org subdomain,https://<dns-friendly-orgname>.<your-cluster-url>;(see the SAML per Org note in Step 7).
Select Save. (This is the same panel shown in Step 7; you are now entering the real values.)
| Precaution – re-download the certificate: After you change the Identifier (Entity ID) or Reply URL, re-download the Certificate (Base64) from section 3 (SAML Certificates) and re-upload it to the ThoughtSpot IdP configuration (Part C, Step 13). Depending on the Entra tenant’s settings, the token-signing certificate can change when these values are updated. Rotating the certificate again after any change to the Entity ID or Reply URL is the safest approach and avoids signature-validation failures at sign-in. |
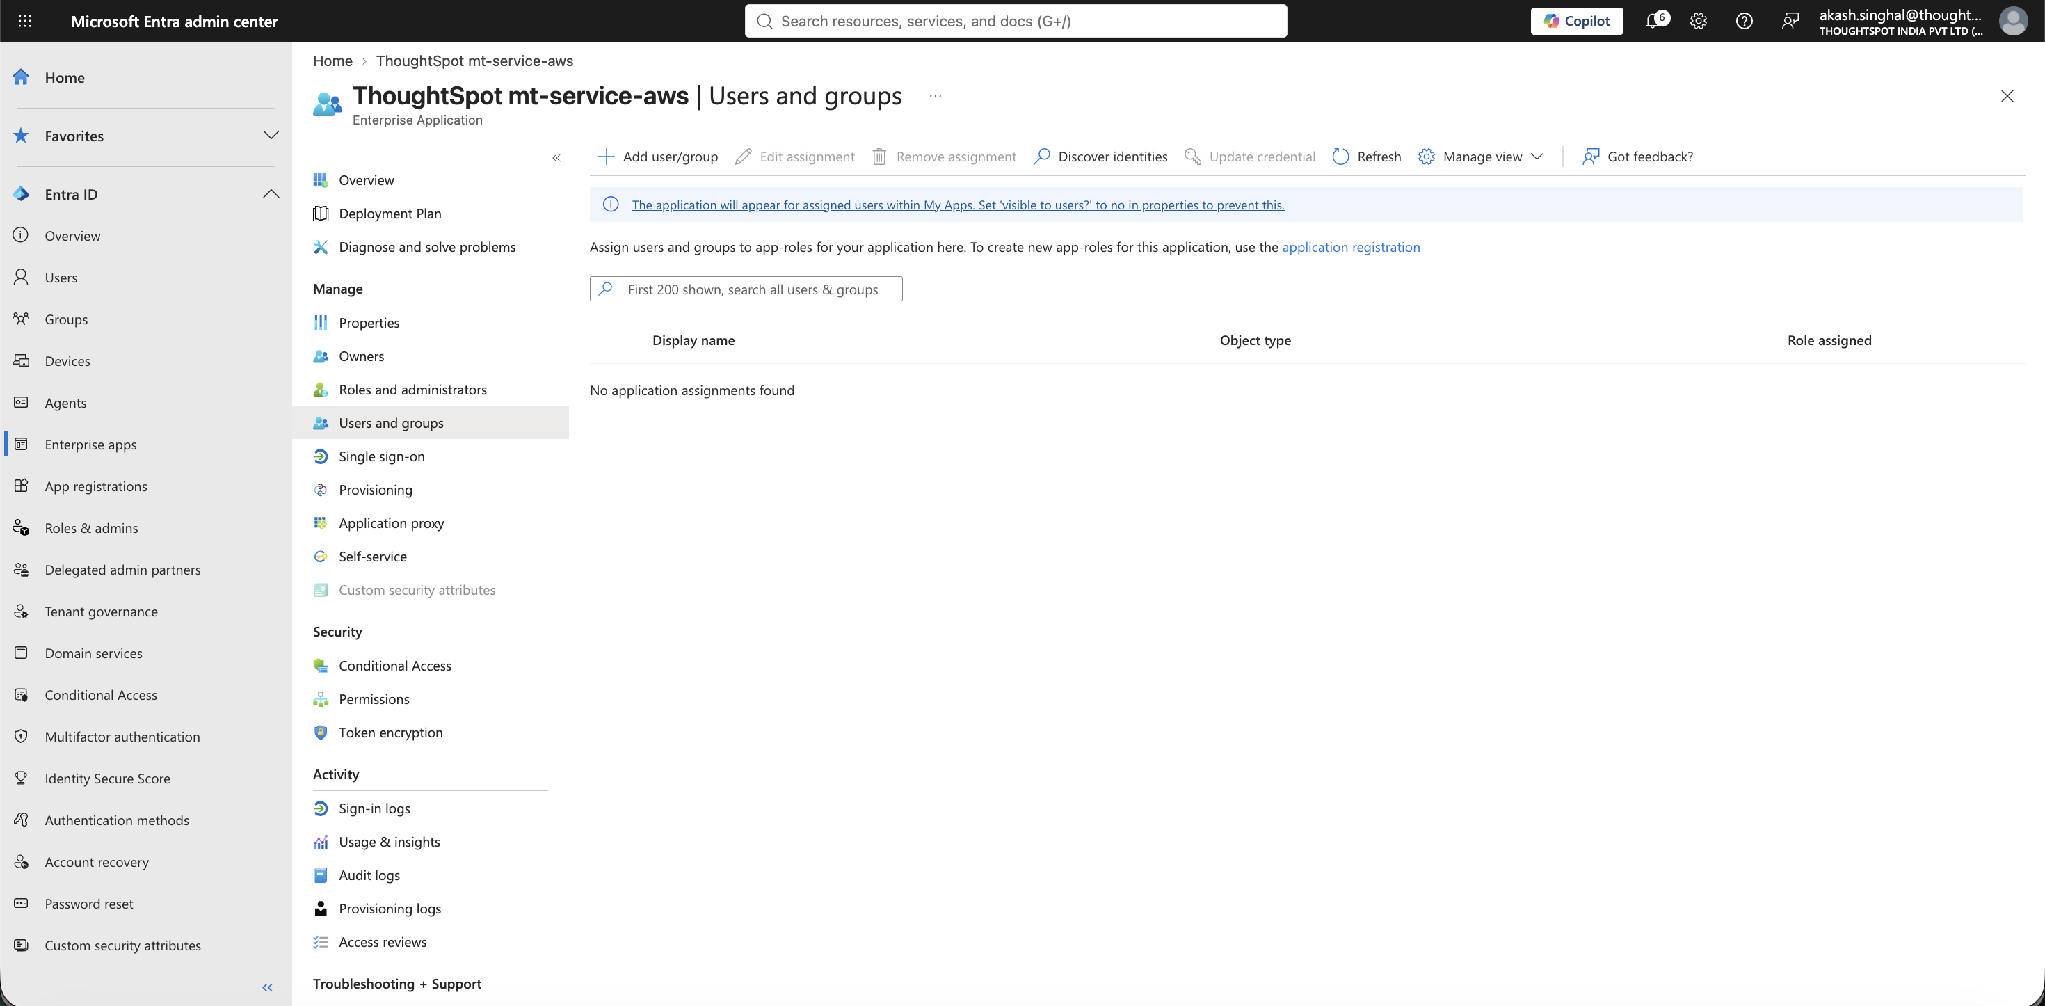
Step 18 – Open Users and groups
In the application, select Users and groups. If no one is assigned yet, select Add user/group. Only assigned users can sign in to ThoughtSpot through this application.
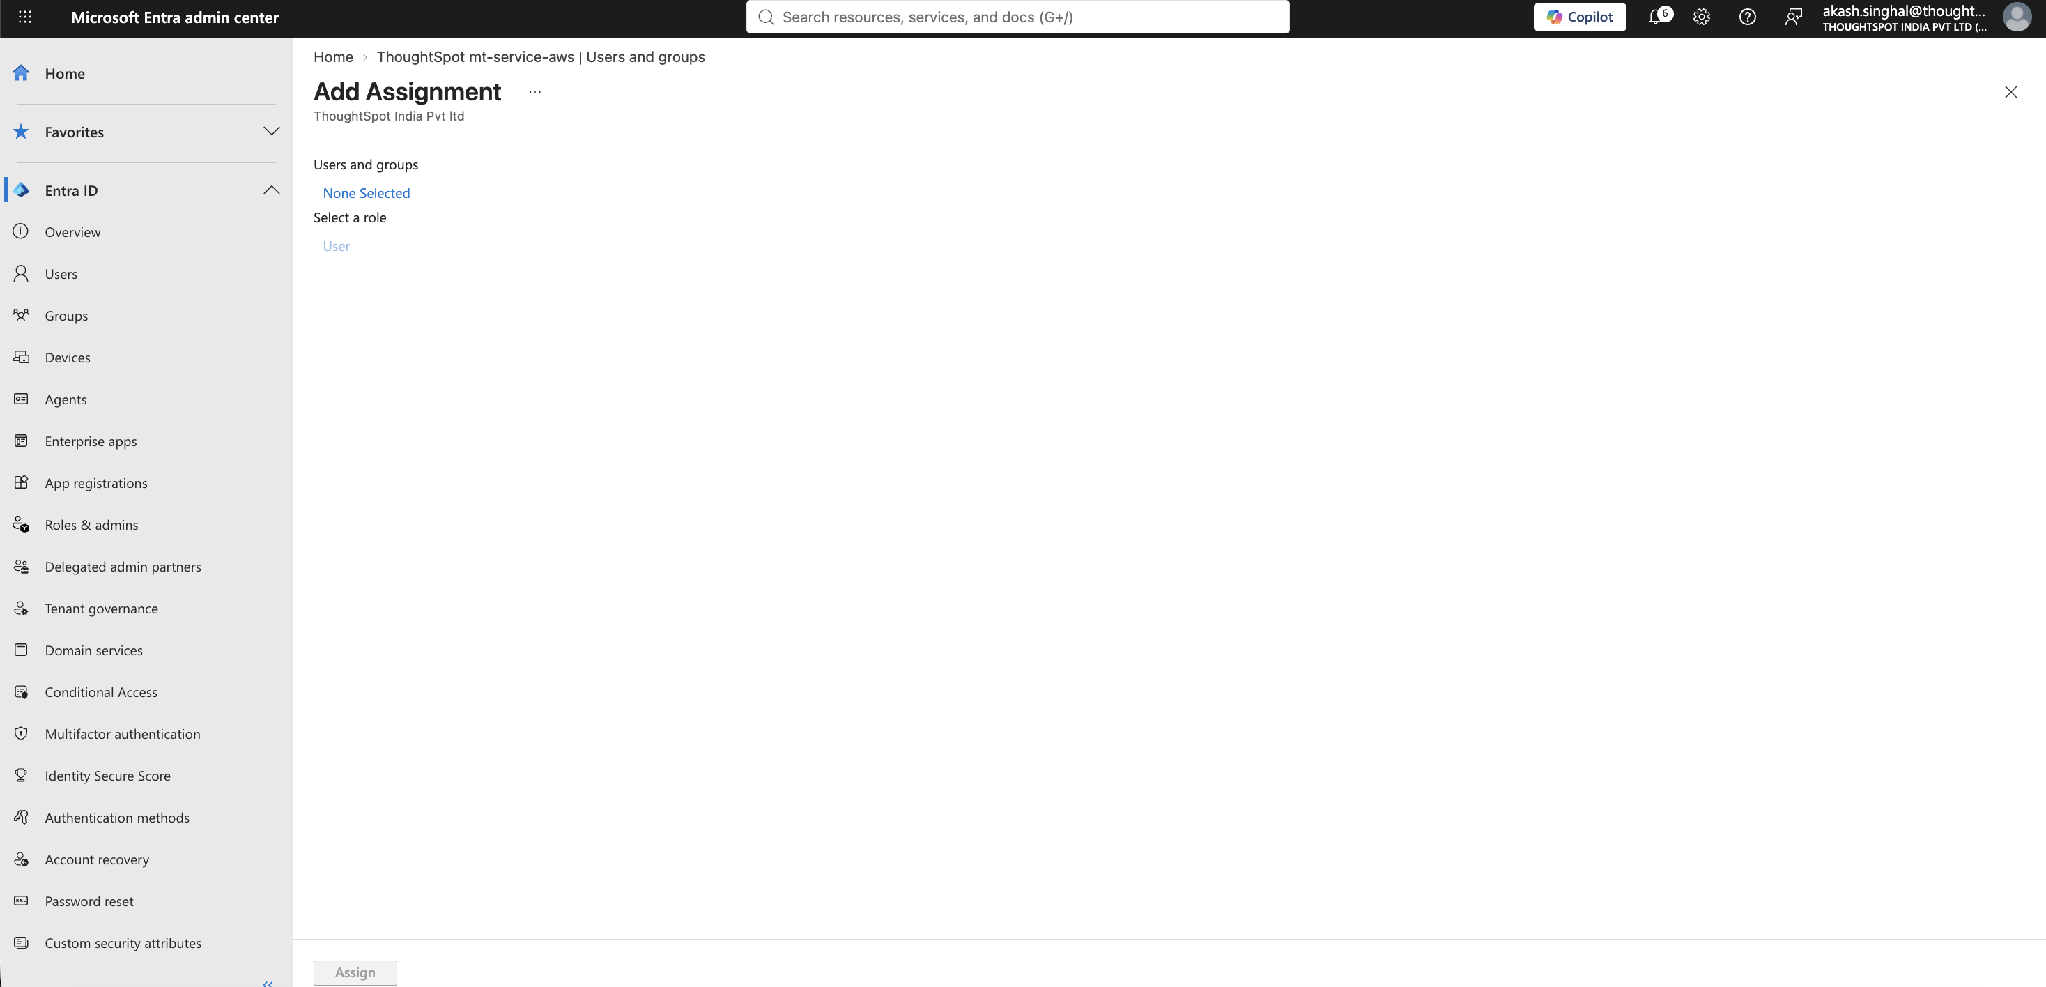
Step 19 – Start the assignment
On the Add Assignment page, select Users and groups under None Selected.
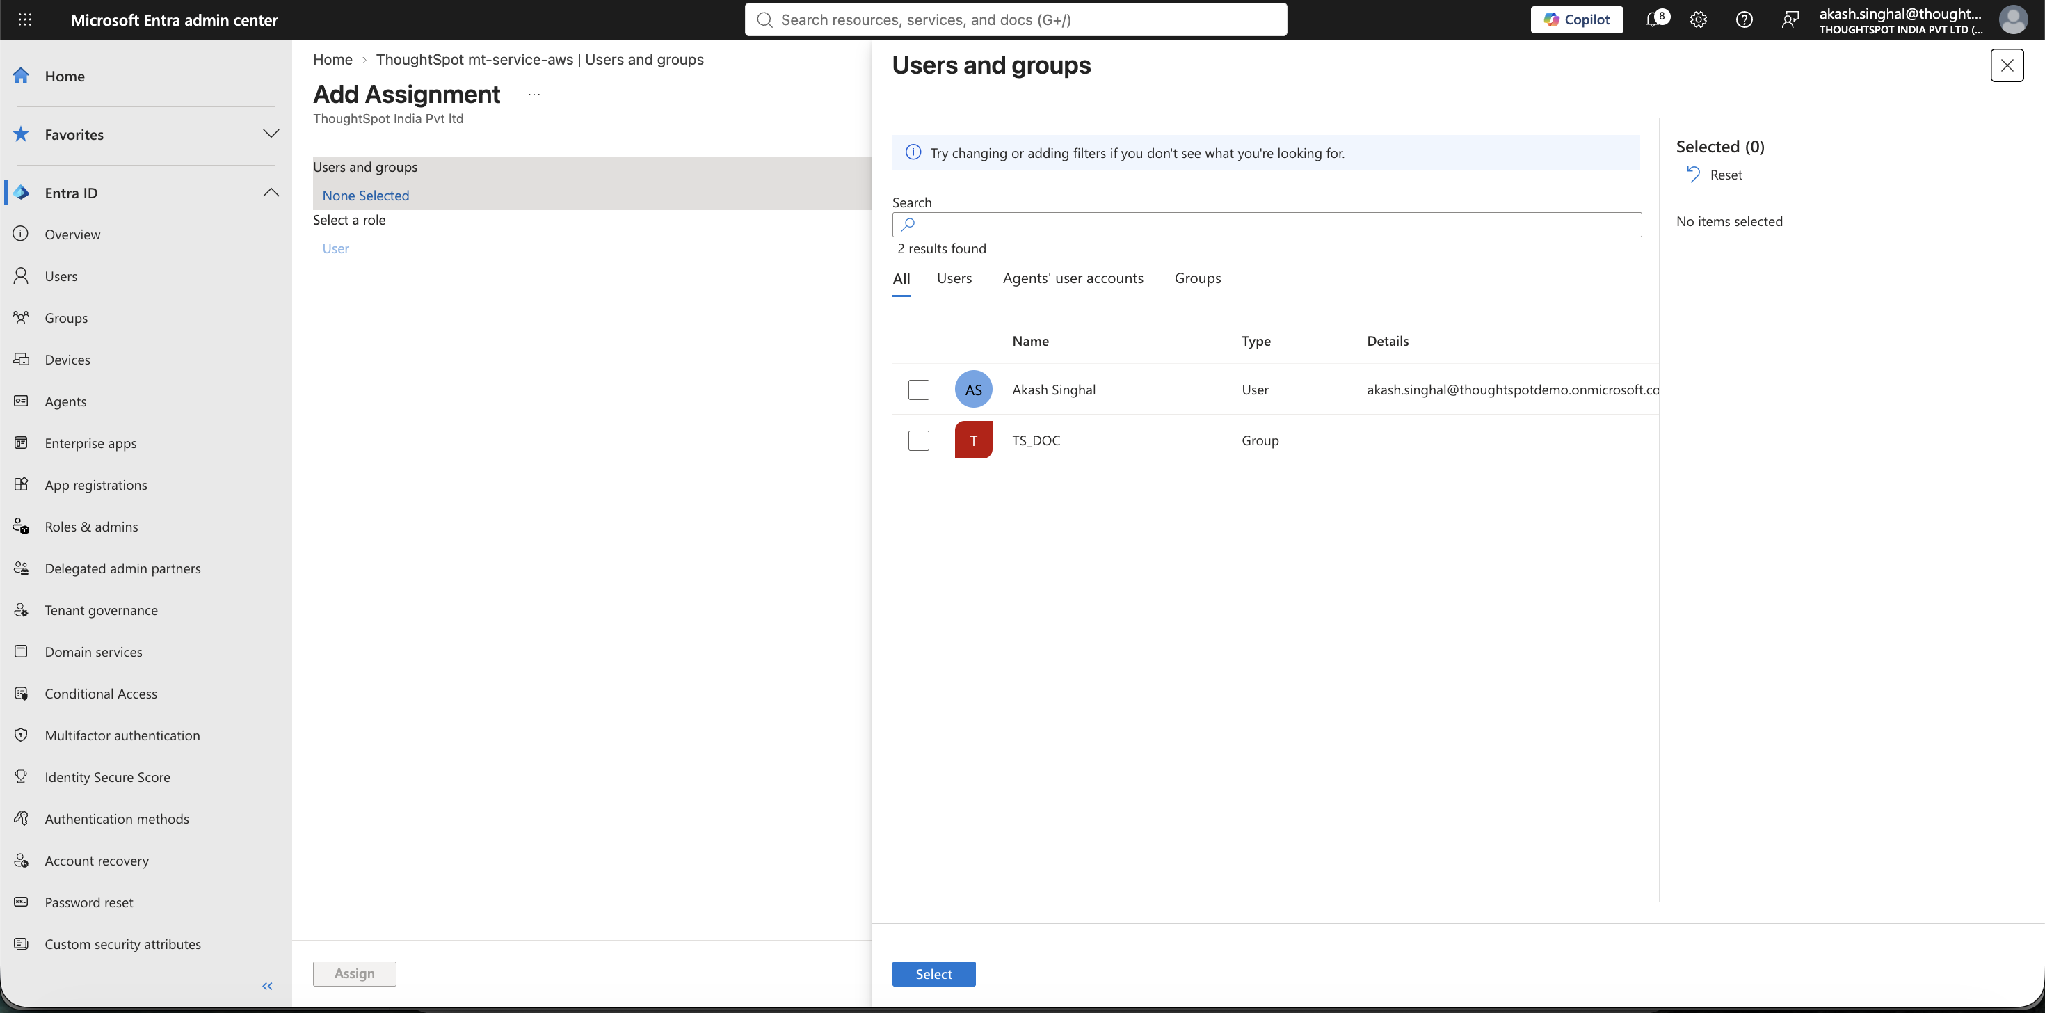
Step 20 – Select users and/or groups
Search for and select the users and/or groups that should have access, then select Select and Assign.
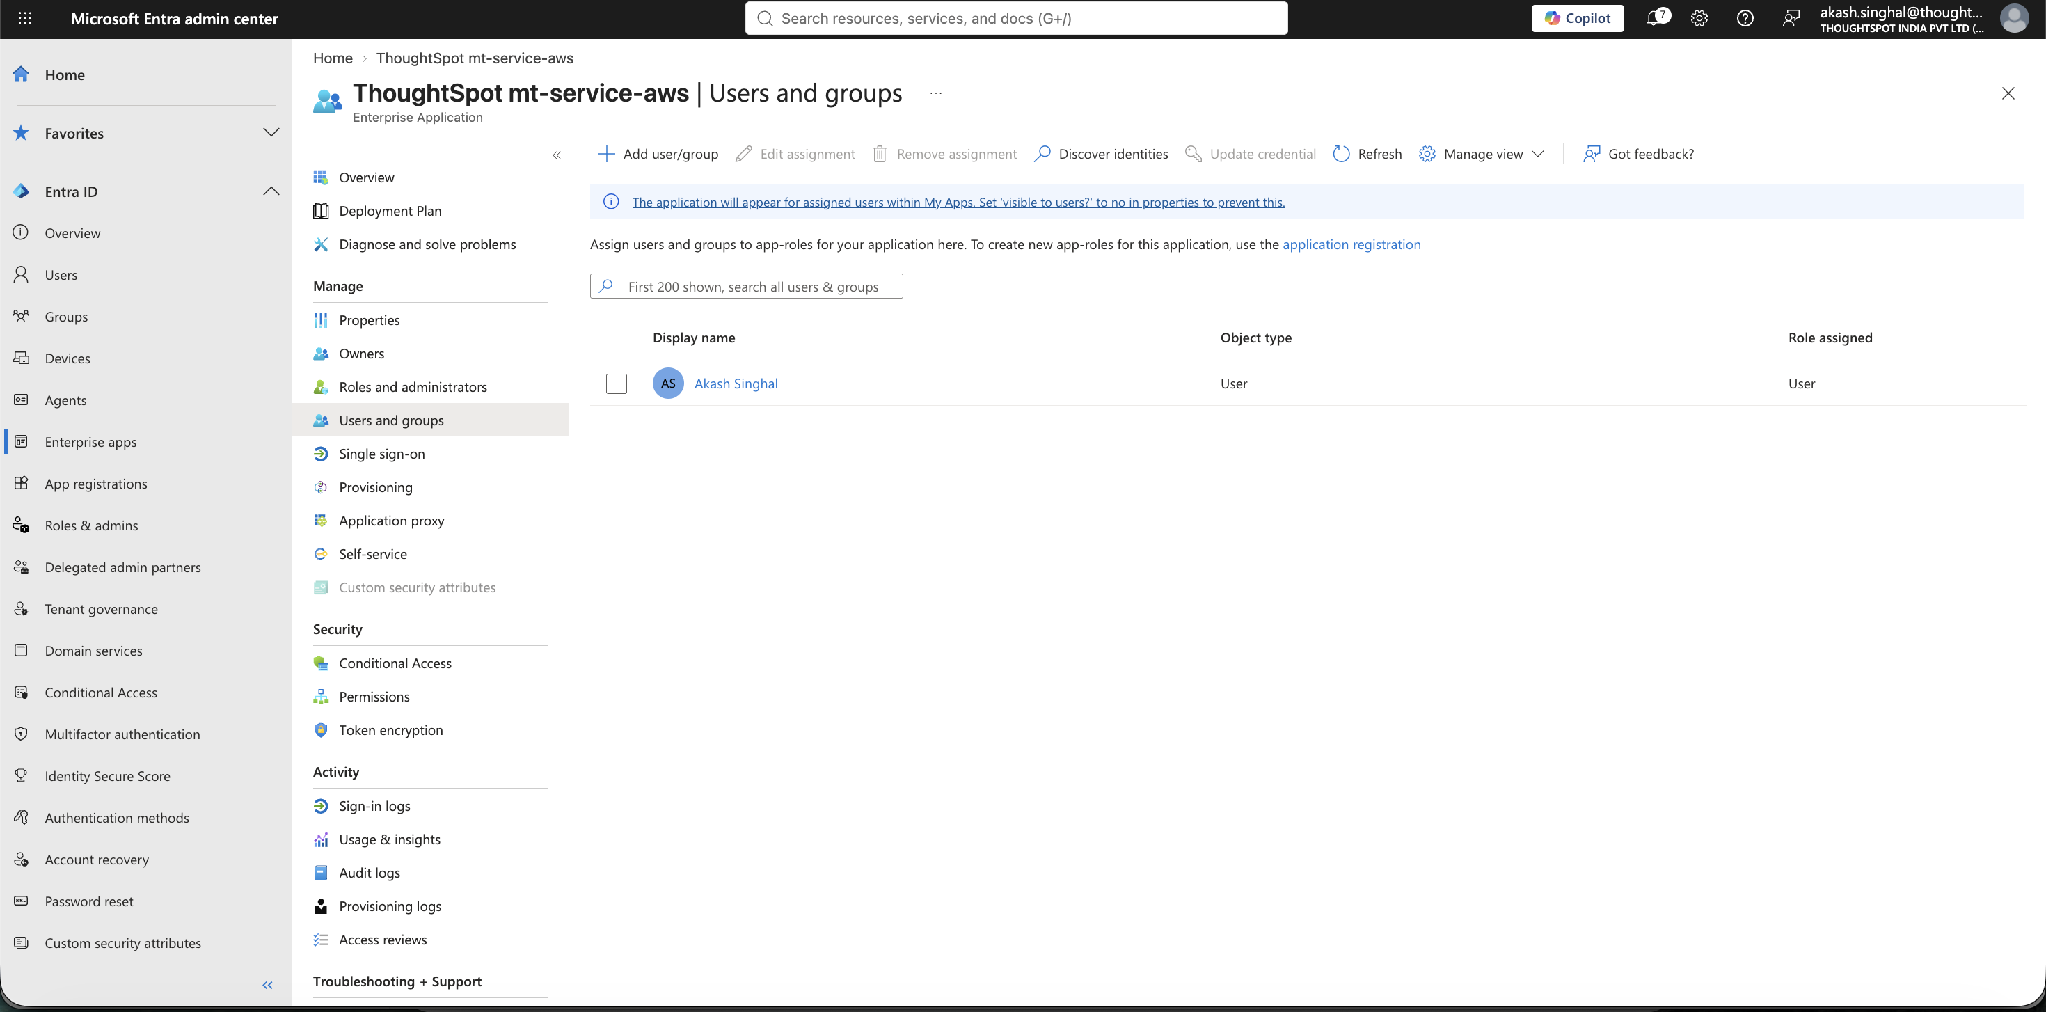
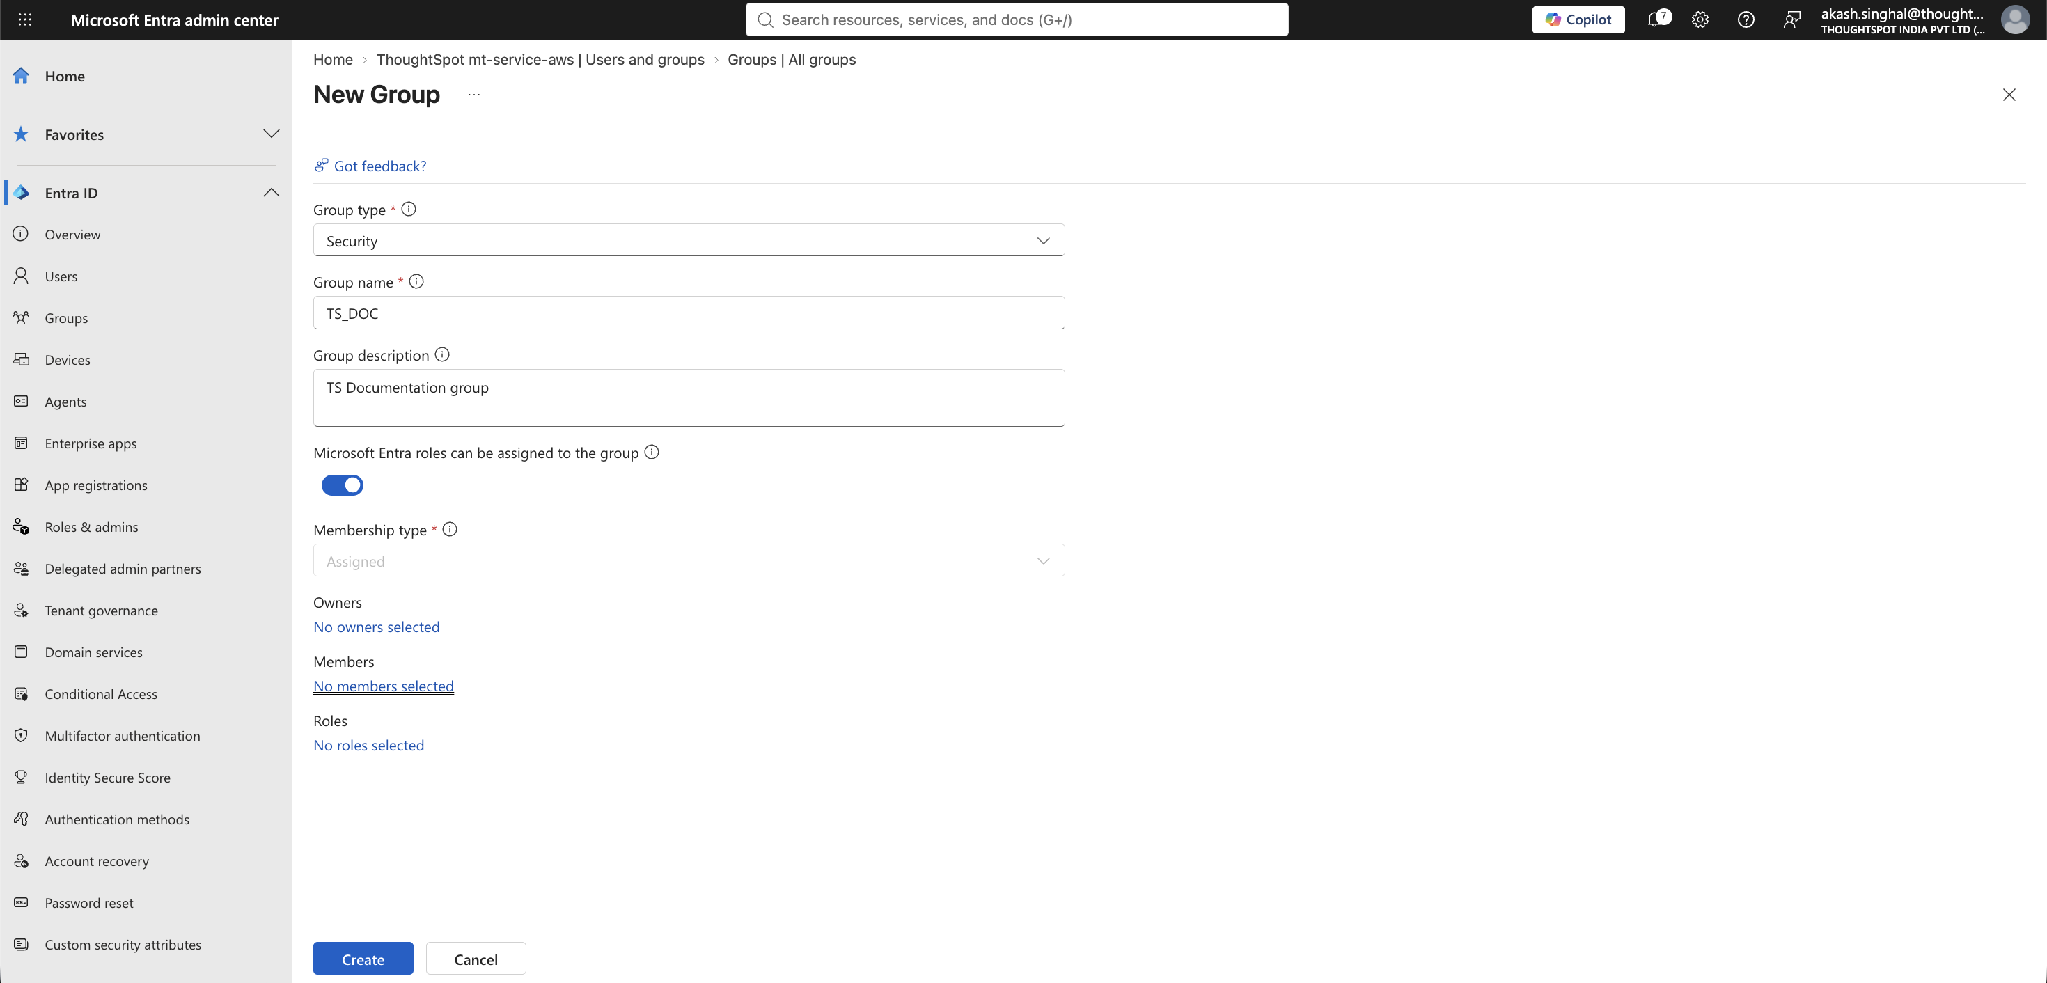
Step 22 – (Optional) Assign access by group
To manage access by group, first create a security group. In Entra ID, go to Groups > New group, set Group type to Security, enter a Group name and description, then add members.
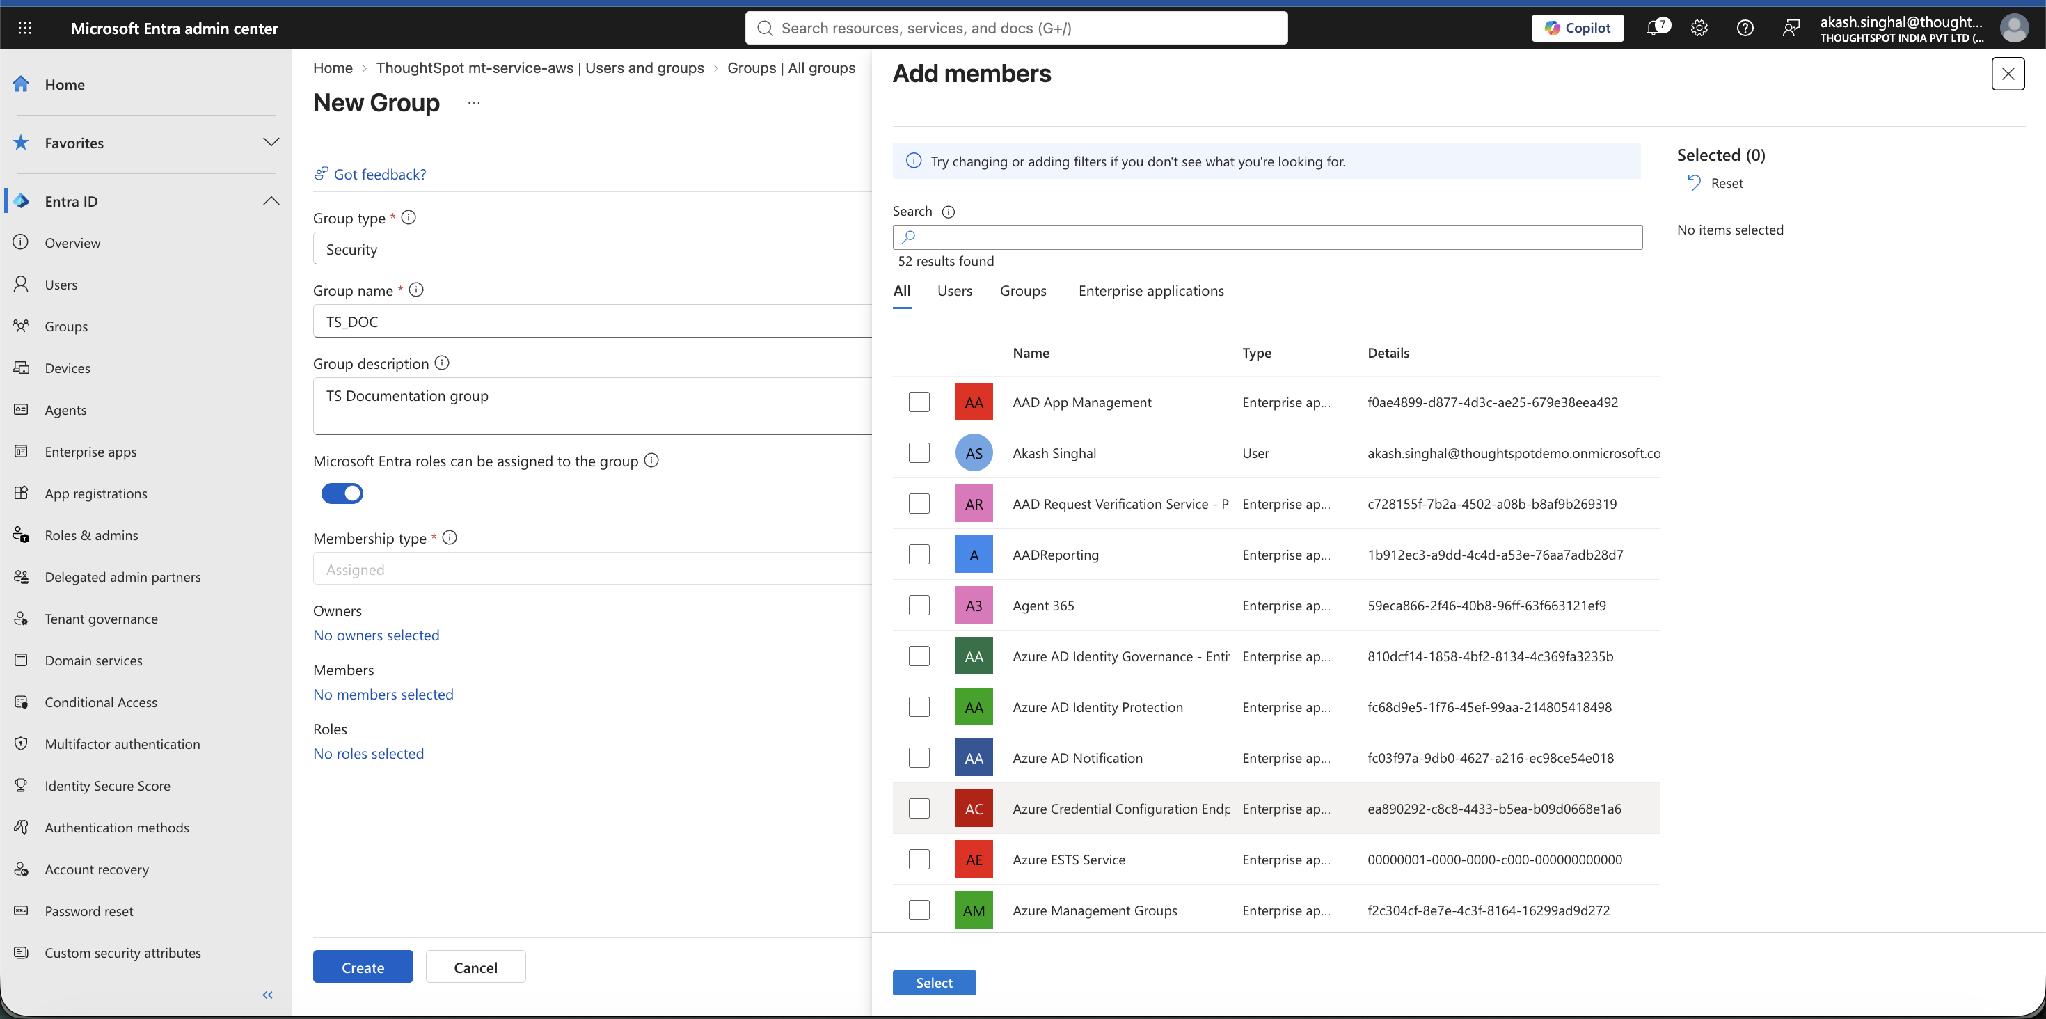
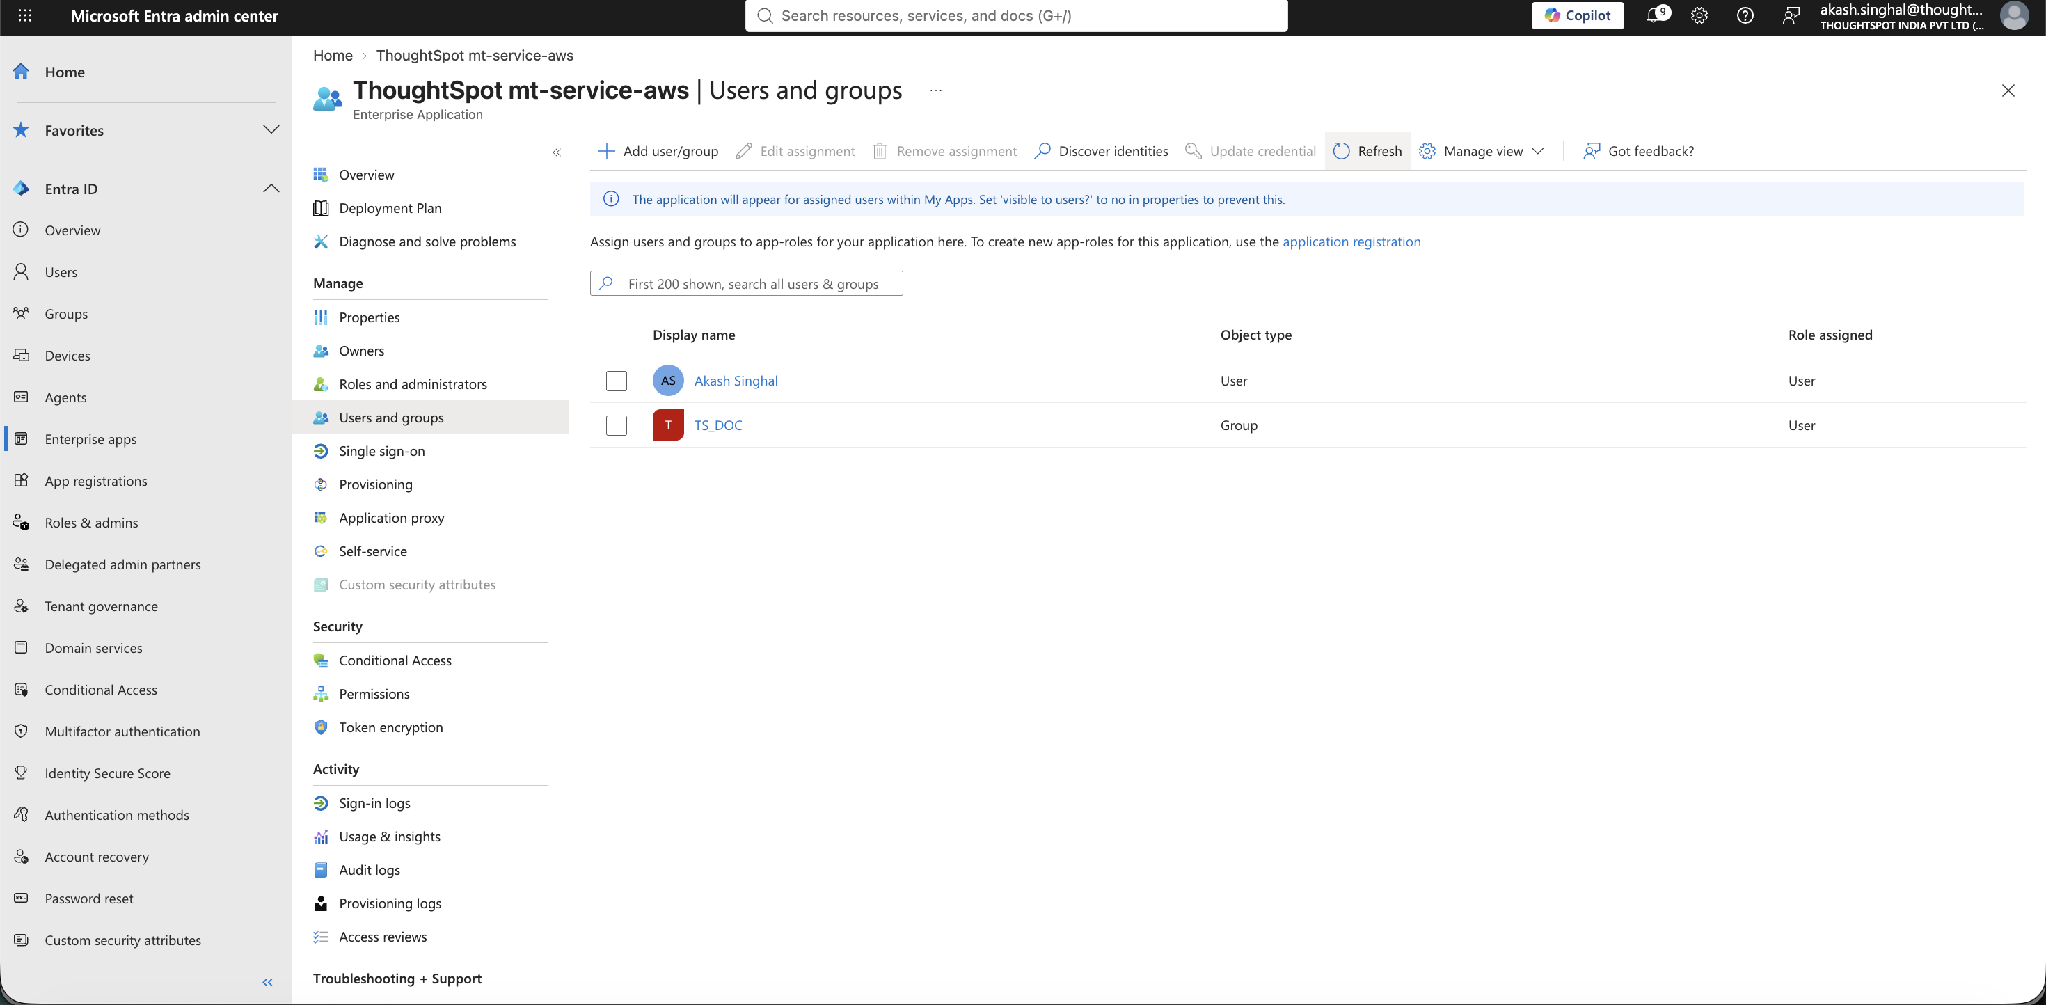
Assign the group to the application the same way you assigned the user (Steps 18–20). Both the user and the group then appear in the Users and groups list.
Part E – Test single sign-on
Step 23 – (Optional) Test from Entra
In the application’s Single sign-on page, section 5, select Test to validate the configuration from the Entra side. Users must be assigned (Part D) before they can sign in.
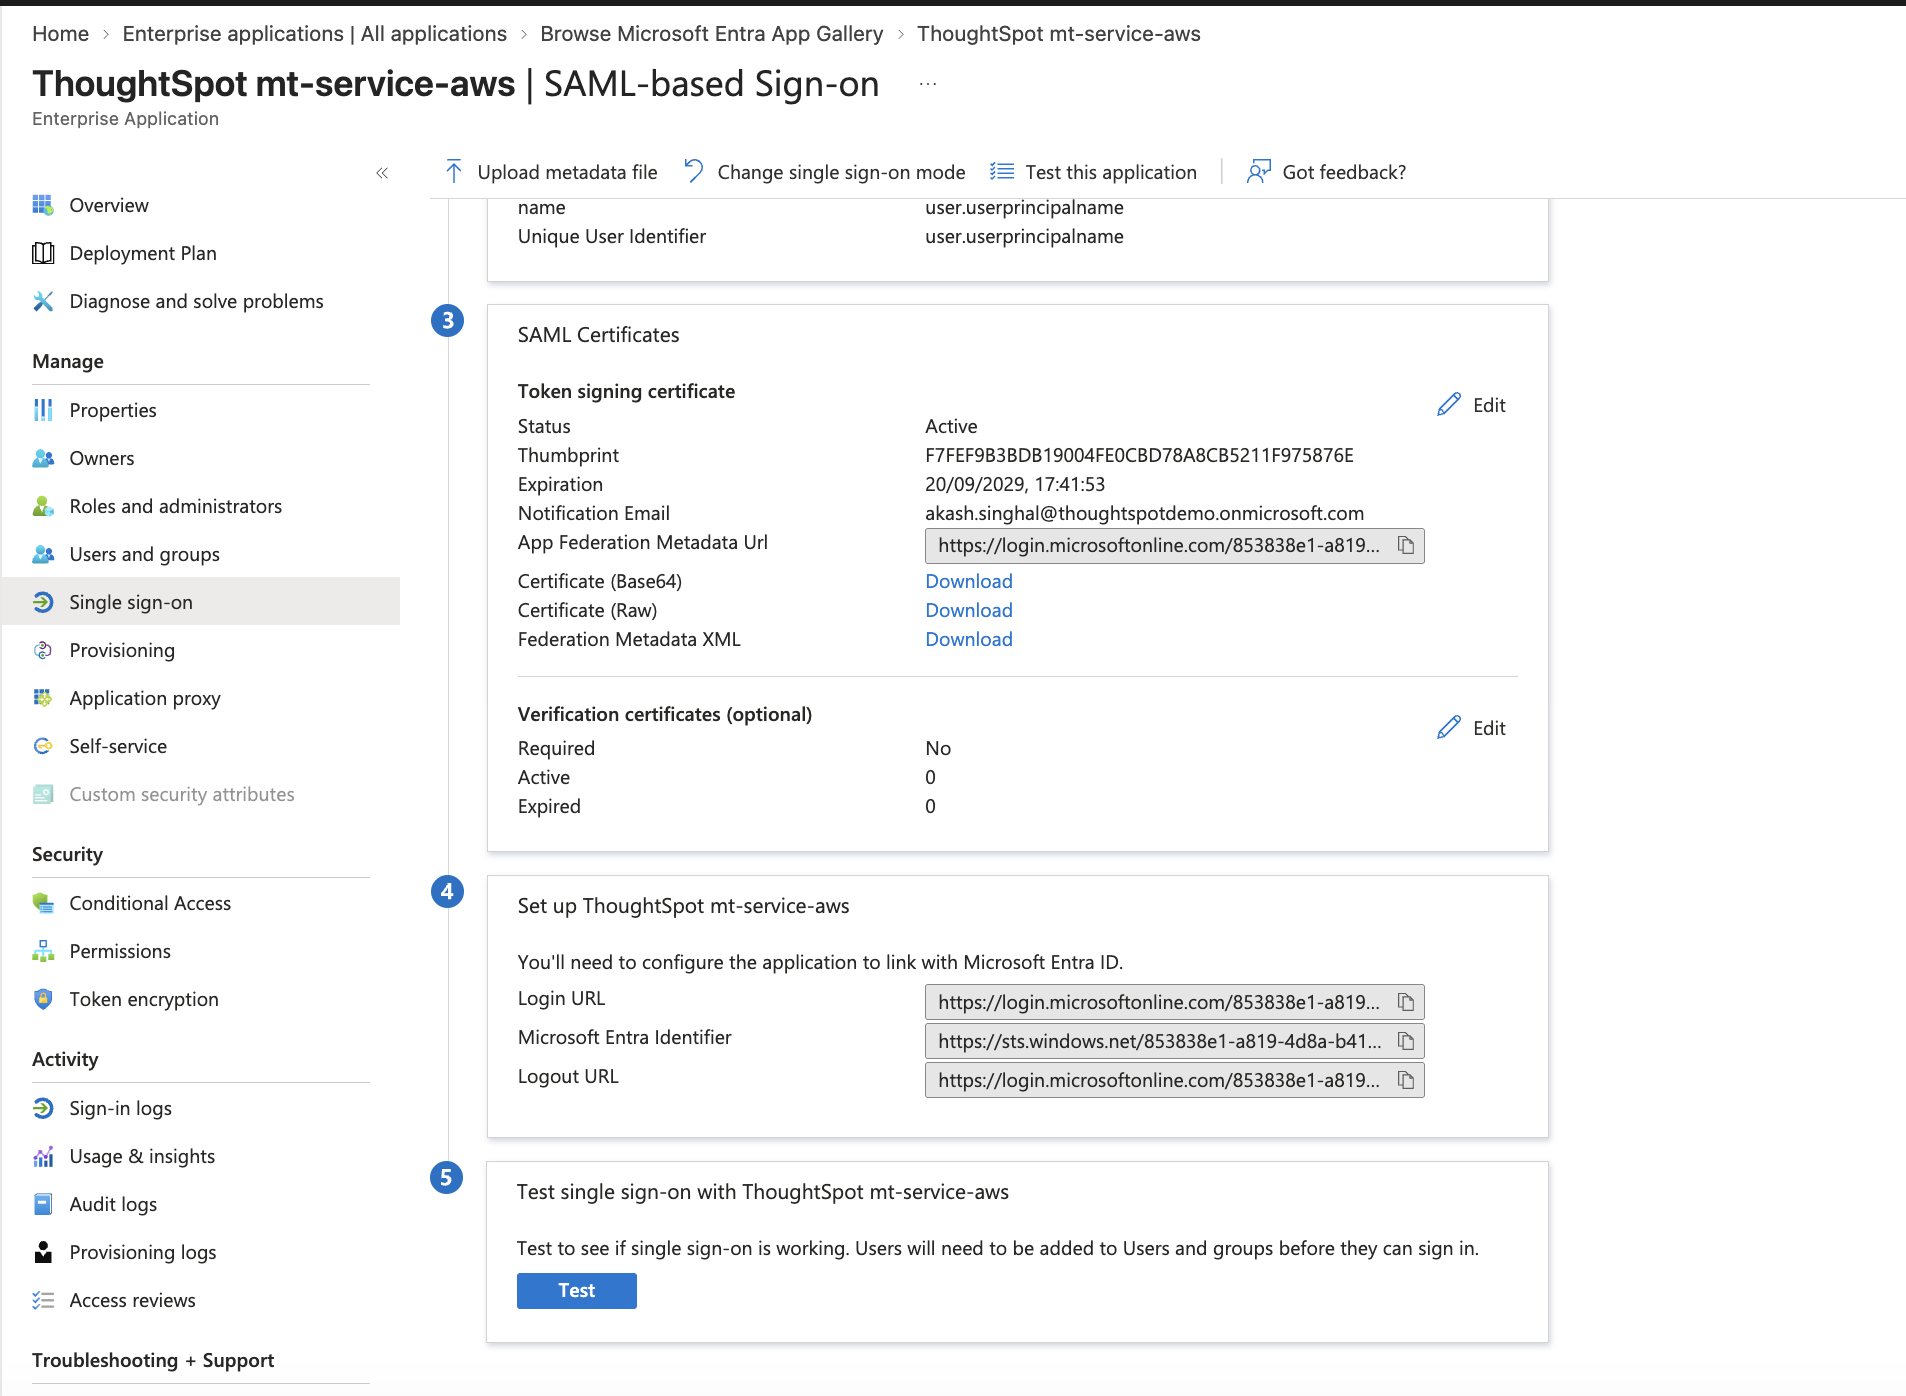
Step 24 – Sign in from ThoughtSpot
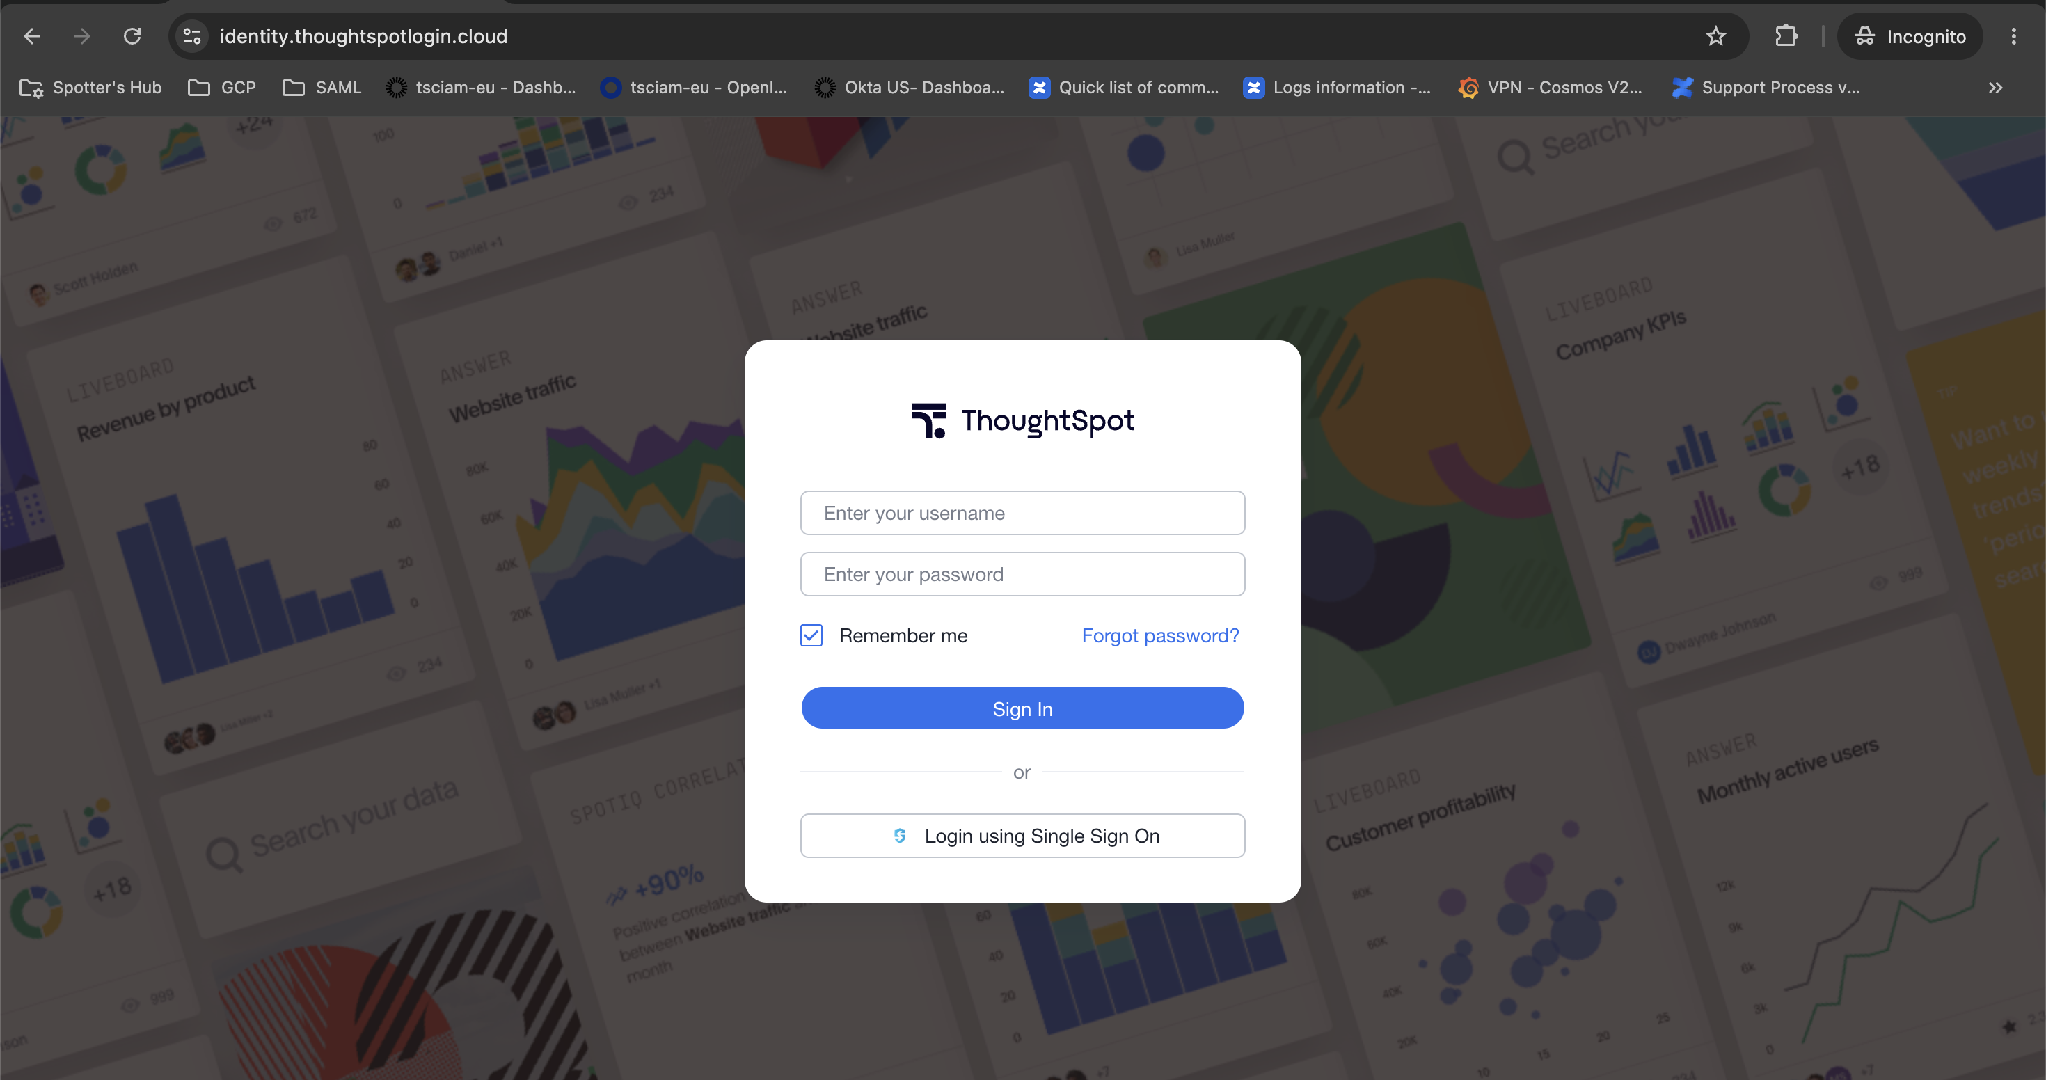
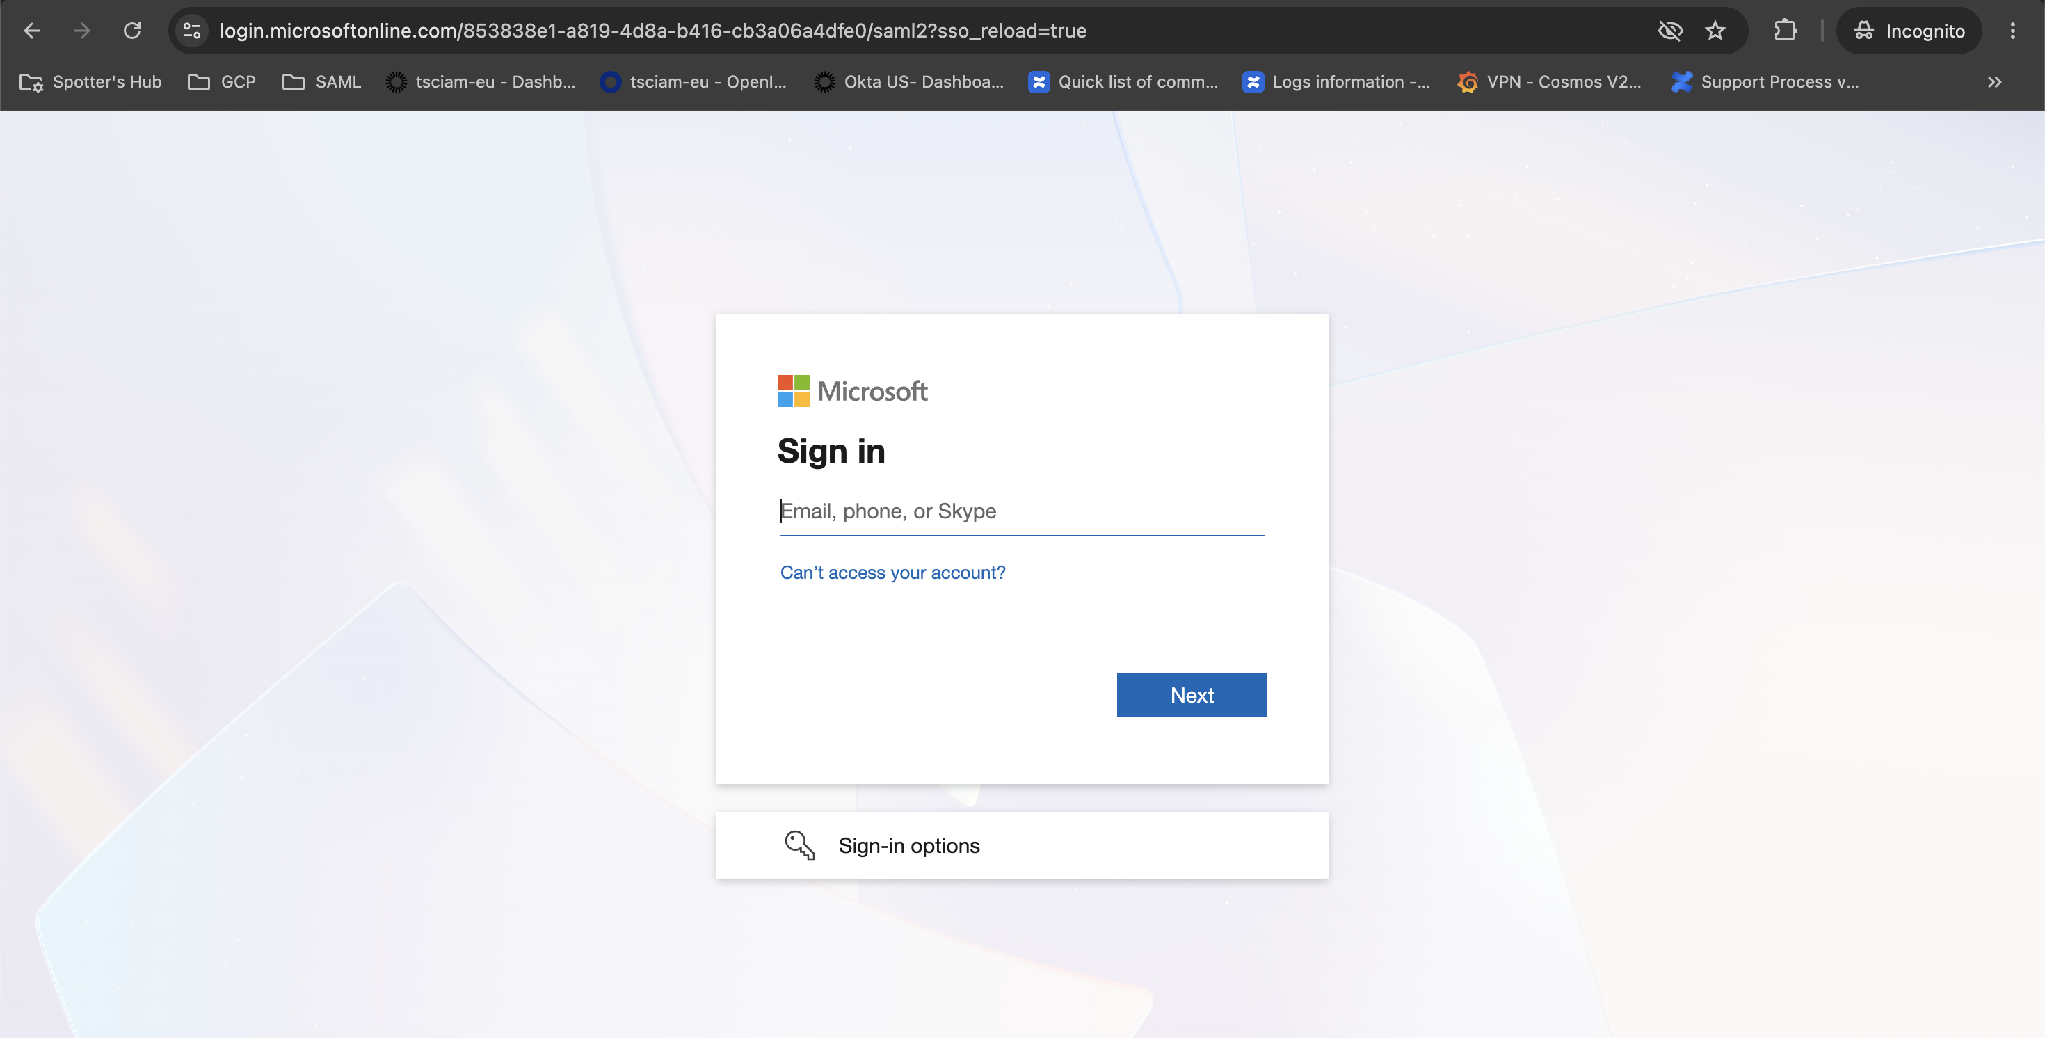
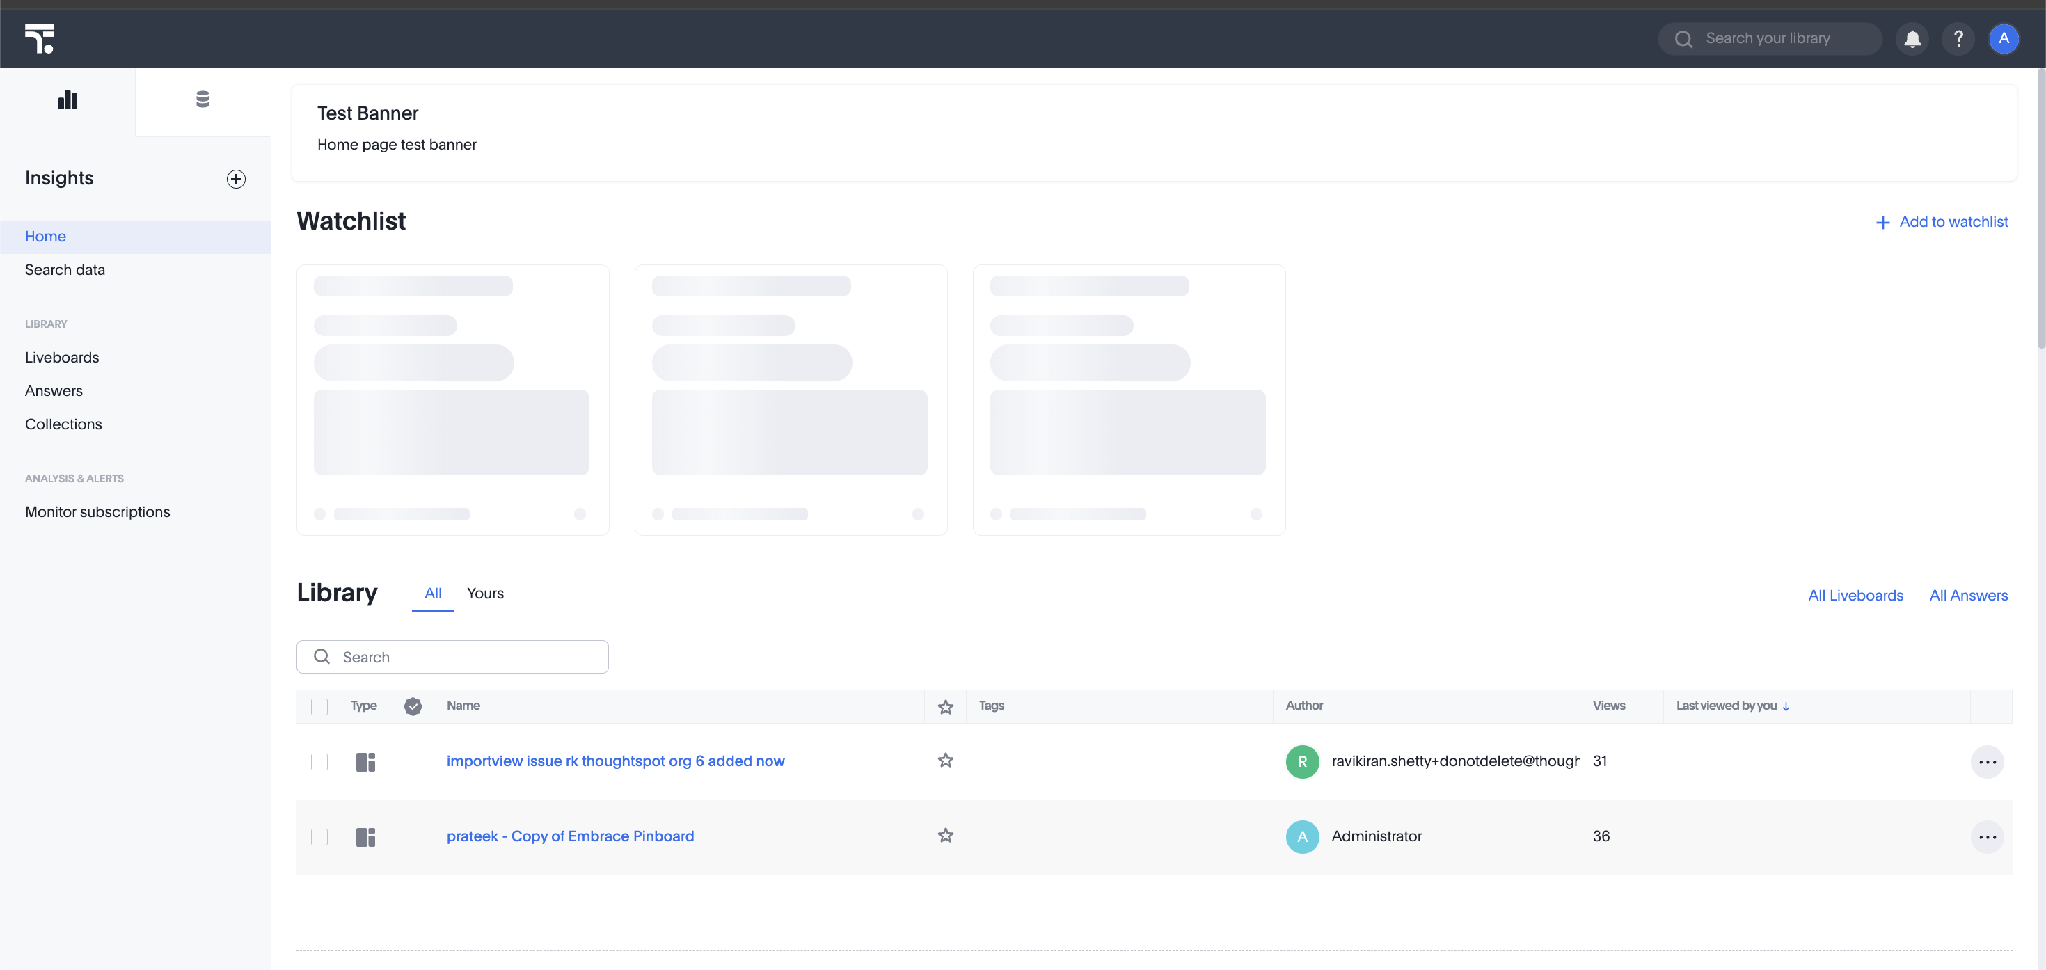
Open your ThoughtSpot cluster URL (https://<your-cluster>.thoughtspot.cloud) in a private/incognito browser window, then select Login using Single Sign On.
Part F – (Optional) Map Entra groups to ThoughtSpot group membership
You can pass a user’s Entra group membership to ThoughtSpot so that ThoughtSpot automatically grants the corresponding group memberships when the user signs in. This requires adding a group claim in Entra and mapping it to the ThoughtSpot Roles attribute. For general information about group mapping, see Configure SAML group and Org mapping.
| Group mapping must be activated from the ThoughtSpot backend. After you complete the configuration in this article, contact ThoughtSpot Support to finish the setup. Until Support enables group mapping, it does not take effect, even if the configuration in Entra and ThoughtSpot is correct. |
The IdP is the source of truth. ThoughtSpot only creates and honors what the identity provider sends in the SAML response or ID token. Anything that must exist in ThoughtSpot at sign-in, such as a user, an email, or a group membership, must be supplied by the IdP (Microsoft Entra ID). When the setup is correct, it is the IdP’s responsibility to include these values. After a value is sent, ThoughtSpot honors and applies it. If a value is missing, ThoughtSpot has nothing to act on.
What is not provisioned from the IdP. Single sign-on can create users and groups in ThoughtSpot at sign-in, but the privileges assigned to those groups and the creation of Orgs are not derived from the IdP. Set up group privileges and create Orgs beforehand, either manually in ThoughtSpot or through automation with the ThoughtSpot REST APIs.
Scope. The group-mapping setup in this article applies to the following scenarios, in which each user belongs to a single Org:
-
Primary Org group mapping: the user belongs to the Primary Org only.
-
Per-Org subdomain login: the user belongs to a single Org and signs in through the Org-specific URL. ThoughtSpot identifies the Org from that URL as the authorized Org, and the user enters that Org with the relevant group memberships.
| Users who must belong to more than one Org require a different approach, with additional guidelines that are not covered in this article. |
Step F1 – Add a group claim in Entra
In the application’s Attributes & Claims (see Step 8), select Add a group claim. In the Group Claims panel, choose which groups to return in the claim — for example, Groups assigned to the application.
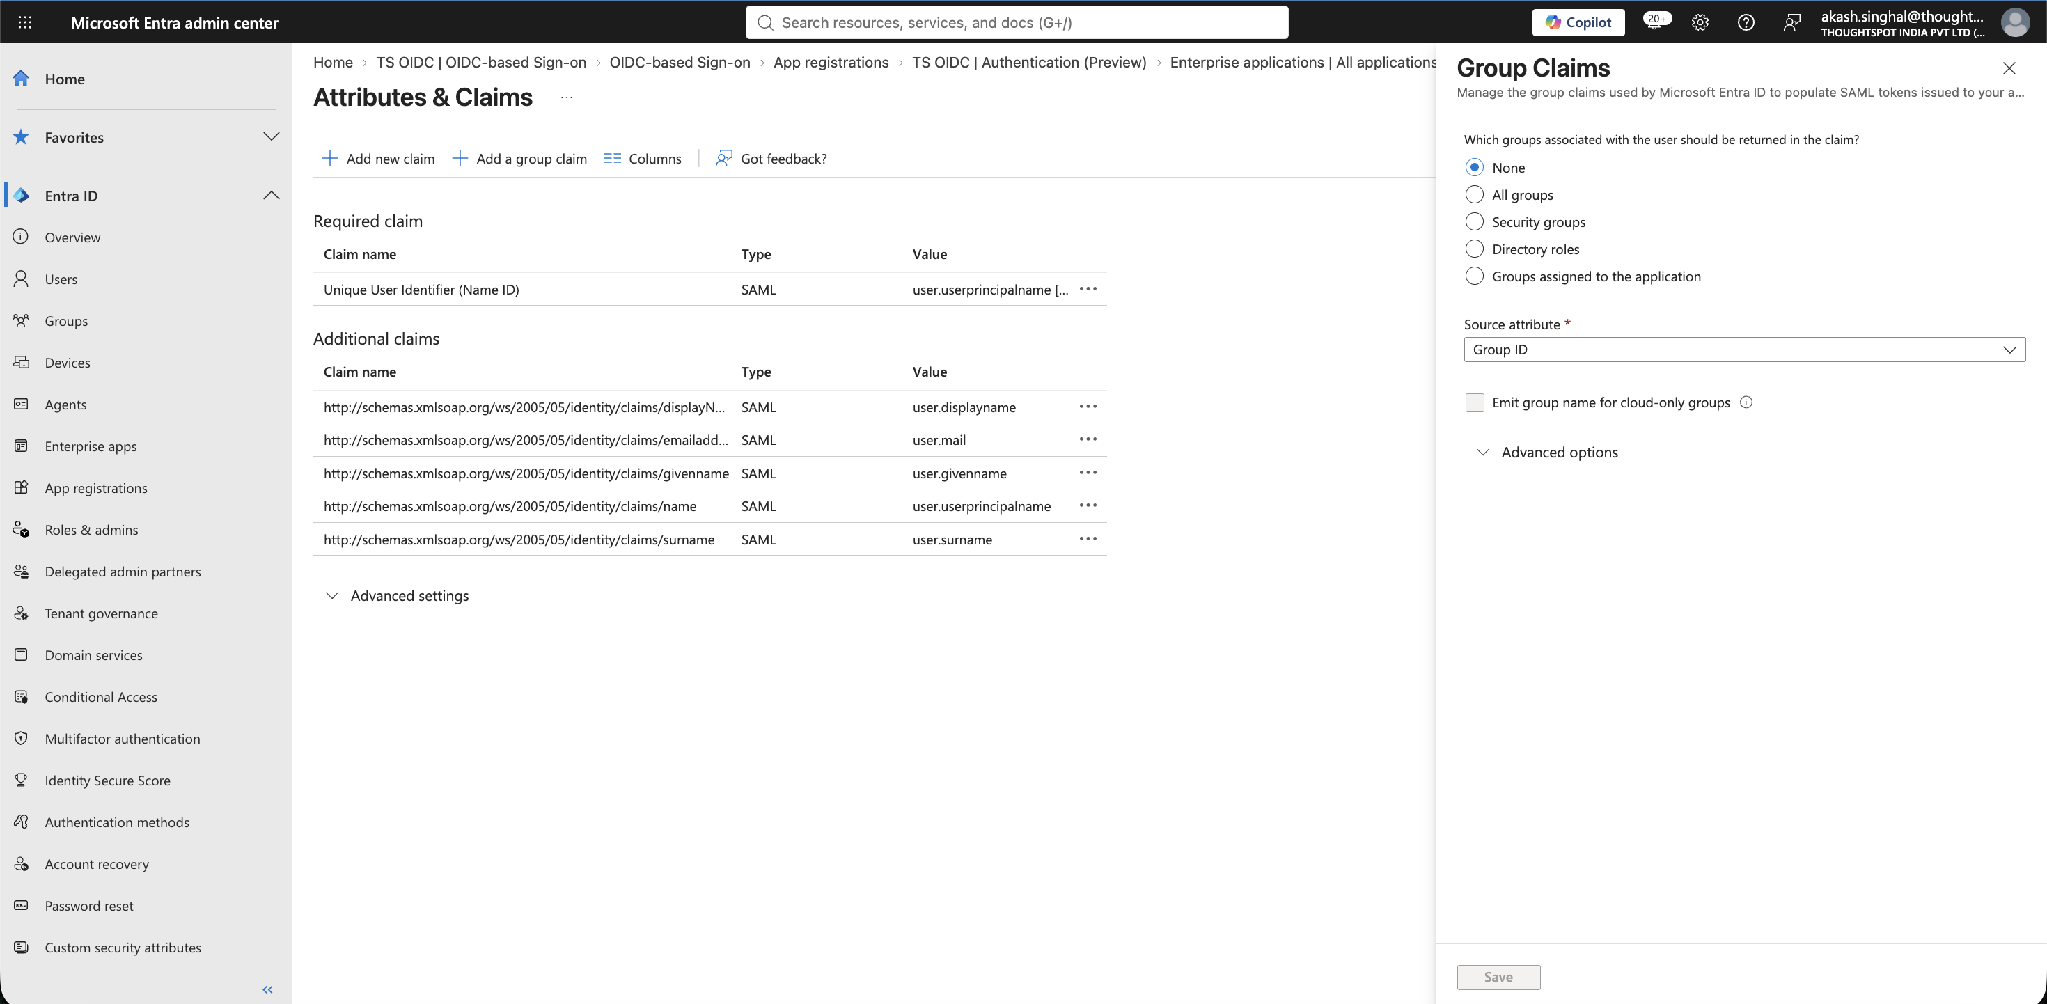
Set the Source attribute to the value that matches how your groups are defined and how you want them represented in ThoughtSpot (for example, Group ID or sAMAccountName), then select Save.
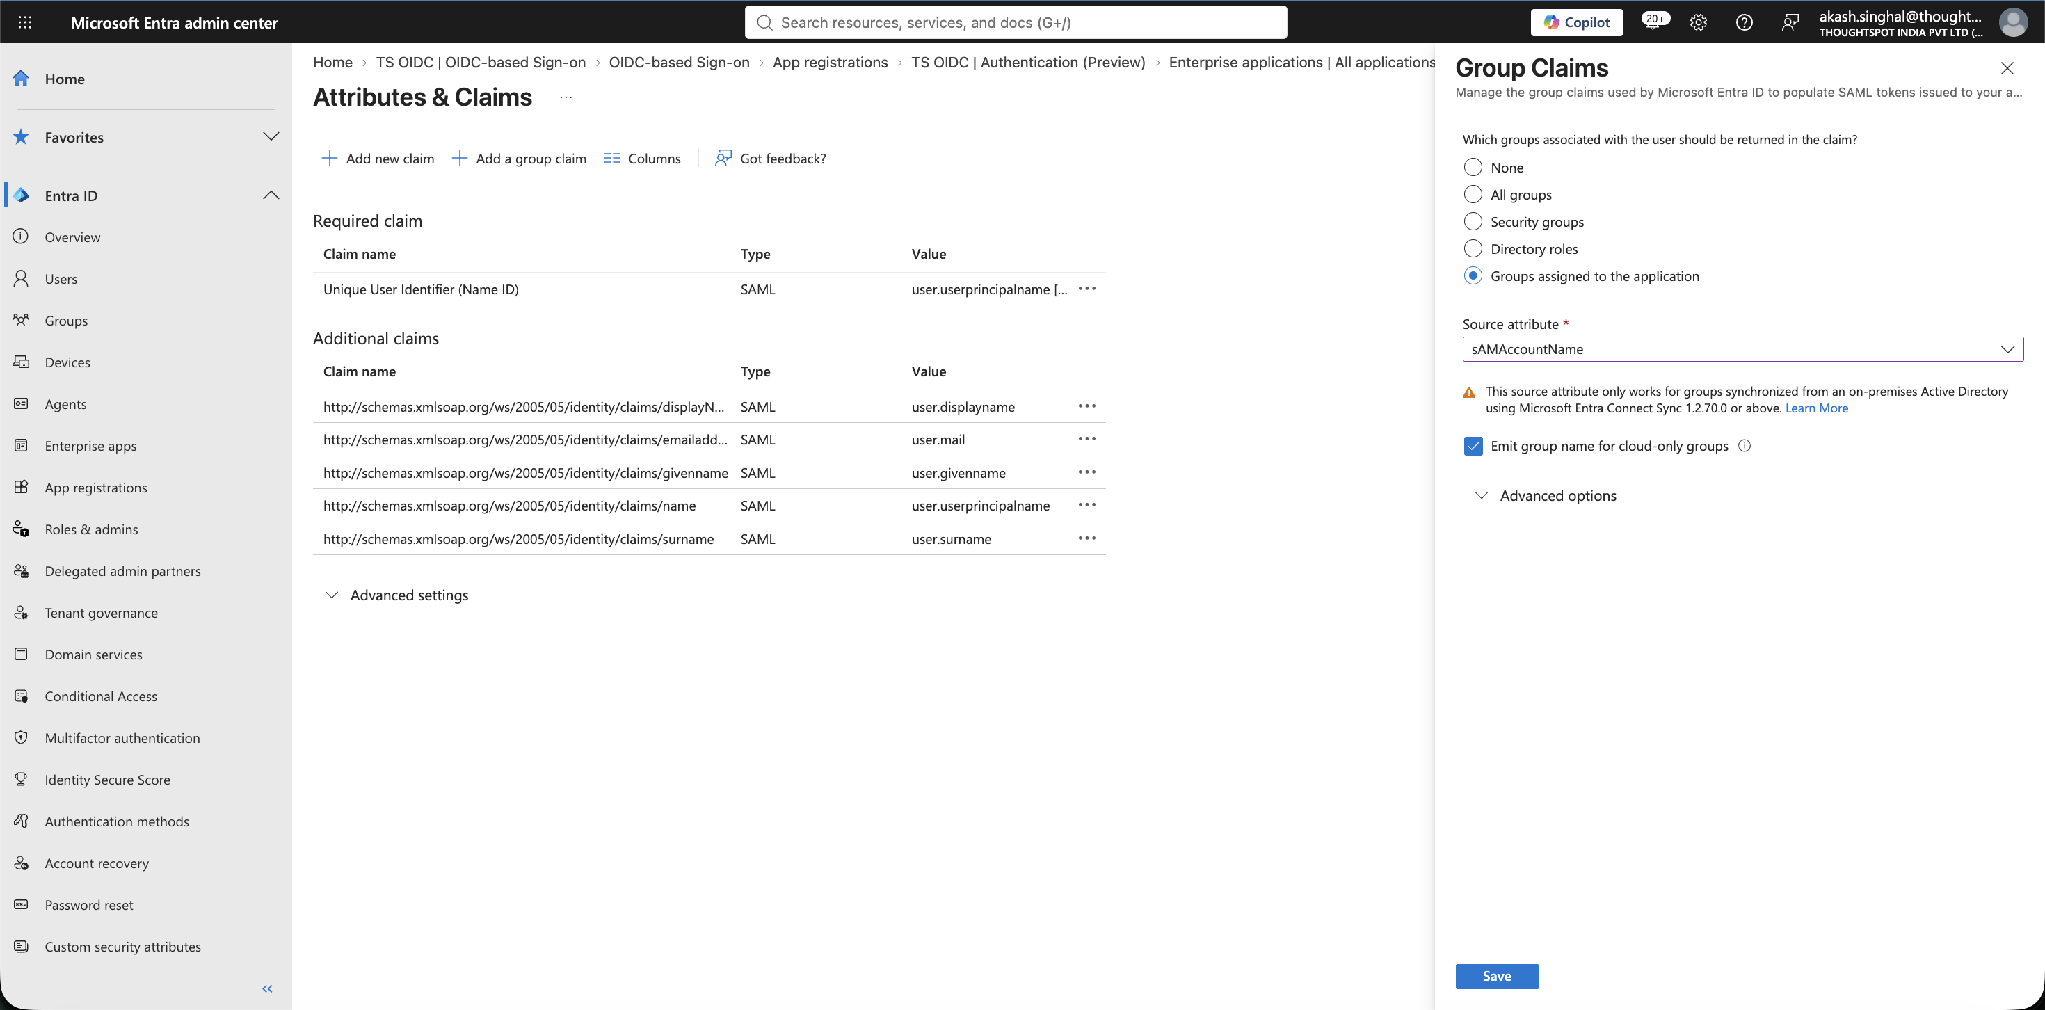
| On-premises source attributes such as sAMAccountName only work for groups synchronized from an on-premises Active Directory using Microsoft Entra Connect Sync 1.2.70.0 or above. If you also have cloud-only groups, enable Emit group name for cloud-only groups. |
Step F2 – Confirm the group claim
The group claim now appears under Additional claims as http://schemas.microsoft.com/ws/2008/06/identity/claims/groups. This claim URI is the group identifier you map in ThoughtSpot.
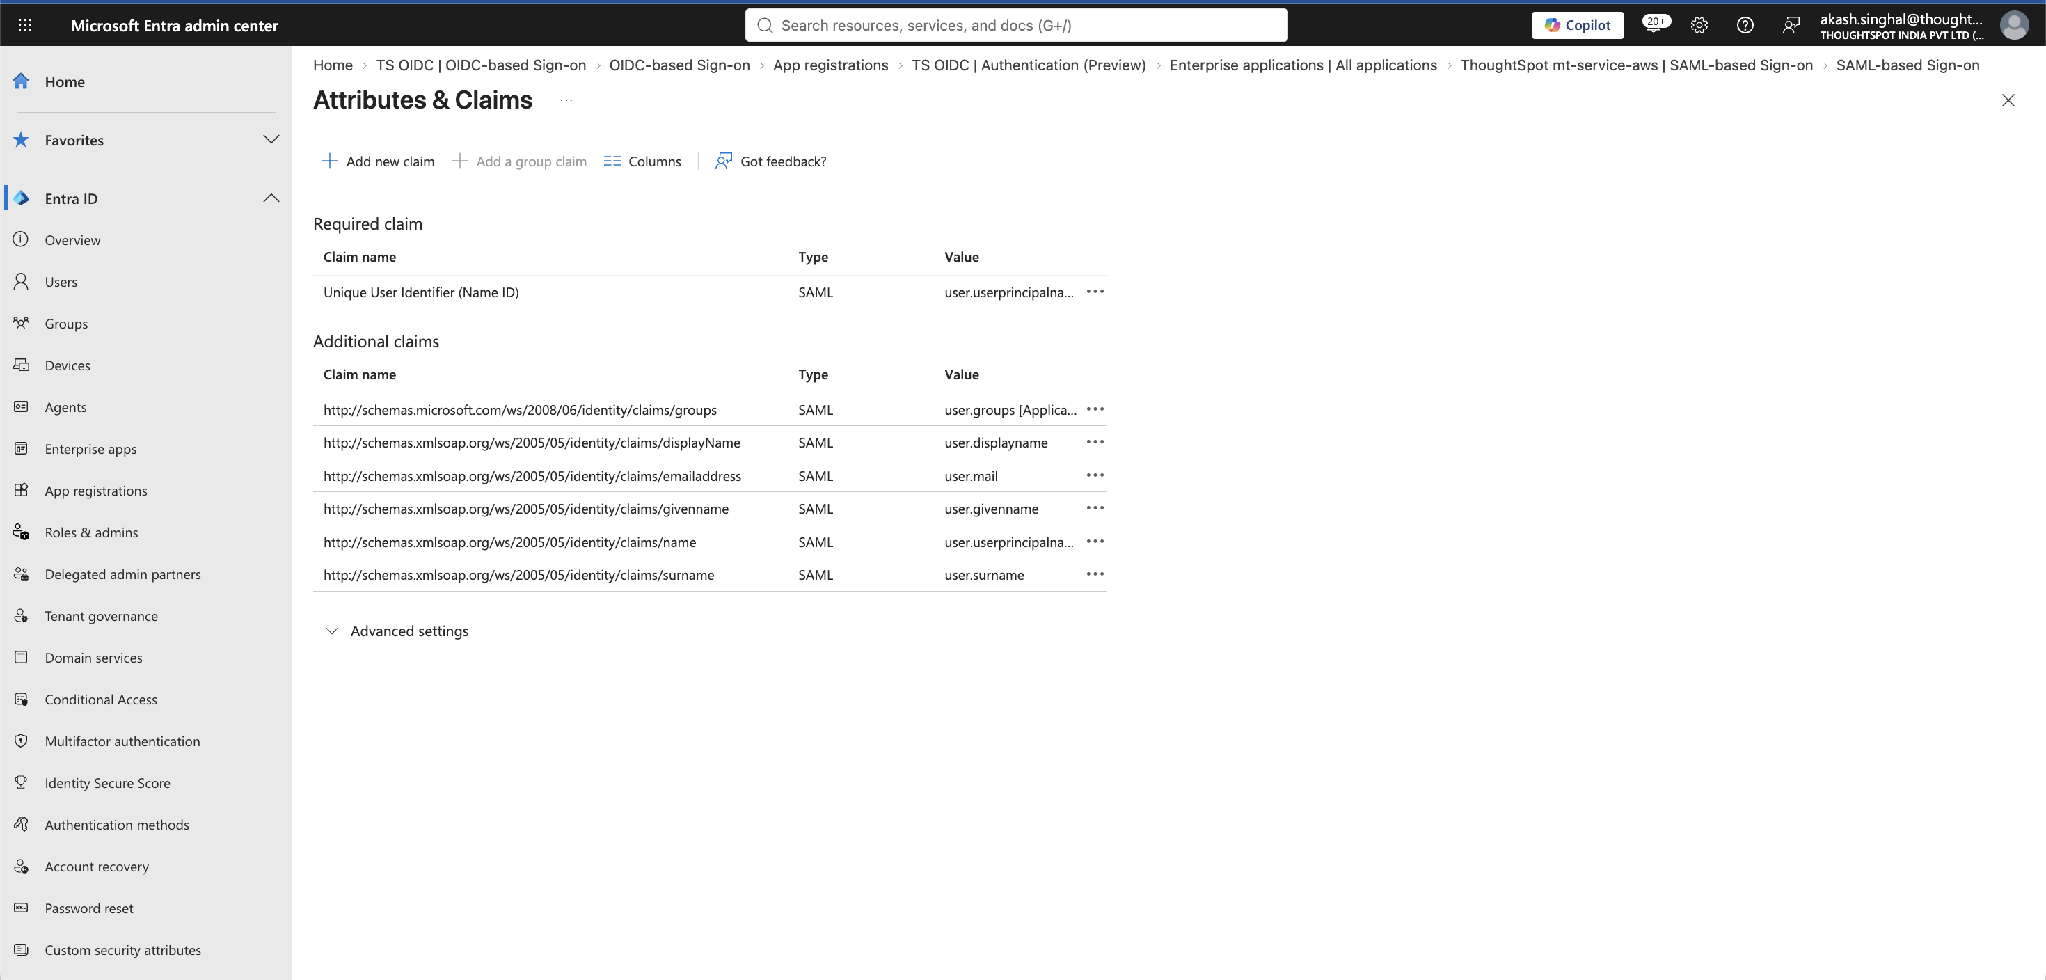
Step F3 – Map the group claim to Roles in ThoughtSpot
In the ThoughtSpot IdP Map attributes step (see Step 15), set the Roles attribute to the group claim URI http://schemas.microsoft.com/ws/2008/06/identity/claims/groups, then save.
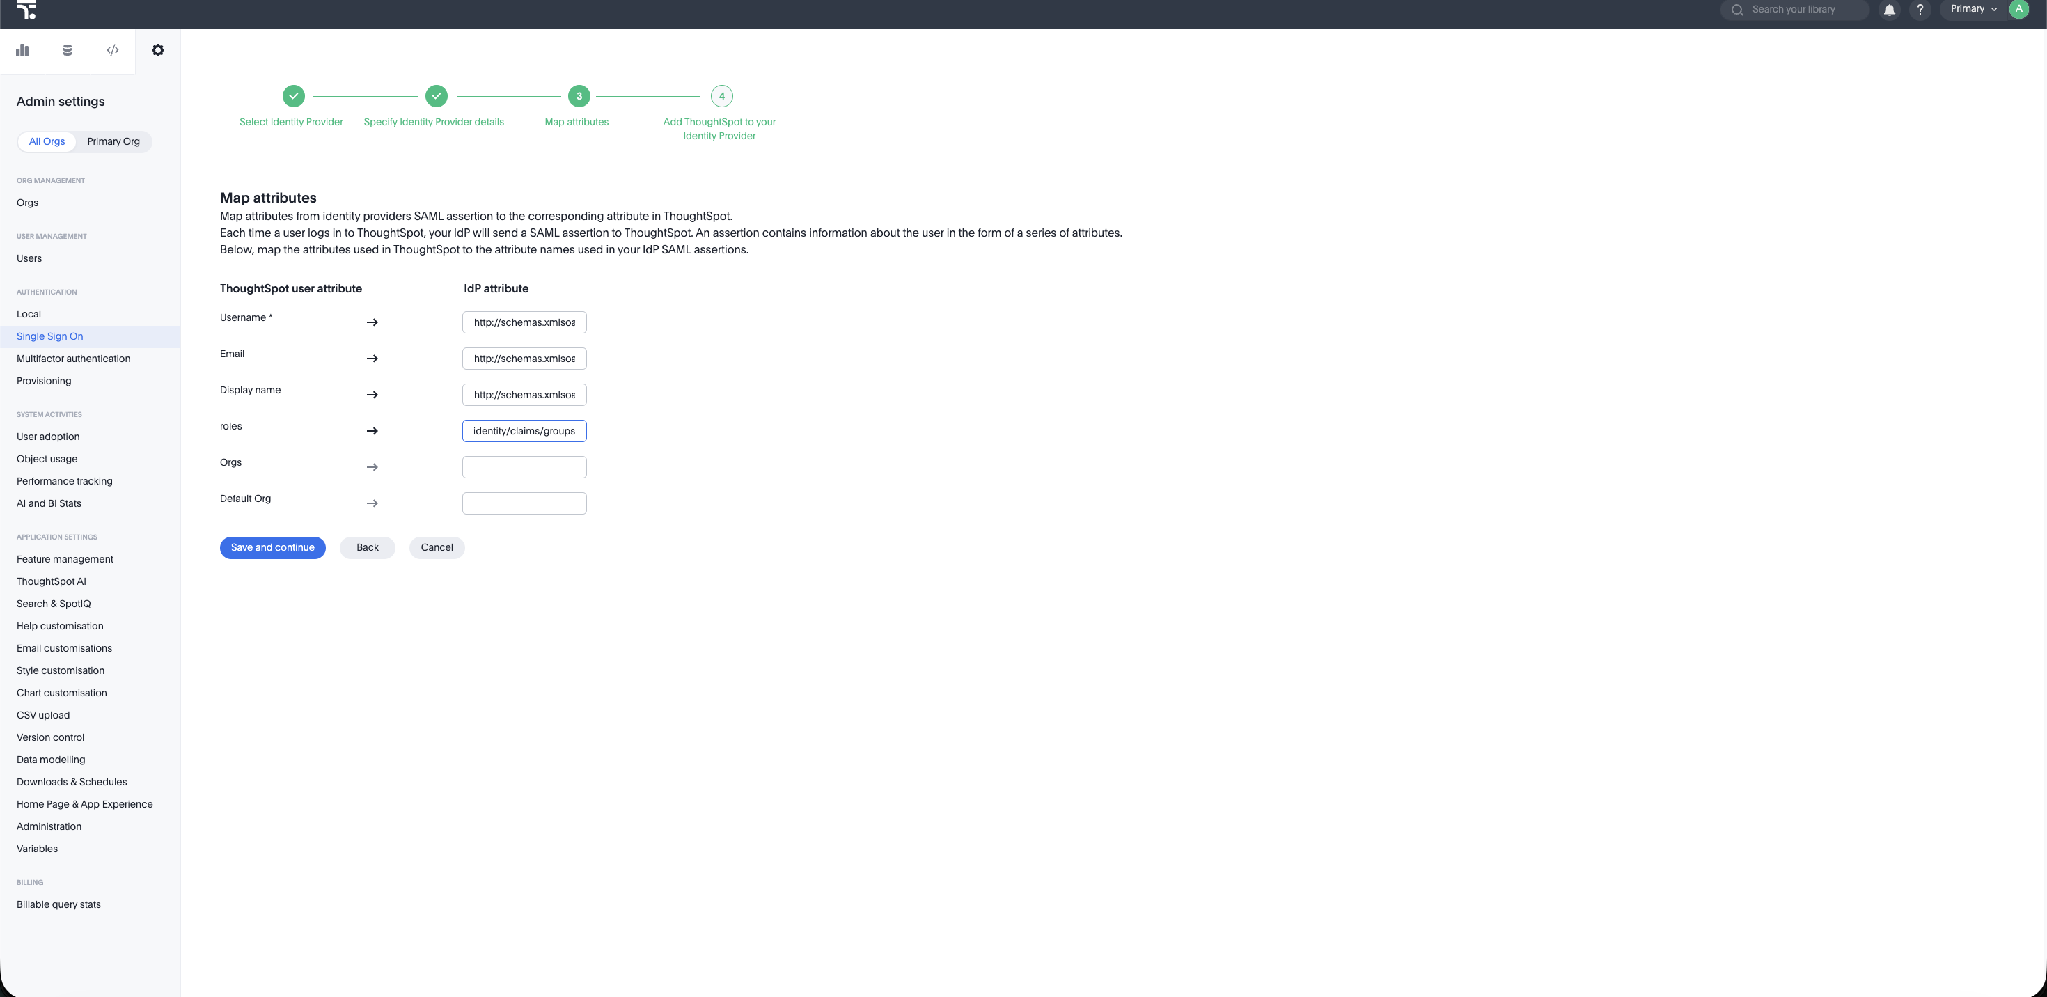
| How it works: Once the Roles attribute is mapped, and the user is a member of groups that are assigned to the application in Entra, those groups are included in the SAML response at sign-in. ThoughtSpot honors the group claim and grants the user the corresponding group memberships automatically. |
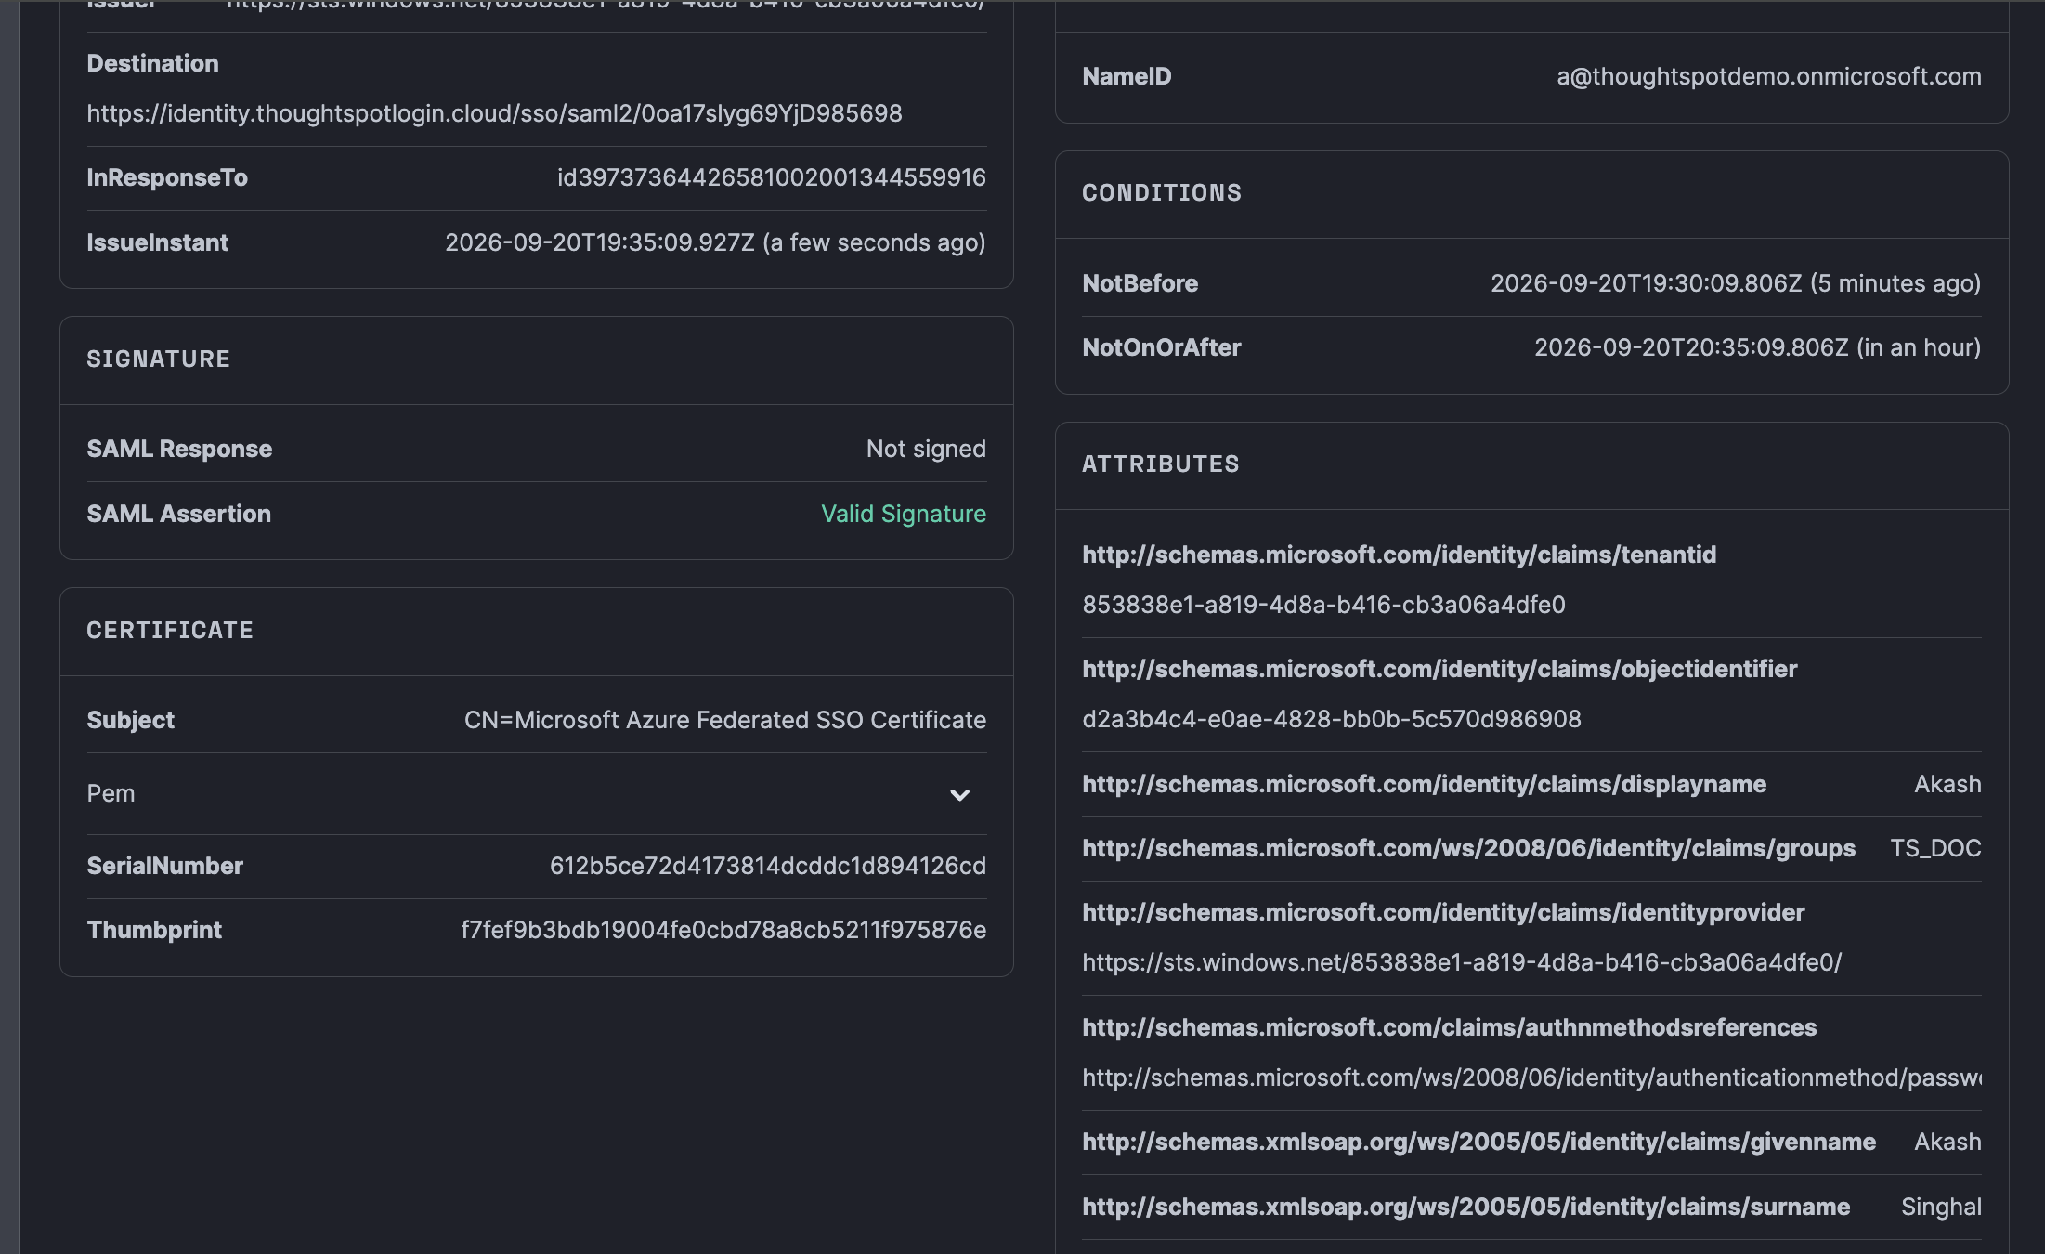
Step F4 – (Optional) Verify the group claim in the SAML response
To confirm the configuration end to end, capture the SAML response during a test login (for example, using a browser SAML-tracer extension) and decode it. Check that:
-
The SAML Assertion shows a Valid Signature.
-
The Destination matches your ThoughtSpot Assertion Consumer Service (ACS) URL.
-
The Attributes include
http://schemas.microsoft.com/ws/2008/06/identity/claims/groupswith the expected group value(s) for the user.
Notes and troubleshooting
-
Whitespace in user names: ThoughtSpot does not support whitespace in user names. Make sure the SAML attribute mapped to Username never contains spaces.
-
Entity ID / Reply URL mismatch: The Entra Identifier and Reply URL must exactly match the ThoughtSpot Audience URL and ACS URL. A mismatch causes the assertion audience or destination check to fail.
-
Attribute name mismatch: The SAML attribute names in the ThoughtSpot mapping must match the claim names Entra actually sends (Step 8). This is a common cause of a successful IdP login that then fails user provisioning in ThoughtSpot.
-
Signature algorithm: Keep the signing algorithm consistent on both sides (SHA-256 recommended).
-
Certificate rotation: If you renew or rotate the Entra token-signing certificate, download the new Base64 certificate and re-upload it to the ThoughtSpot IdP configuration. See Update your IdP certificate.
-
Certificate after changing Entity ID / Reply URL: As a precaution, re-download the Base64 certificate and re-upload it to ThoughtSpot whenever you change the Identifier (Entity ID) or Reply URL in Entra. Depending on the tenant’s settings the certificate can change when these values are updated, so rotating it again is the safest approach.
-
Access: Only users and groups assigned to the enterprise application (Part D) can sign in.
-
Group mapping needs ThoughtSpot Support: Group mapping is activated from the ThoughtSpot backend. If groups still do not apply after the Entra and ThoughtSpot configuration is correct, contact ThoughtSpot Support to enable it — it will not take effect until Support completes this backend step.
-
IdP is the source of truth: ThoughtSpot honors only what the IdP sends in the SAML response. If a user, email, or group is expected in ThoughtSpot at login but is missing, confirm the IdP is configured to include it in the assertion — that responsibility sits with the IdP, not ThoughtSpot.
-
Privileges and Orgs are not auto-provisioned: SSO can create users and groups, but group privileges and Org creation must be set up separately — manually in ThoughtSpot or via the ThoughtSpot REST APIs.
-
Group mapping: If group memberships are not applied, confirm the Entra group claim is added (Part F), the user’s groups are assigned to the application in Entra, and the ThoughtSpot Roles attribute is mapped to
http://schemas.microsoft.com/ws/2008/06/identity/claims/groups. Group mapping as described here assumes each user belongs to a single Org; multi-Org users follow a different approach not covered here. -
SAML per Org: When SAML is configured per Org with subdomain-based login, the Relay State must be
https://<dns-friendly-orgname>.<your-cluster-url>;, where<dns-friendly-orgname>exactly matches a DNS-compliant Org name in ThoughtSpot (Admin > Orgs). Create the DNS-compliant Org names before configuring the subdomain login, or the per-Org SSO redirect will fail.