Managing search and SpotIQ settings
As an administrator you can manage certain advanced settings for your organization from the admin console. This includes enabling, disabling, and configuring the following features: SpotIQ, column indexing, summaries, and the footer for downloaded Answers and Liveboards.
| If your organization uses multi-tenancy with Orgs, you must be an instance administrator to manage these settings, not an Org administrator. You manage these settings for the whole instance. You cannot set them separately for each Org. |
Navigate to the Admin Console by selecting the Admin settings tab. Select Search & SpotIQ from the side navigation bar that appears.
If your organization uses multi-tenancy with Orgs, ensure that you are in the Primary Org, in the All orgs section of the Admin Console. You manage Search and SpotIQ settings for the whole instance. You cannot set them separately for each Org.
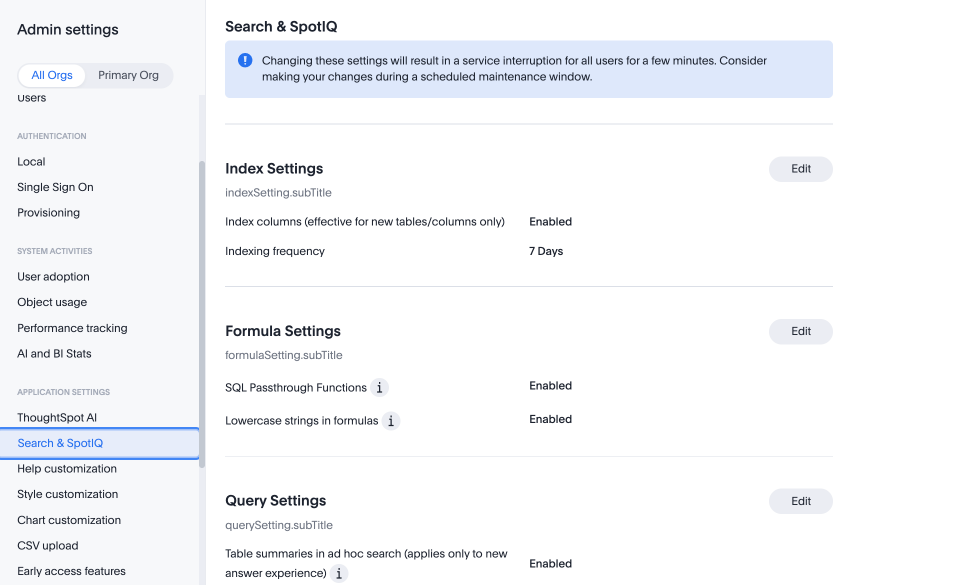
| Changing these settings results in a service interruption for all users for approximately 2 minutes. To minimize disruption, consider making your changes during a scheduled maintenance window. |
Index settings
Under Index settings, you can configure ThoughtSpot’s indexing behavior.
To learn more about ThoughtSpot’s default indexing behavior, refer to Manage suggestion indexing.
Supported Indexing Frequencies
ThoughtSpot supports the following frequency schedules for instance-level indexing:
| Frequency Type | Description and Execution Pattern |
|---|---|
Hourly |
Runs indexing jobs periodically at fixed hour intervals (8 and 12 hours). |
Daily |
Runs indexing jobs once per day at a specified local time (for example, every day at 02:00 AM). |
Weekly |
Runs indexing jobs on designated days of the week at a specified time (for example, every Sunday at 04:00 AM). |
Monthly |
Runs indexing jobs on specific days of the month at a designated time (for example, on the 1st and 15th of every month at 03:00 AM). |
Only once |
Schedules a single, non-recurring indexing execution for a specific date and time. |
Configure an Indexing Schedule
Follow these steps to set or update the indexing schedule for your instance:
-
Log in to your ThoughtSpot instance.
-
Select Admin from the top navigation bar.
-
Select All Orgs.
-
In the left navigation panel, select Search & SpotIQ.
-
In the Index Settings section, click Edit.
-
Index columns (effective for new tables/columns only): Select the toggle to enable or disable ThoughtSpot’s indexing of columns in new connections. If you disable this feature, all columns from new connections are set to
DONT_INDEX. Note that this change only applies to columns from new connections. You must manually set columns that already exist toINDEXorDONT_INDEX. -
Indexing scope: Select which columns you want to index. The options are Index only columns used in Models (default), or Index all columns.
Indexing only columns used in your Models significantly reduces the number of queries sent to your cloud data warehouse and reduces memory usage. This option does not apply to SQL views, CSV tables, or datasets, which are always indexed. -
Large table indexing control: You can choose to Index all tables, Disable indexing for tables with ≥ 100M rows, Disable indexing for tables with ≥ 250M rows, or Disable indexing for tables it ≥ 1B rows.
-
Use the Indexing Frequency dropdown menu to select the desired schedule type (Hourly, Daily, Weekly, Monthly, or Only once).
-
In the Frequency settings section, configure the schedule parameters according to your requirements:
-
For Hourly, select the hour interval (for example,
8 hours). -
For Daily, select the run time and time zone (for example,
02:00 AMAmerica/Los_Angeles). You can exclude weekends if you want. -
For Weekly, select the run time, day(s) of the week, and time zone (for example,
Sundayat04:00 AM,America/Los_Angeles). -
For Monthly, select the calendar day(s) and the run time (for example,
1stof the month at03:00 AM). -
For Only once, the tables will be indexed only once, when they are brought into ThoughtSpot.
-
-
Click Save.
Reset an Indexing Schedule to Default
To revert instance indexing to the default system schedule (Weekly on Sunday at 04:00 AM local time), do the following:
-
Select Admin from the top navigation bar.
-
Select All Orgs.
-
In the left navigation panel, select Search & SpotIQ.
-
In the Index Settings section, click Edit.
-
Click Reset configuration.
-
Verify that the displayed schedule updates to the system default configuration of weekly at 4:00 on Sunday.
Important considerations and best practices
|
Formula Settings
Under Formula Settings, you can enable or disable the following formula opt-in features:
- SQL Passthrough Functions
-
Enables the use of SQL passthrough functions in search. These functions allow users to send SQL expressions directly to the database to expose custom database functions not yet implemented by ThoughtSpot. Enabling these functions, however, may pose a security risk as the SQL passed cannot be validated by TS and could be used to circumvent our row and column-level security.
- Lowercase strings in formulas
-
When enabled, strings defined in formulas are saved as lowercase. To respect the entered string’s case, disable this setting. The ability to respect the case is important when leveraging pass-through functions. This is because functions defined in the underlying data platforms are often case-sensitive.
To enable or disable SQL Passthrough Functions or Lowercase strings in formulas, follow these steps:
-
Select the Edit button in the Formula Settings section.
-
Select the toggle to enable or disable the feature.
-
Select Save.
Alternatively, you can select Reset configuration to reset to the default. By default, both settings are enabled.
Query Settings
Under Query Settings, you can enable or disable the following sql query generation rules:
- Table summaries in ad hoc search
-
This setting enables you to control whether column summaries in a table should be visible or not by default in the ad hoc search / answer page. Changing the value of the flag has no effect on saved objects i.e saved answers, pinned tables, headline tiles in Liveboards etc.
- Search Data, Go button re-run query
-
Clicking the Go button a second time allows the user to execute the same query. The user will be prompted to confirm.
- Measure SQL includes null check
-
When enabled, all measures are wrapped in a case statement to consider
NULLasZERO. When disabled, the underlying query is simplified. - Default date bucket for date columns
-
Default date bucket for date columns.
- Disable auto-date bucketing
-
When disabled, defaults to monthly date buckets.
- Optimize custom calendar filters
-
Some data sources might not be able to optimize data partitions when custom calendars are enabled. This setting adds an approximate(wide) filter to improve data fetches.
- Whether count/unique count should include null
-
When enabled, count/unique account includes
NULL.
To enable or disable query settings, follow these steps:
-
Select the Edit button in the Query Settings section.
-
Select the toggle to enable or disable the feature.
-
Select Save.
Alternatively, you can select Reset configuration to reset all settings to their defaults.
SpotIQ settings
Under SpotIQ settings, you can enable or disable SpotIQ analyze or Monitor, as well as define the upper limit frequency for monitoring KPIs.
To enable or disable SpotIQ Analyze or Monitor, follow these steps:
-
Select the Edit button in the SpotIQ Settings section.
-
Select the toggle to enable or disable the feature.
-
Select Save. Alternatively, you can select Reset configuration to reset to the default. By default, SpotIQ and Monitor are both enabled.
KPI monitoring frequency
Use the shortest time period to check alerts option to define the upper-limit frequency for monitoring KPIs. For example, if you define the upper-limit frequency as "weekly", users in your organization will not see "hourly" or "daily" options when they create KPI alerts.
To change the shortest time period to check alerts for your cluster, follow these steps:
-
Select the Edit button in the SpotIQ Settings section.
-
Open the shortest time period to check alerts dropdown menu and select one of the following time periods:
-
hourly
-
daily
-
weekly
-
monthly
-
-
Select Save changes. Alternatively, you can Reset to default. The default frequency is "hourly".
Related information